Policy Events allow you to schedule your Policies so that Groups can have more or less restrictive Filtering Policies active throughout different times of the day or week.
 Overview of Policy Events
Overview of Policy Events
A Policy Event is a period of time over which a Policy applies to a Group and its member clients. Policy Events do not belong to Policies, and Policies do not belong to Policy Events. Rather a Policy Event ‘activates’ a Policy. A Group may have multiple Policies and Policy Events.
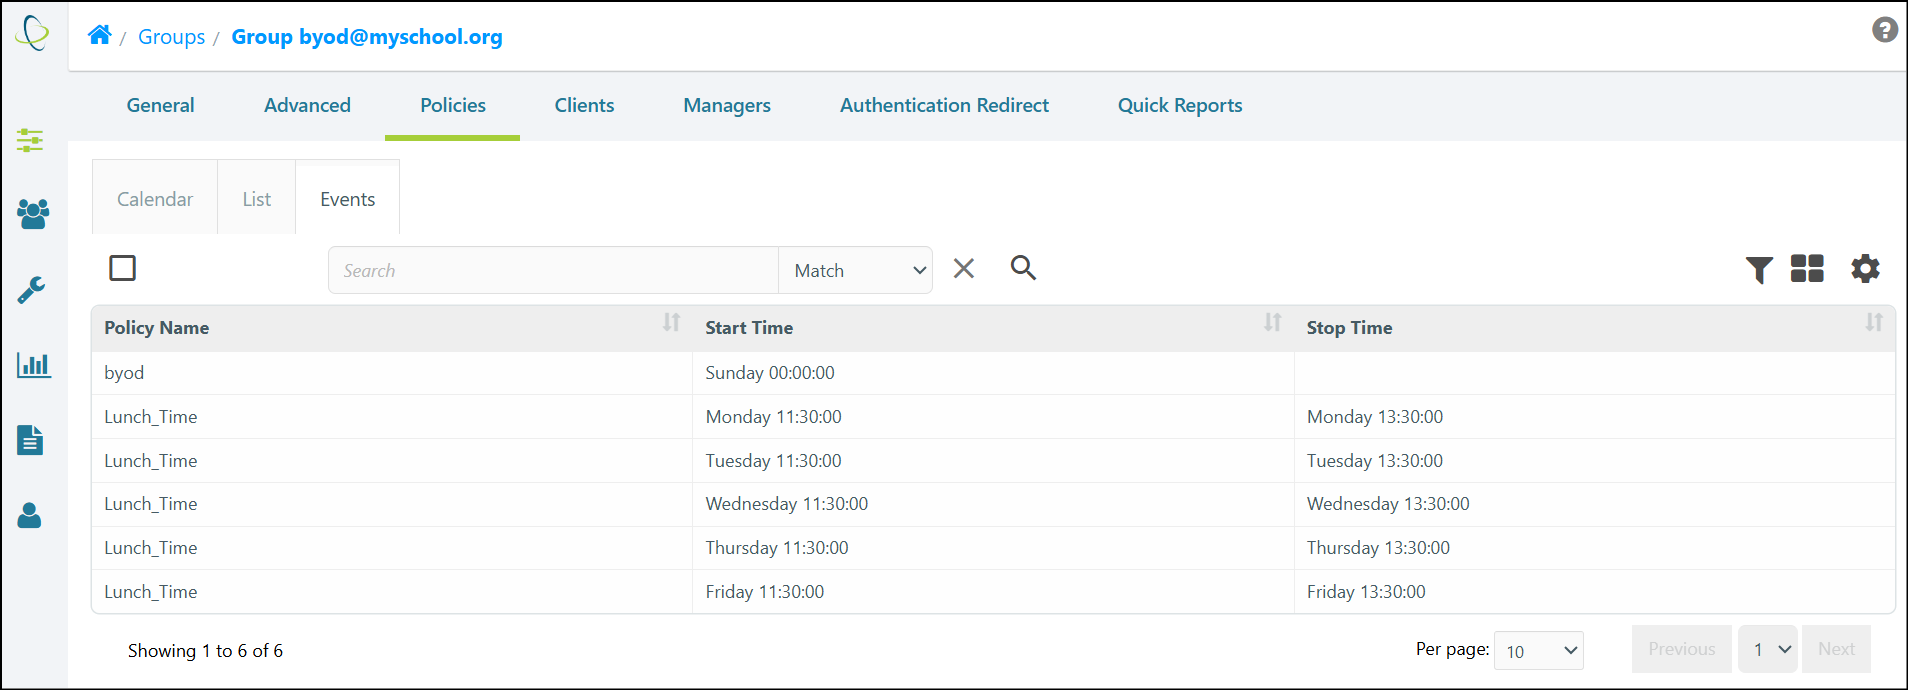
Policy Events allow you to set more restrictive or less restrictive Internet filtering at different times of the day or night for a group of Clients. Only one Policy is active at any time for a Group.
The Policy Events Calendar
The Policy Events Calendar
You can add, modify, or delete Policy Events directly on the Policy Calendar page.
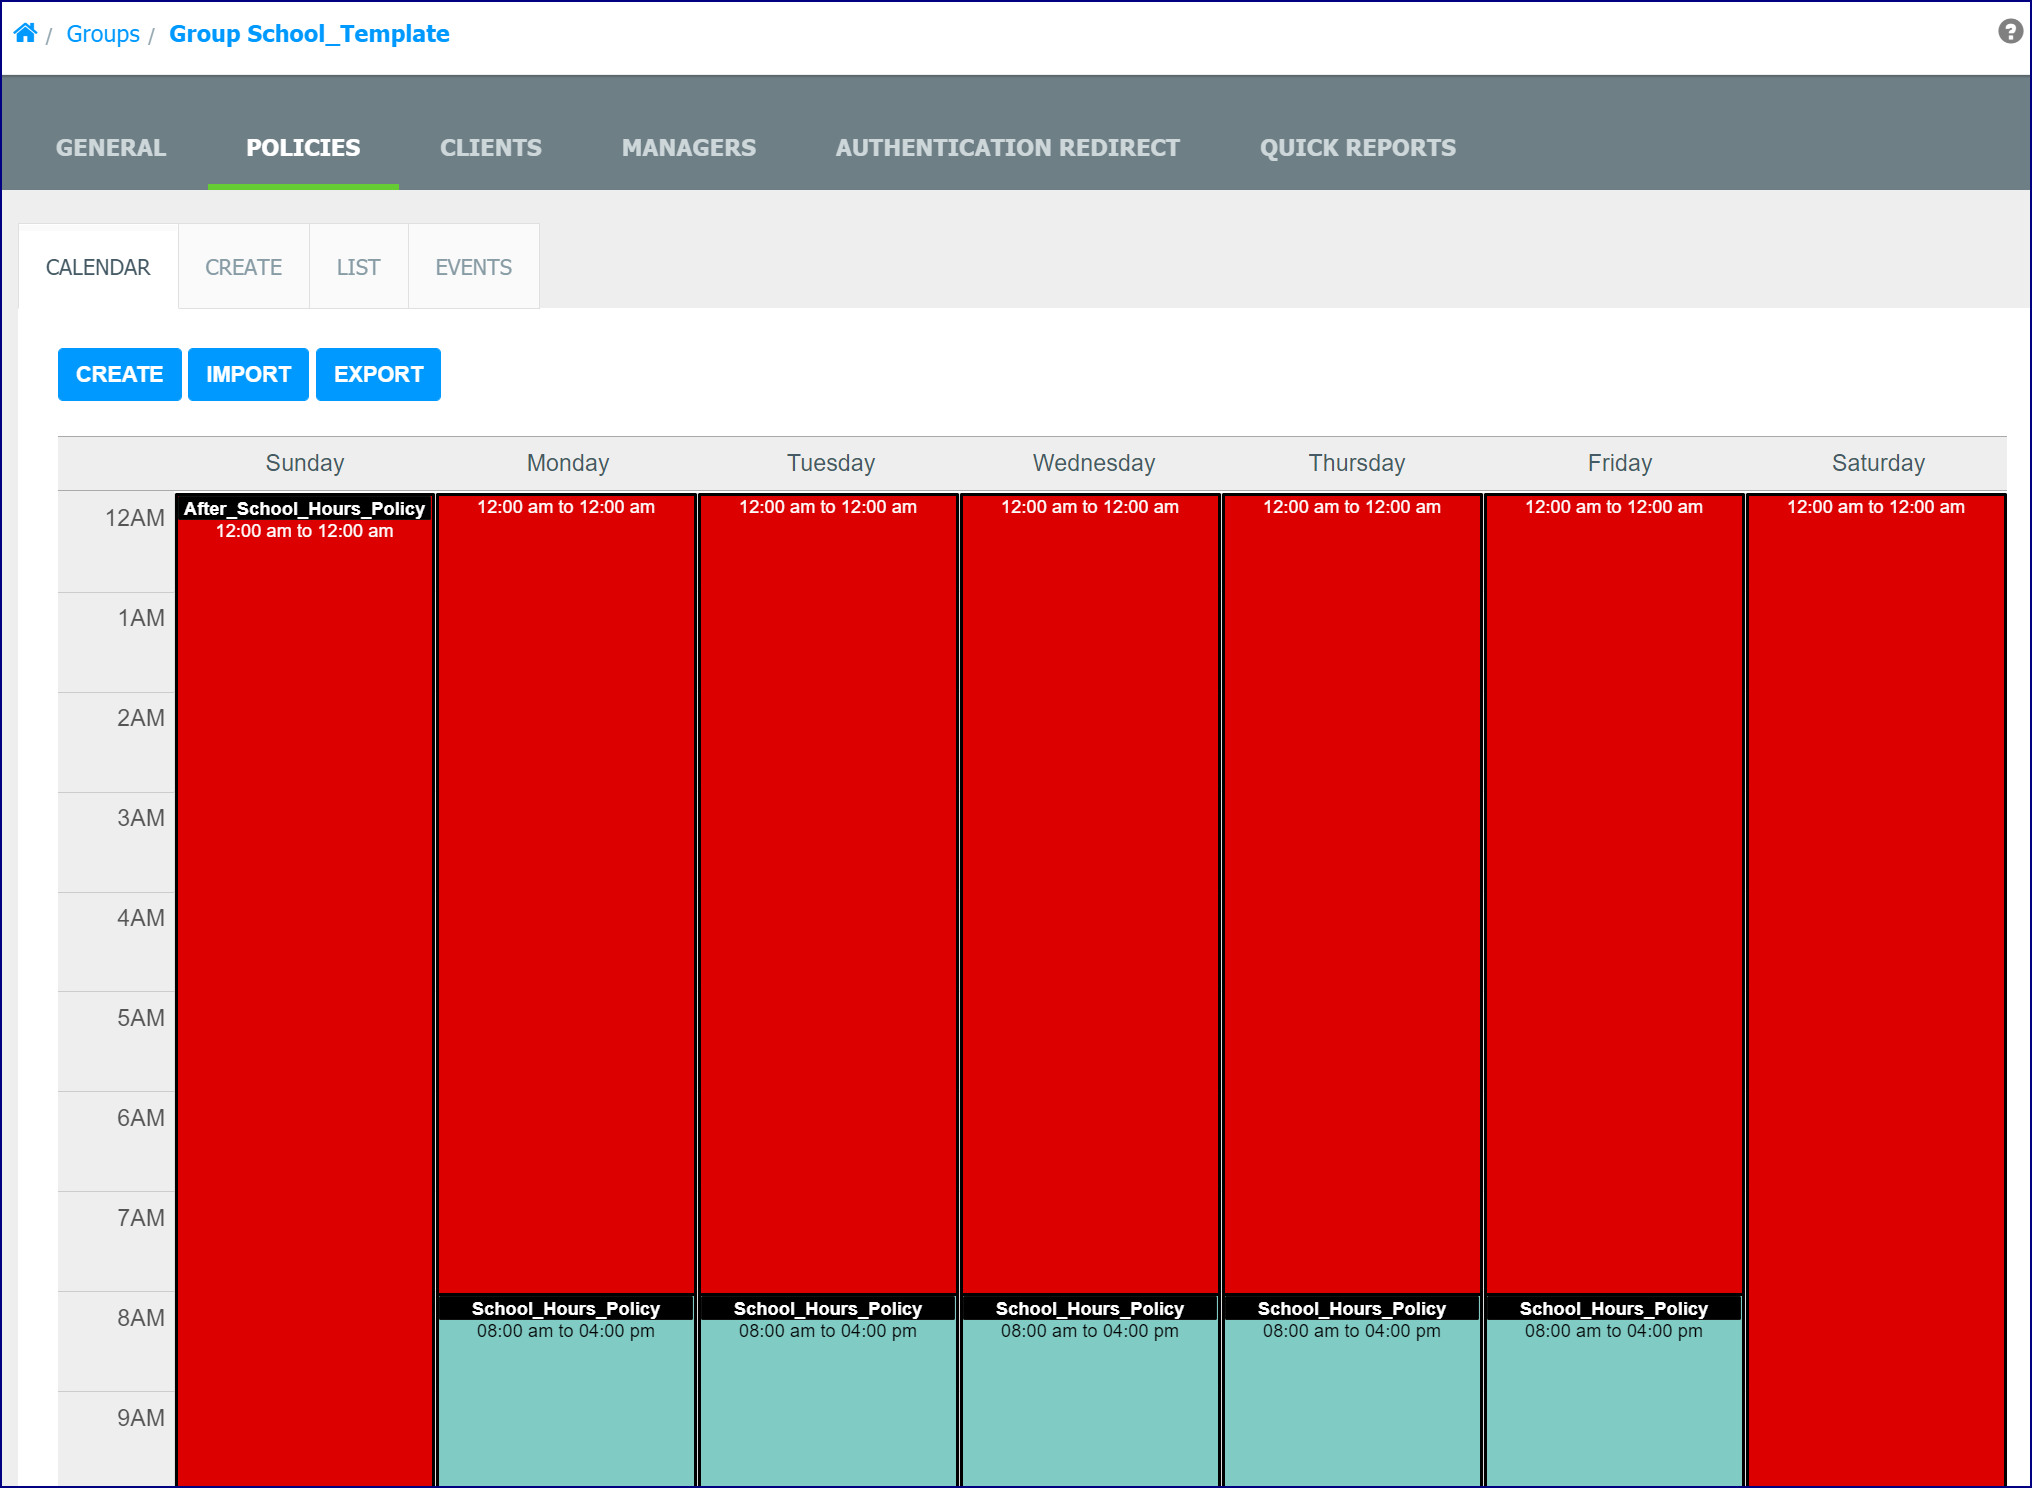
You can create new Policies ‘on the fly’ while adding or editing Policy Events. The duration of a Policy Event can be multiple days or have ‘No End Time’. Multiple Policy Events can be created with the same duration starting on different days. You can also create your own color scheme for reviewing Policy Events on the Policy Calendar.
Creating Policy Events
Creating a Policy Events
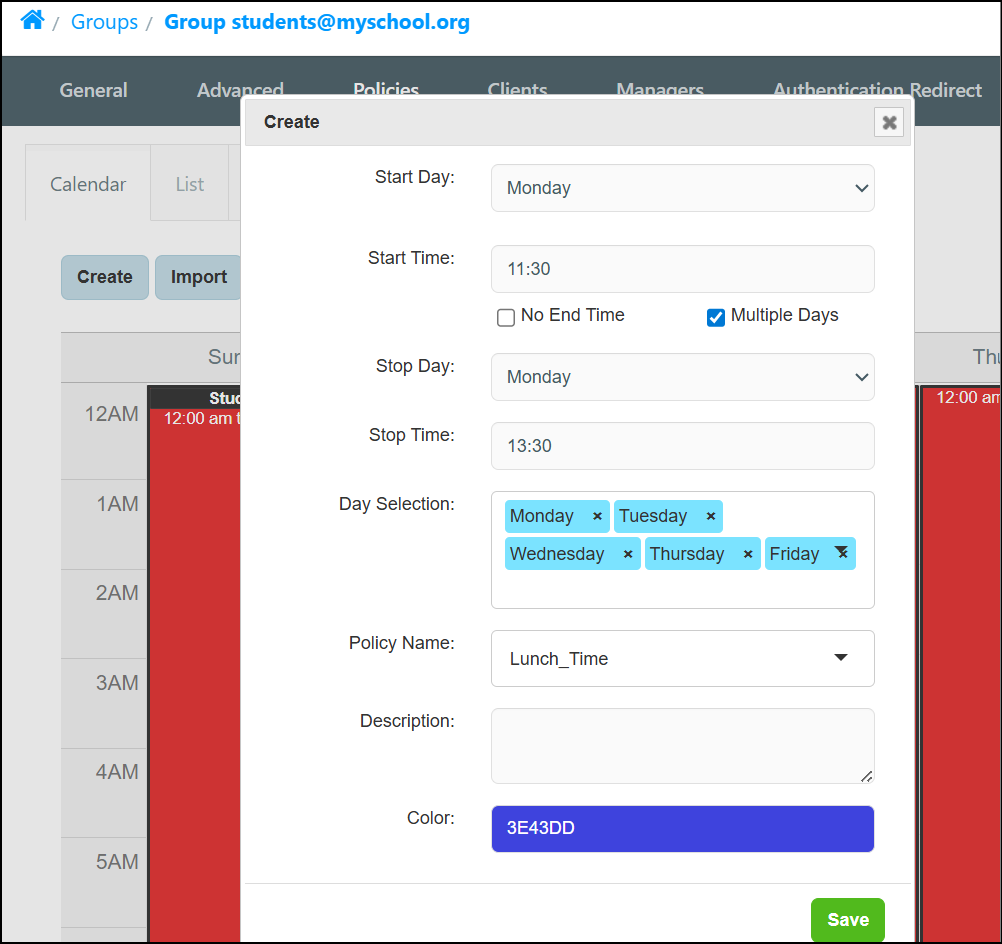
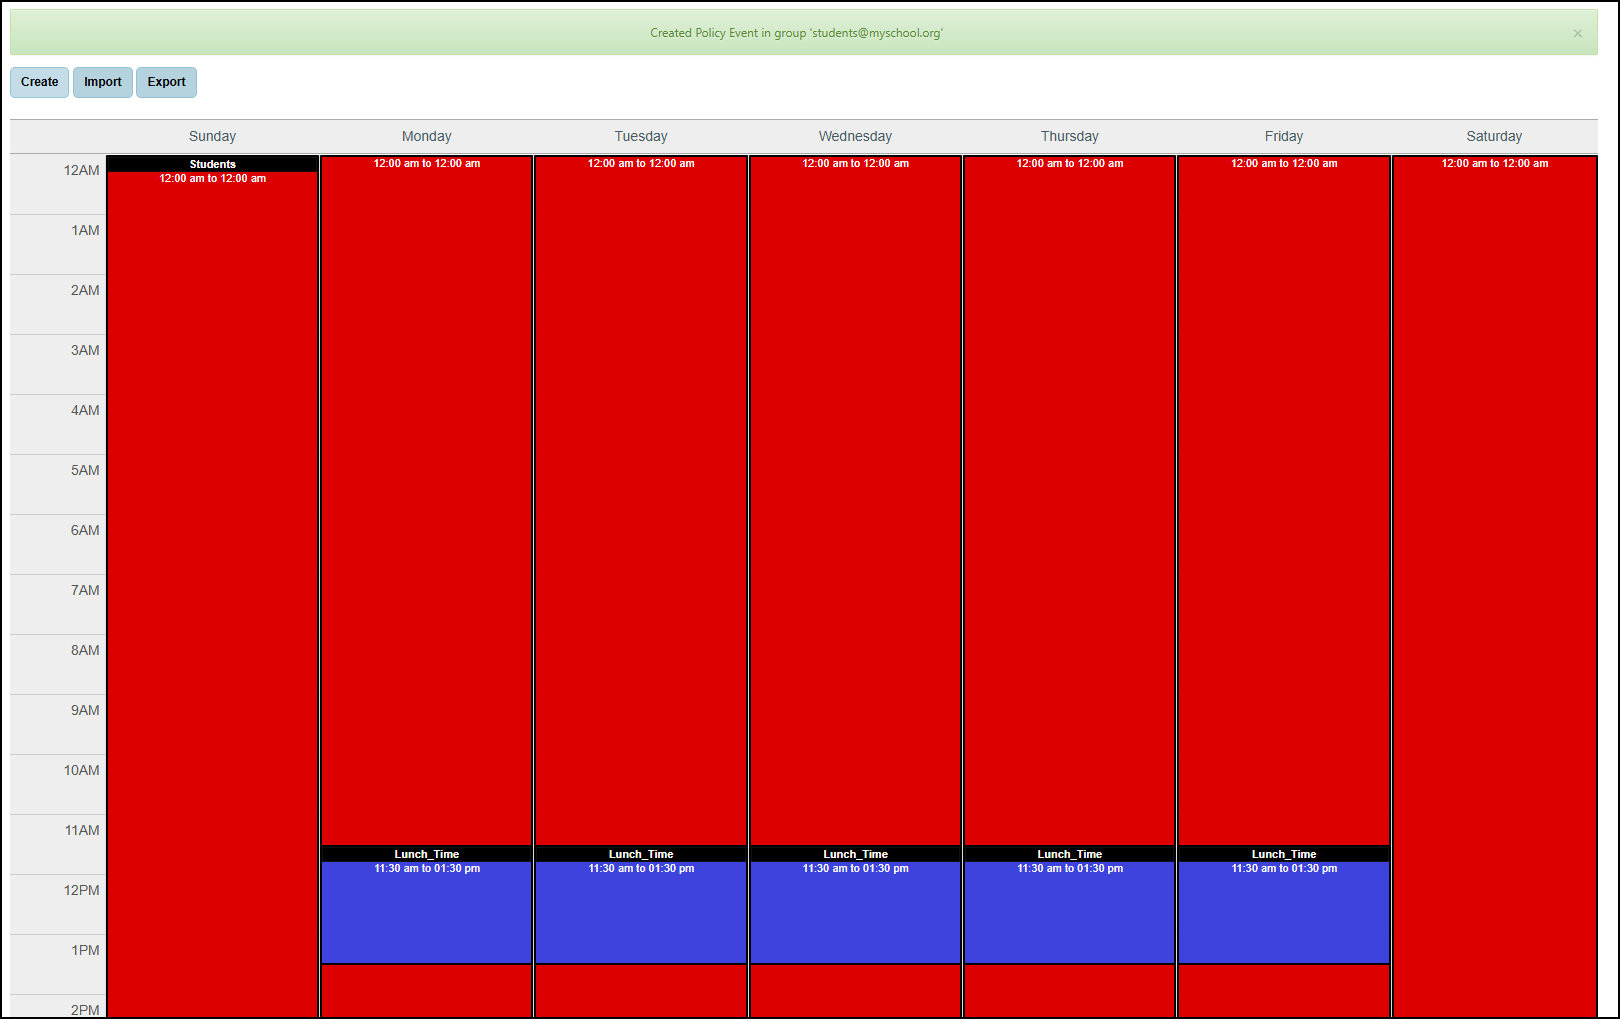
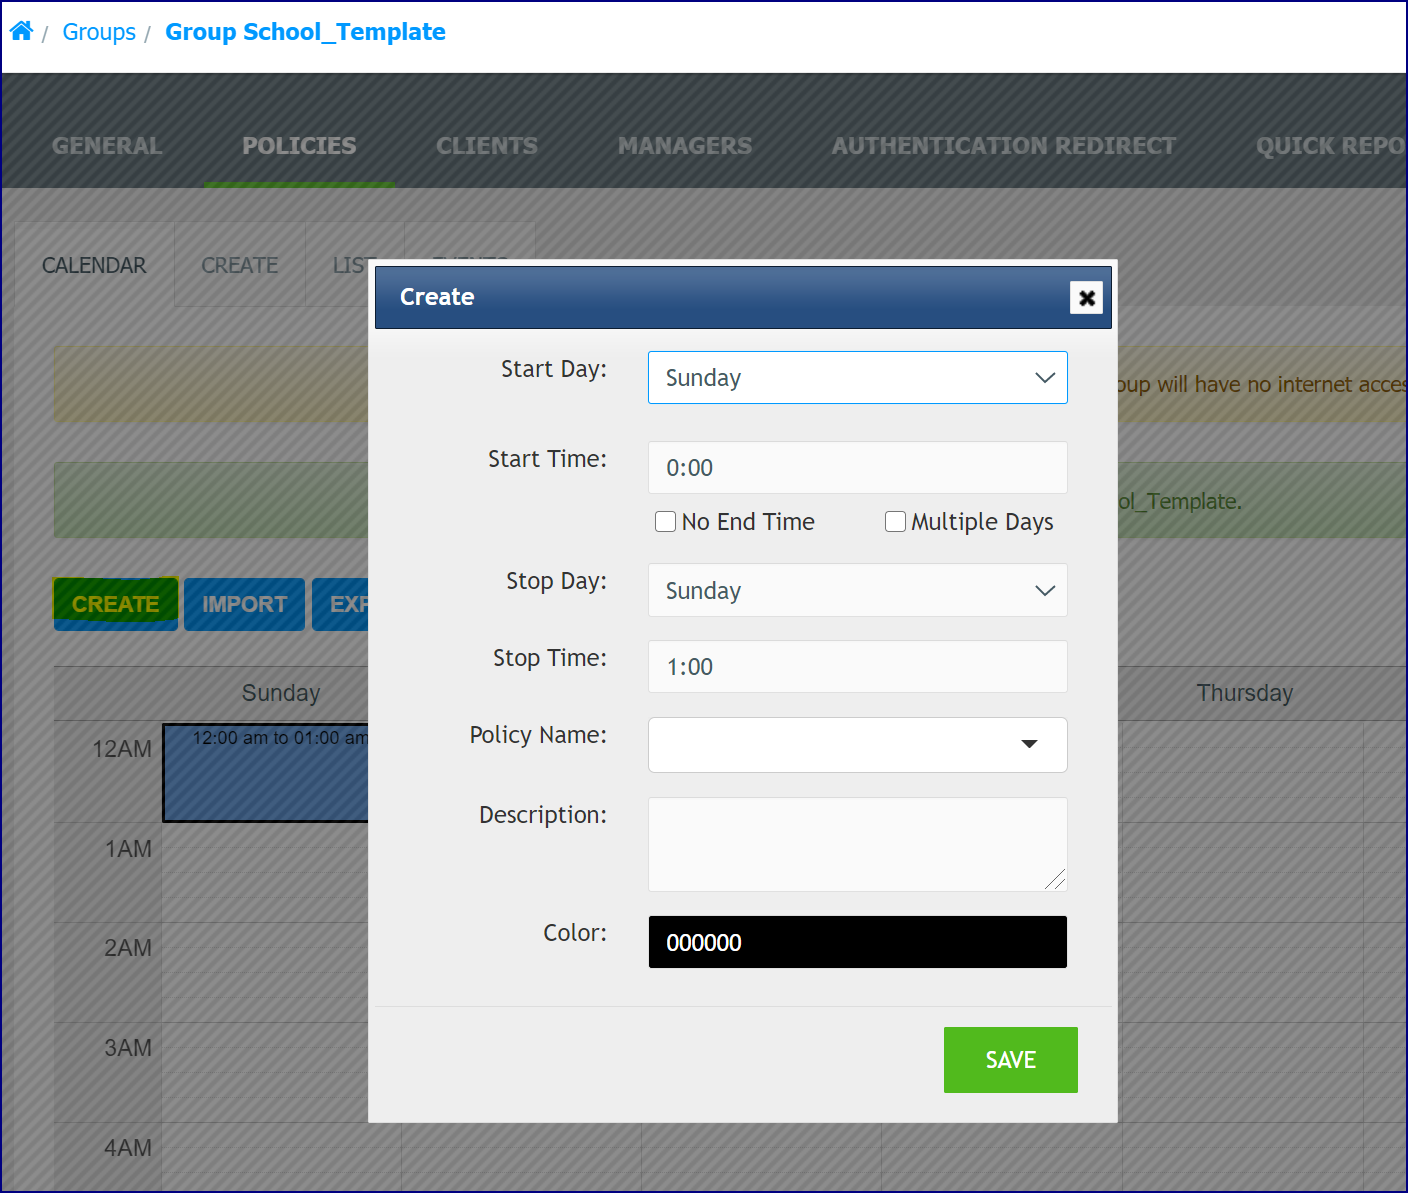
- To create a basic Policy Event, navigate to the Policies tab for the desired Group, choose the Calendar subsection and select the Create button to open the ‘Create’ window. In this scenario, we will add a single Policy Event for the lunch period at a school.
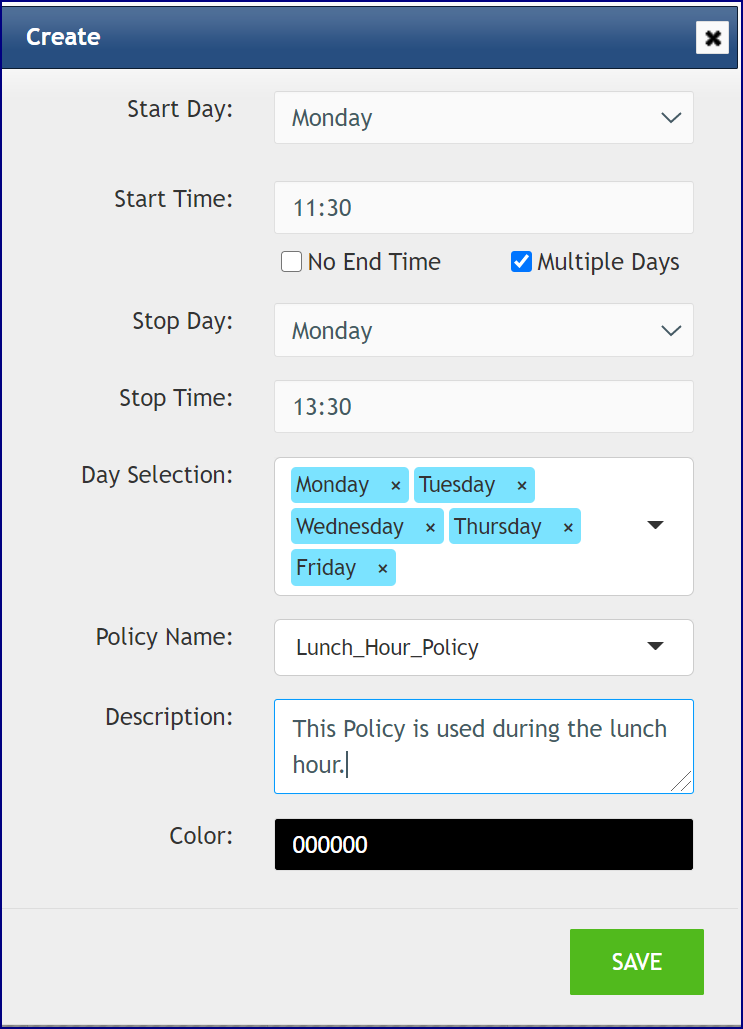
- In the window, choose Monday as the Start Day and the Stop Day. Enter the Start Time as 11:30 and the Stop Time as 13:30.
- There is no Lunch_Hour Policy yet, so create it in the window by typing the name and the description. Apply a color and select the Save button.
Please note that Policy names can only contain alpha-numeric characters with no spaces and colors are not assigned to the Policy Event but to the Policy.
- The Lunch_Time Policy Event displays.
About Dragging and Dropping Policy Events
You can drag a Policy Event by the Title. If the Policy Event spans multiple days, you cannot drag it down. You can only drag it left, right or up.
Keystrokes for Policy Events
- Pressing the Enter key when on any of the fields, excluding Description, will save the Policy Event.
- Pressing the Del key with Start Day / Stop Day or after either check box check, will delete the Policy Event.
- Pressing Esc will close the add/edit Policy Event pop-up.
Importing and Exporting Policy Events
Importing and Exporting Policy Events
About the Policy Event Export
Each Policy Event export contains the time durations, the Policy, and the Policy color. For SysOps, the ‘Policy Events' permission is required for the Import/ Export feature.
Export a Policy Event
- Navigate to Policies > Groups and choose the desired Group.
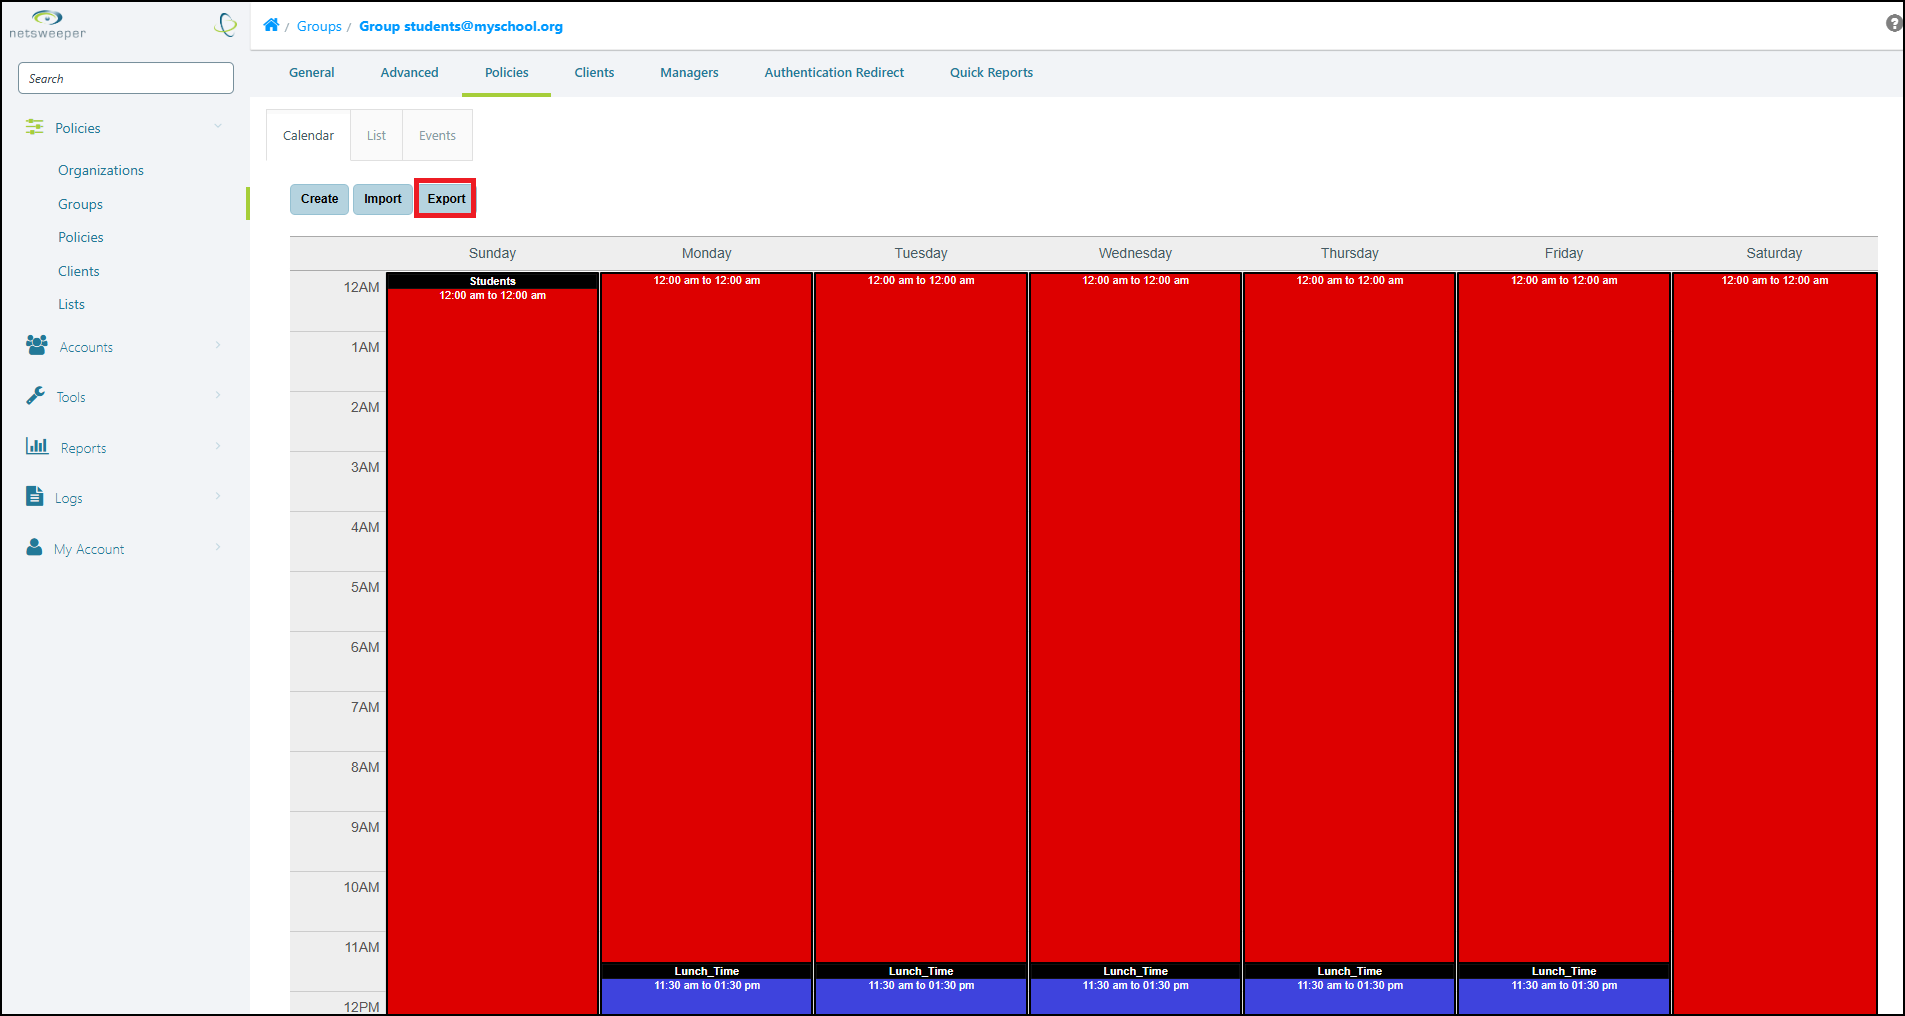
- Go to the Group's Policies tab > Calendar subsection.
- Select the Export icon.
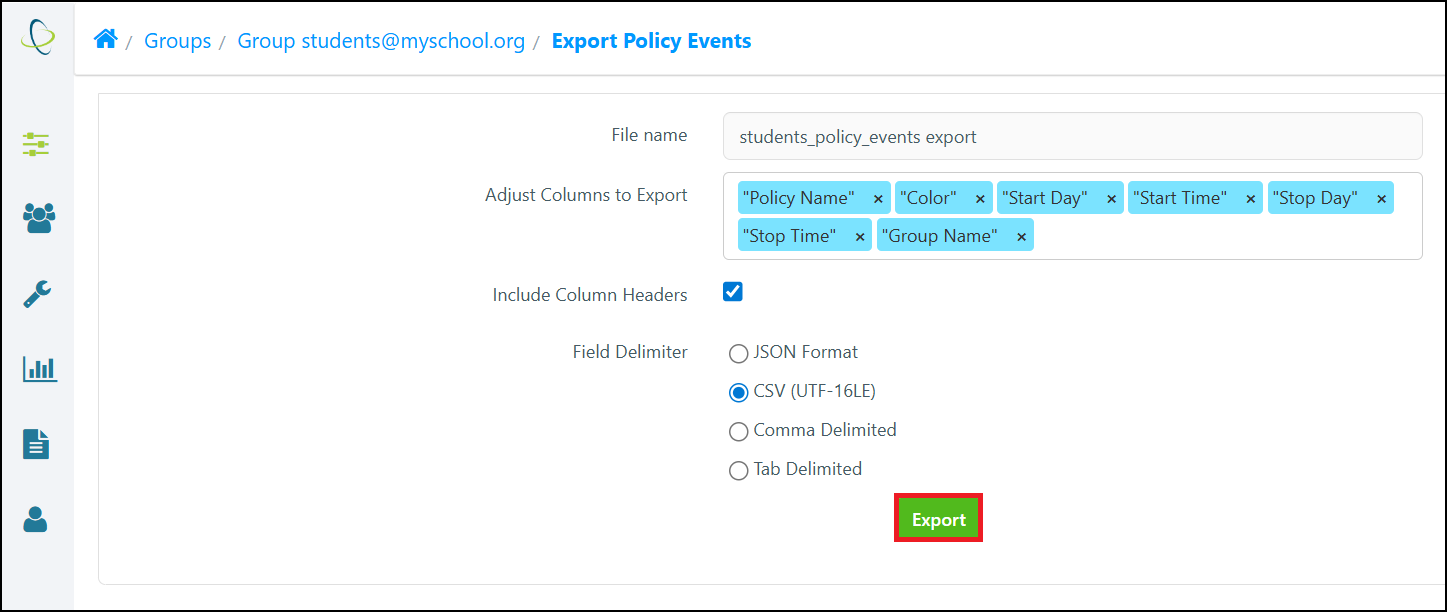
- In the ‘Export Policy Events’ window, enter an optional file name or accept the default. You can include or exclude column headers.
- Choose the desired Field Delimiter type.
- Select the Export button.
- The file is downloaded to the default download folder.
About Policy Event Imports
When importing Policy Events, the time durations and the Group Policy are used. If the Group has no existing Policy, the imported Policy:
- Can be ignored
- Can be created
- Can use a specified Policy provided in the import wizard
If the Policy is created, the color from the import will be used for the Policy. If a Policy already exists in the Group, the existing Policy is used.
Importing Policy Events
- Navigate to Policies > Groups and choose the desired Group.
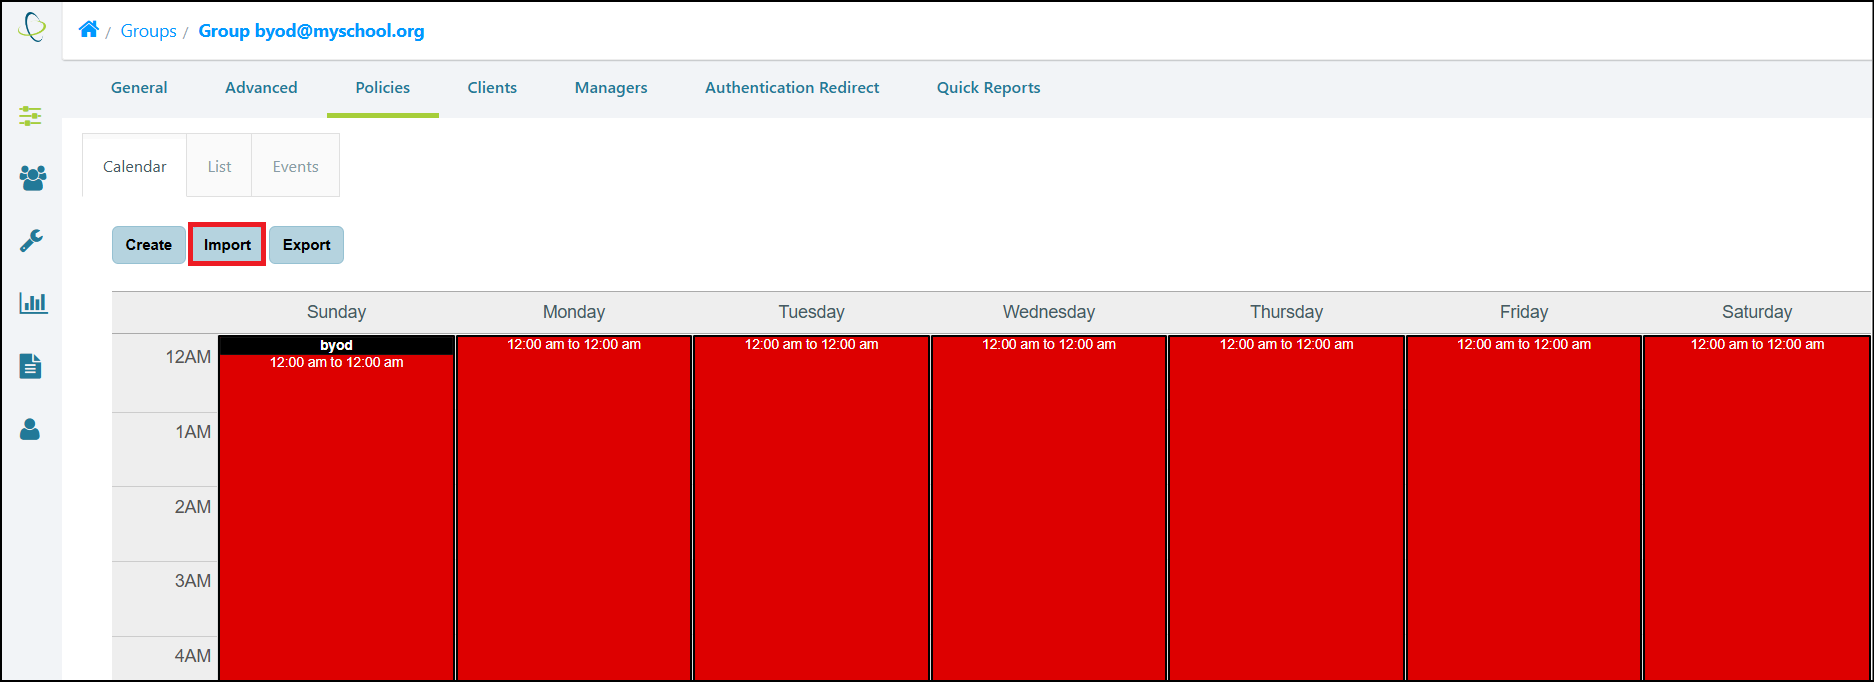
- Go to the Group's Policies tab > Calendar subsection.
- Select the Import button.
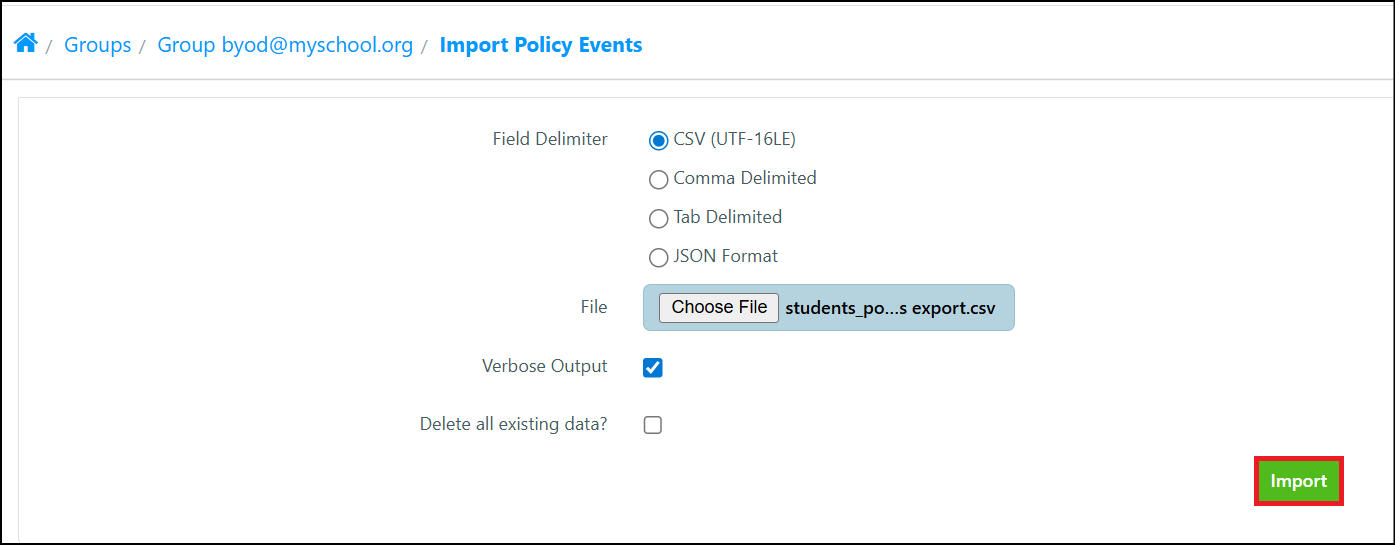
- Choose the desired Field Delimiter type and select the Choose File button to select your file.
- You can select the Verbose Output option to increase verbosity in the event of an error with the import.
- You can also choose the Delete all existing data option if you wish to remove any existing Policy Events.
- Select the Import button to continue.
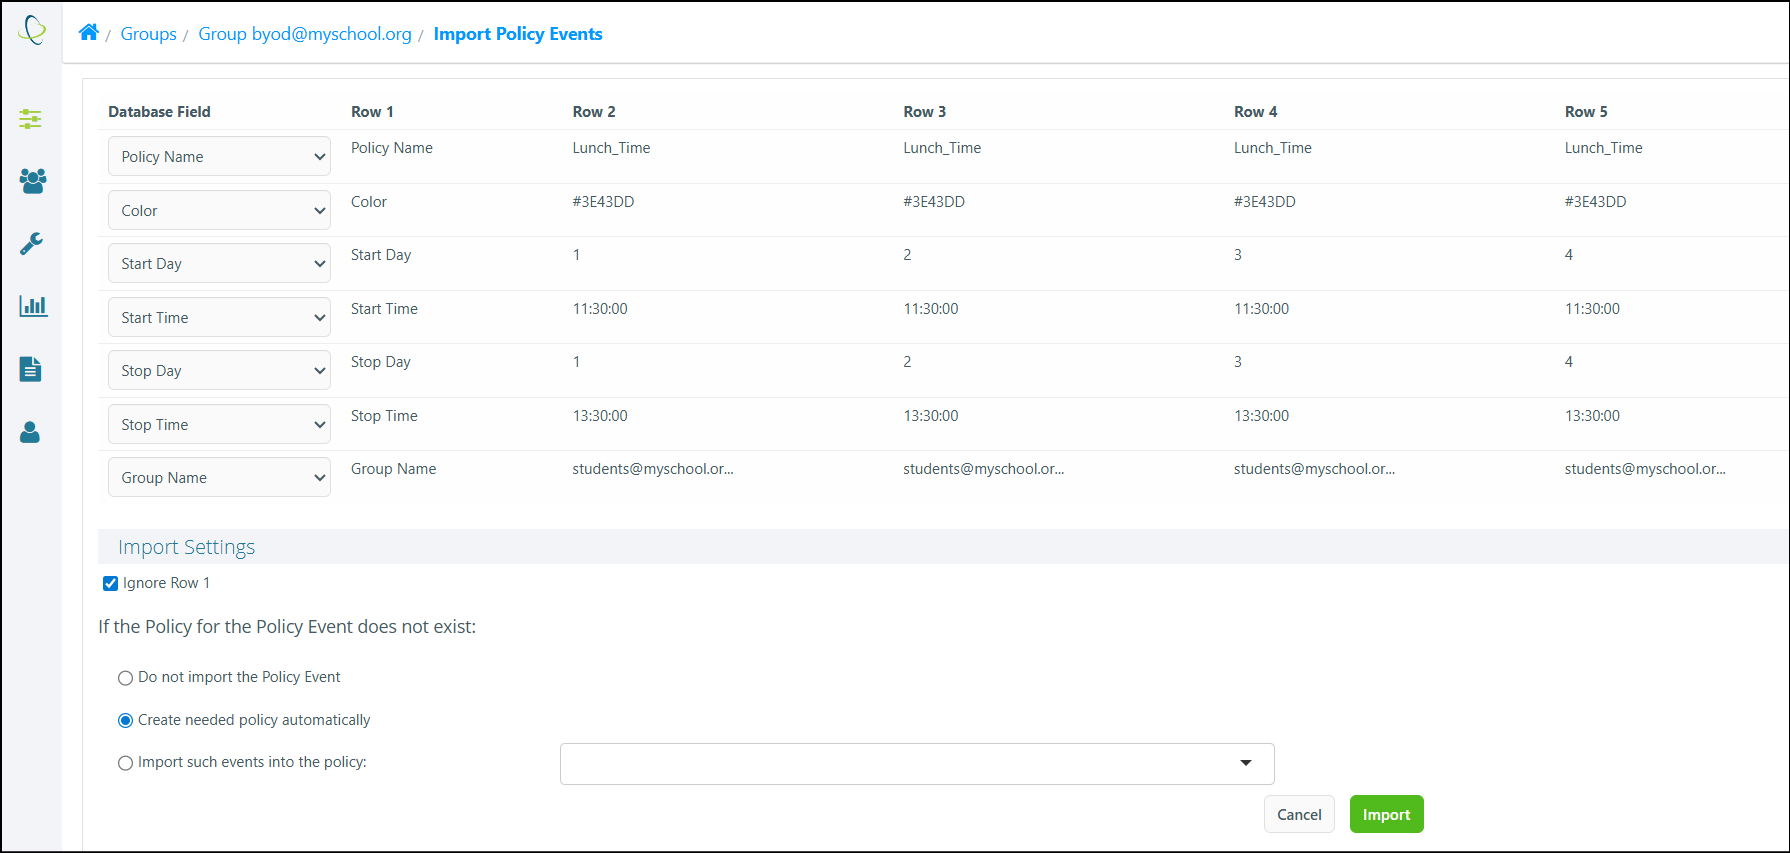
- On the second page of the Import Policy Events window, choose from the available choices. (Descriptions of the options are provided below).
-
Select the Import button. A message displays indicating the number of records added.
|
Option |
Description |
|---|---|
|
Do not import the Policy Event |
The Policies will not be imported. |
|
Create needed policy automatically |
Policies will be created and will use the colors from the import. |
|
Import such events into the policy |
If a Policy is not listed in the import file, select the Policy to be used from the dropdown list. |
Policy Events Use Case
Policy Events Use Case
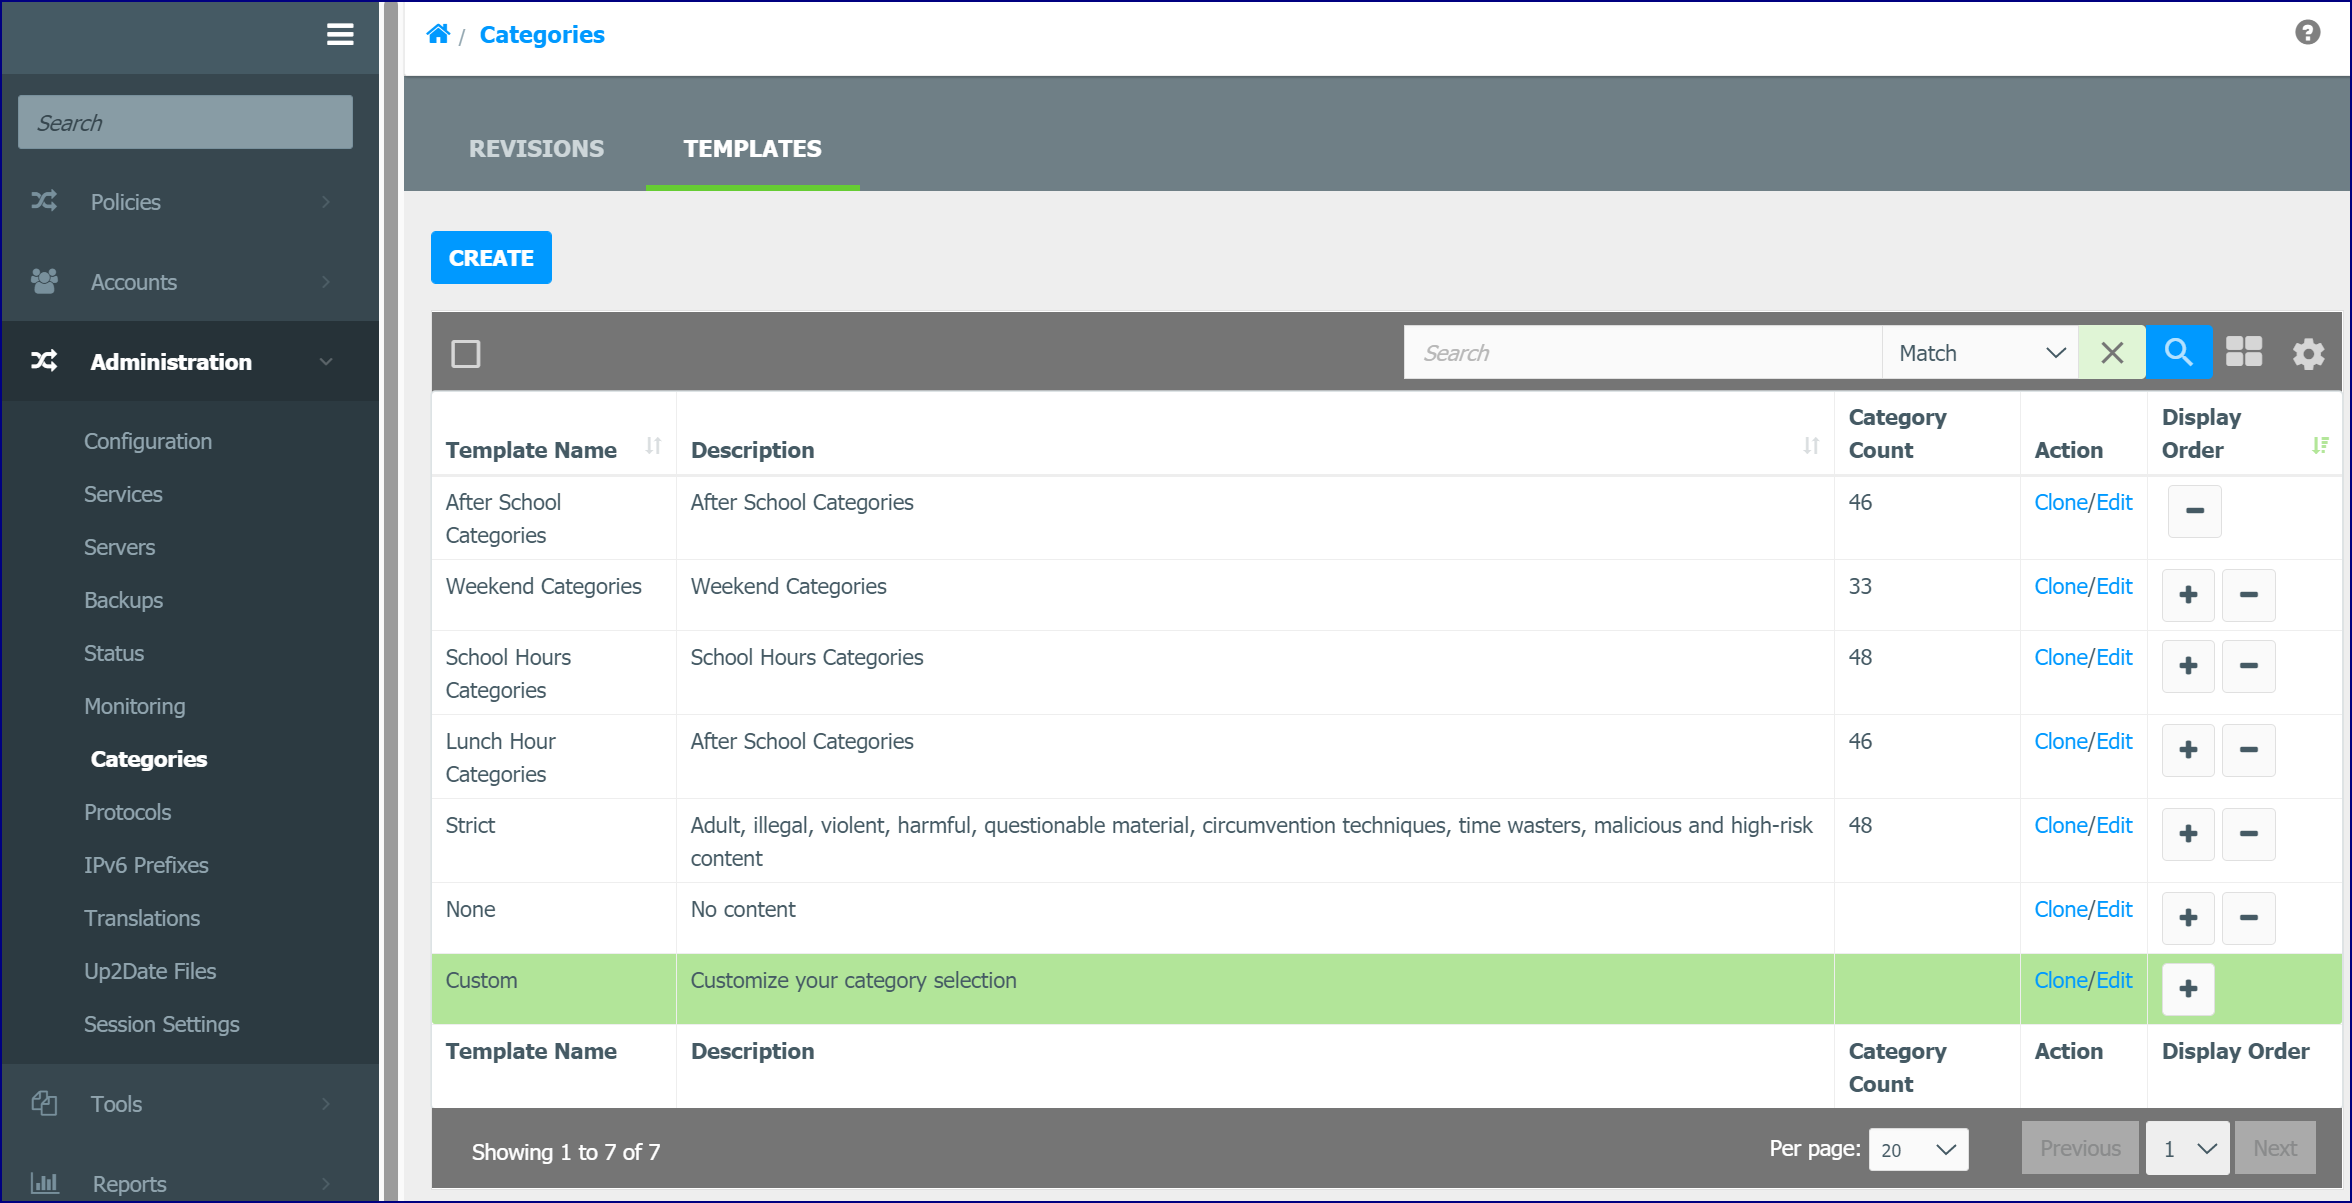
In this example, we will create multiple Policy Events for a school week. We have created four Category Templates with different blocked Categories: After School, Lunch Hour, School Hours and Weekend. We will apply these Category Templates later after we create some Policies.
Delete the Default Time Event
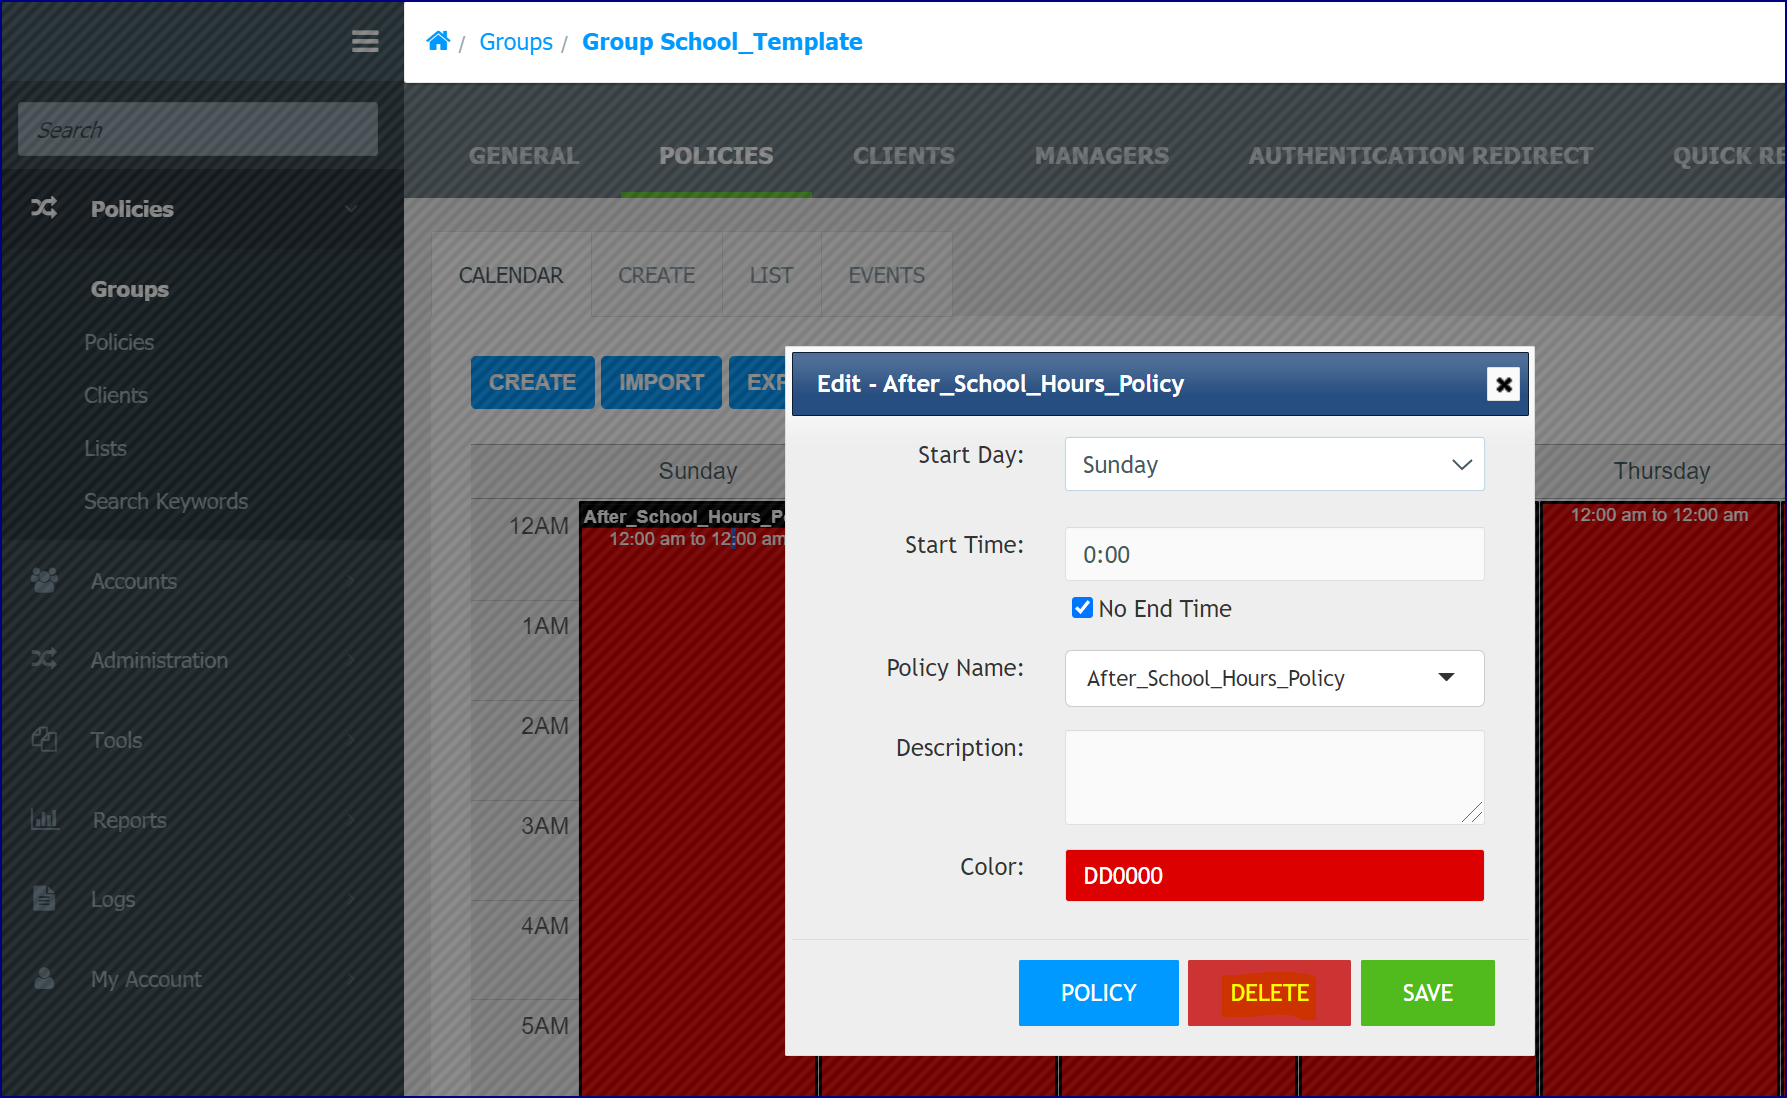
Open a Group and click the Policies tab. By default, the default Policy Event displays in red. We want to delete this event. Click the Policy Event to display the edit window and choose Delete to delete the Policy Event.
The screen displays with no Policy Events.
Click the Create button or click anywhere on the calendar. The ‘Create’ window displays. We want to add a ‘School Hours’ Policy Event attached to ‘School Hours’ Policy. This will be applied from 8:00 a.m. to 4:00 p.m. from Monday to Friday.
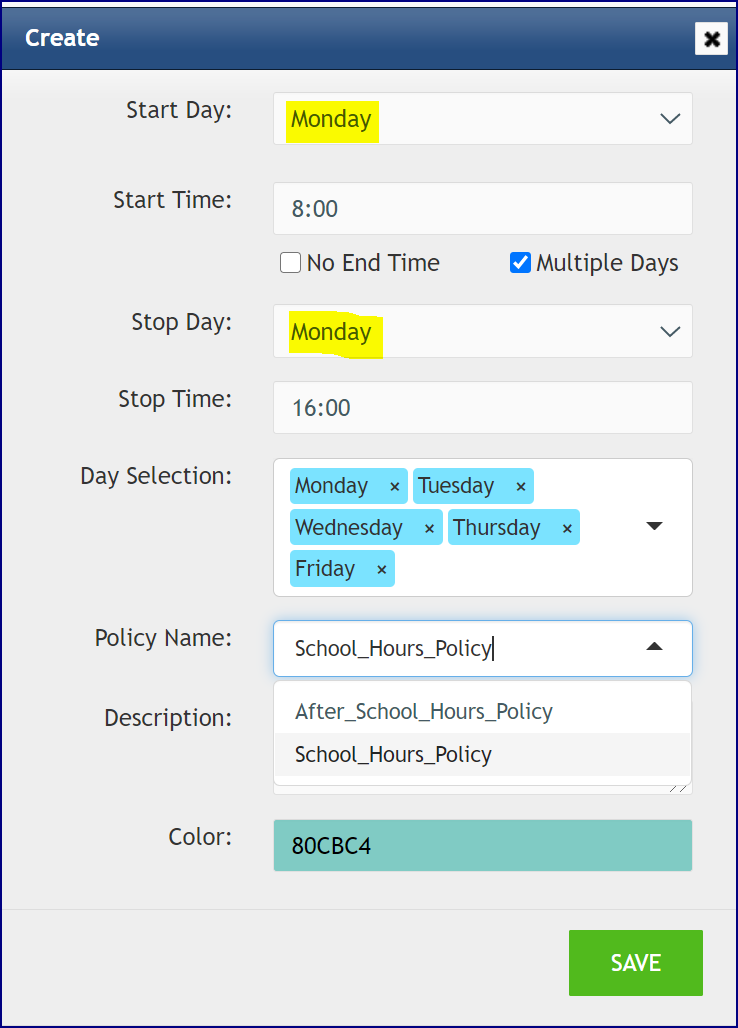
Creating a School Hours Policy Event
Clicking the Create button displays the ‘Create’ window. The example below will create a Policy Event from 8 a.m. to 4 p.m. from Monday to Friday. We have selected ‘Multiple Days’ and then selected the days to apply the Policy Event. We have also used this window to create ‘School_Hours_Policy’ and have designated a color 8OCBC4.
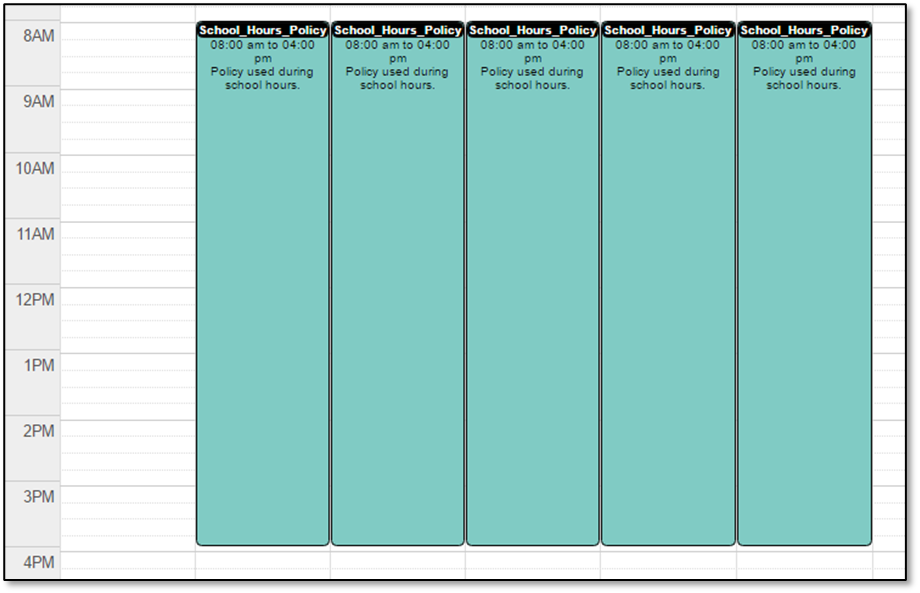
When we choose Save, the Policy Events display in the Policy Calendar. Please note that you can drag the title bar of the Policy Event to move it.
Adding a Lunch Hour Time Event
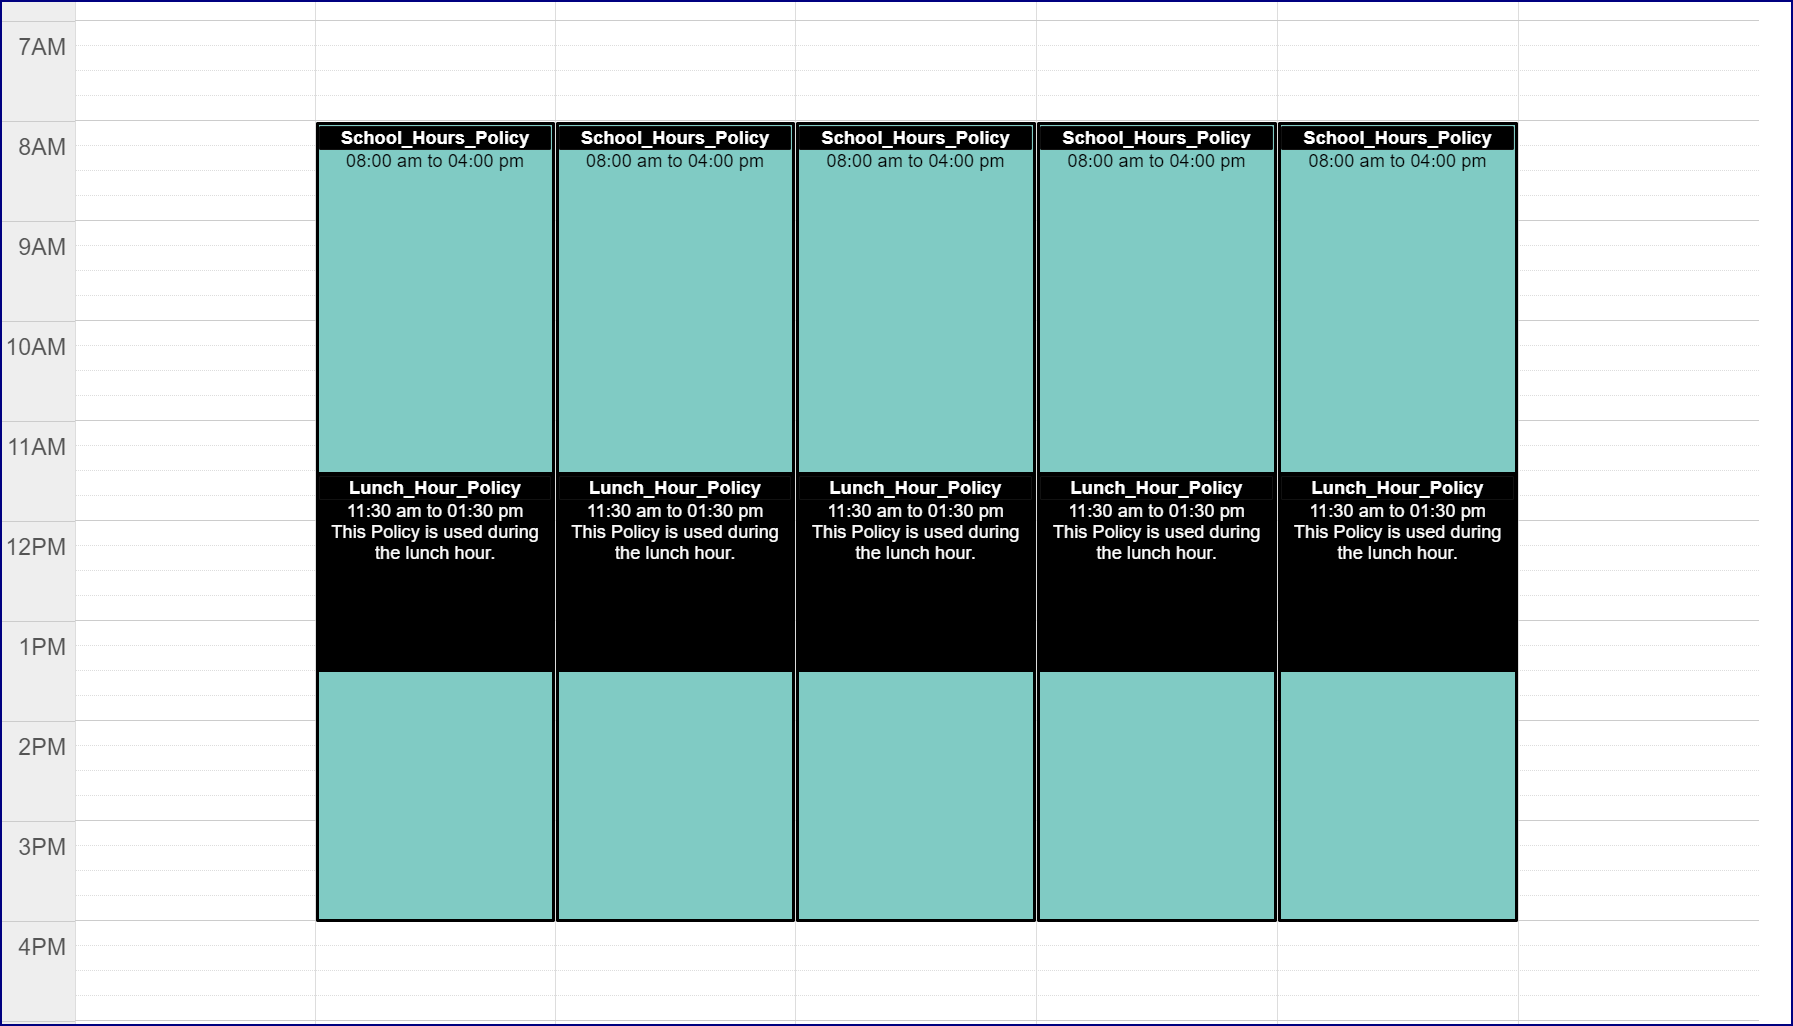
We now want to add a lunch hour Policy Event with different filtering. This Policy Event is like the ‘School Hours’ Policy Event but we will overlay this on the ‘School Hours’ Policy Event. Enter the options as shown here and click Save.
The Lunch Hour Policy Event displays.
Creating a Weekend Time Event
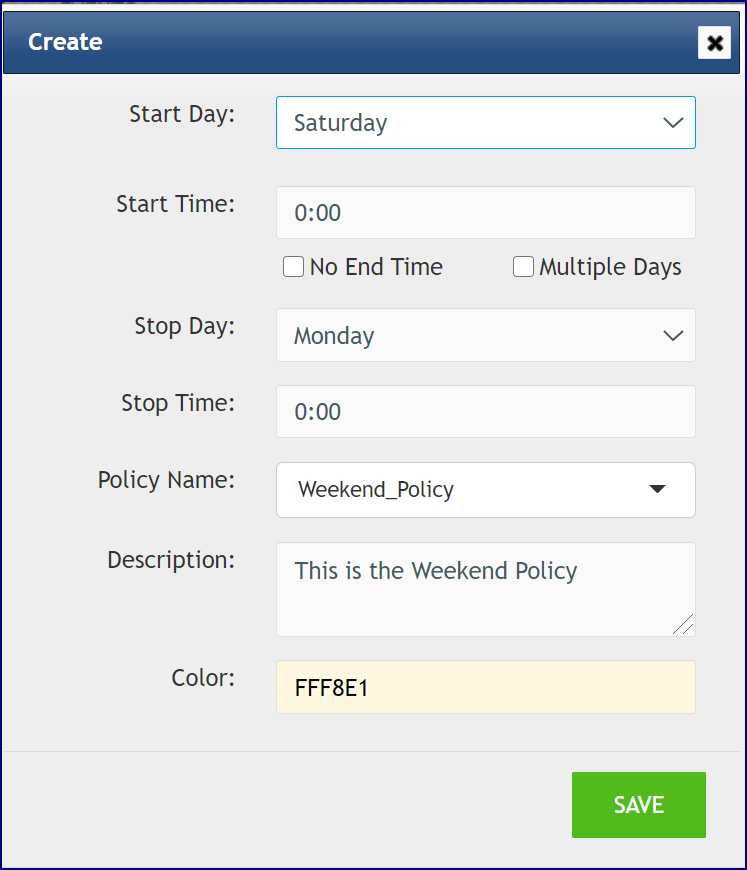
We now want to add a ‘Weekend’ Policy Event and Policy. This will span over multiple days with no time duration specified. We choose the ‘Start Day’ of Saturday with a ‘Start Time’ of 0:00 and our ‘Stop Day’ will be Monday with a ‘Stop Time’ of 0:00. This is the end of Sunday night. We will create a ‘Weekend_Policy’ and apply a color. Click Save.
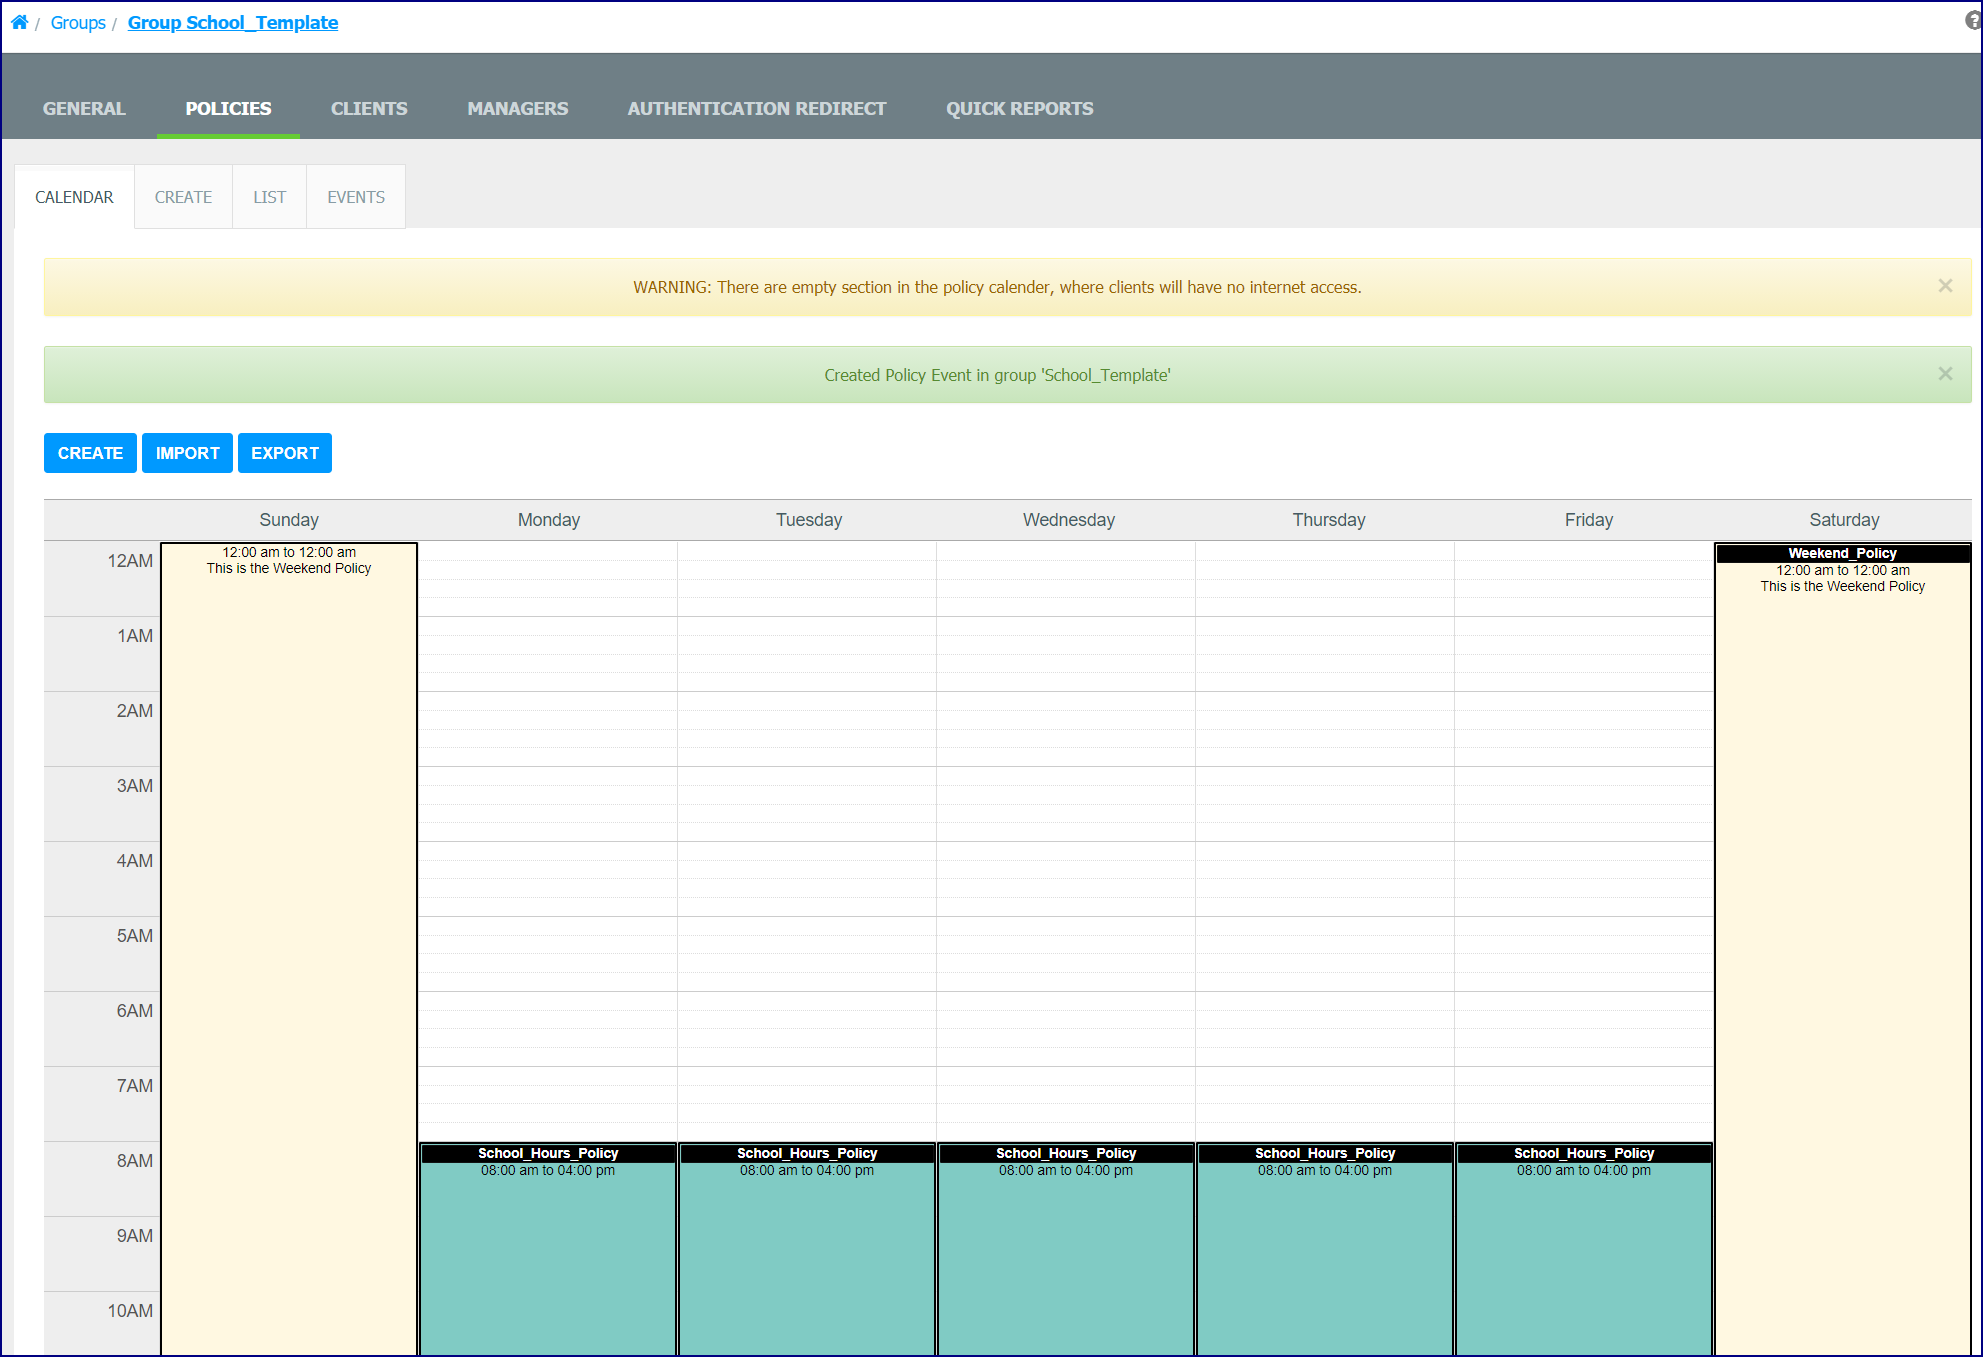
The Weekend Policy Event displays.
Warning Message for Empty Sections
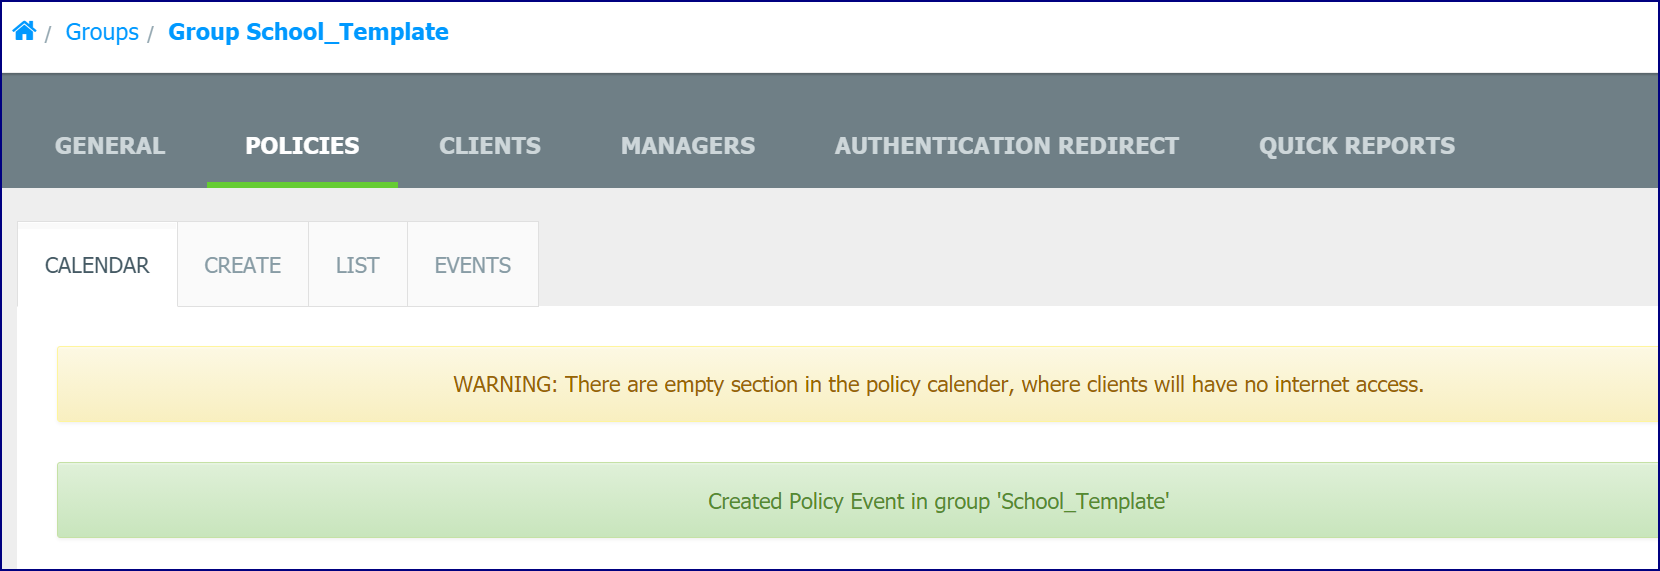
If there are sections of the Policy Calendar that are not covered by a Policy Event, a warning message displays.
Creating an After School Time Event
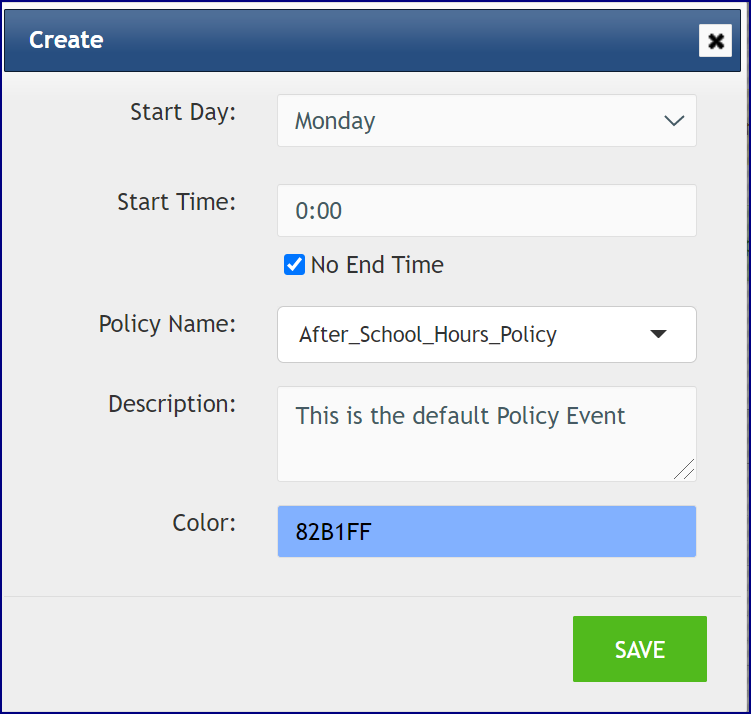
We will now create an ‘After School’ Policy Event and Policy. This Policy Event and Policy will act as the default Policy for this Group and it will use ‘No End Time’ and not ‘Multiple Days’. Here is a brief description of these two options.
No End Time: This option will disable ‘Multiple Days’. If this is enabled, no end time will be used for the selected Policy Event.
Multiple Days: This option is disabled if ‘No End Time’ is enabled. Use this option if you wish your Policy Event’s duration to be replicated across multiple days. If this option is selected, a ‘Day Selection’ field dropdown menu displays where you can click to add additional days.
Choose Monday as the ‘Start Day’ and enter a ‘Start Time’ of 0:00. Select ‘No End Time’ and create the new ‘After School’ Policy. Apply a color and choose Save.
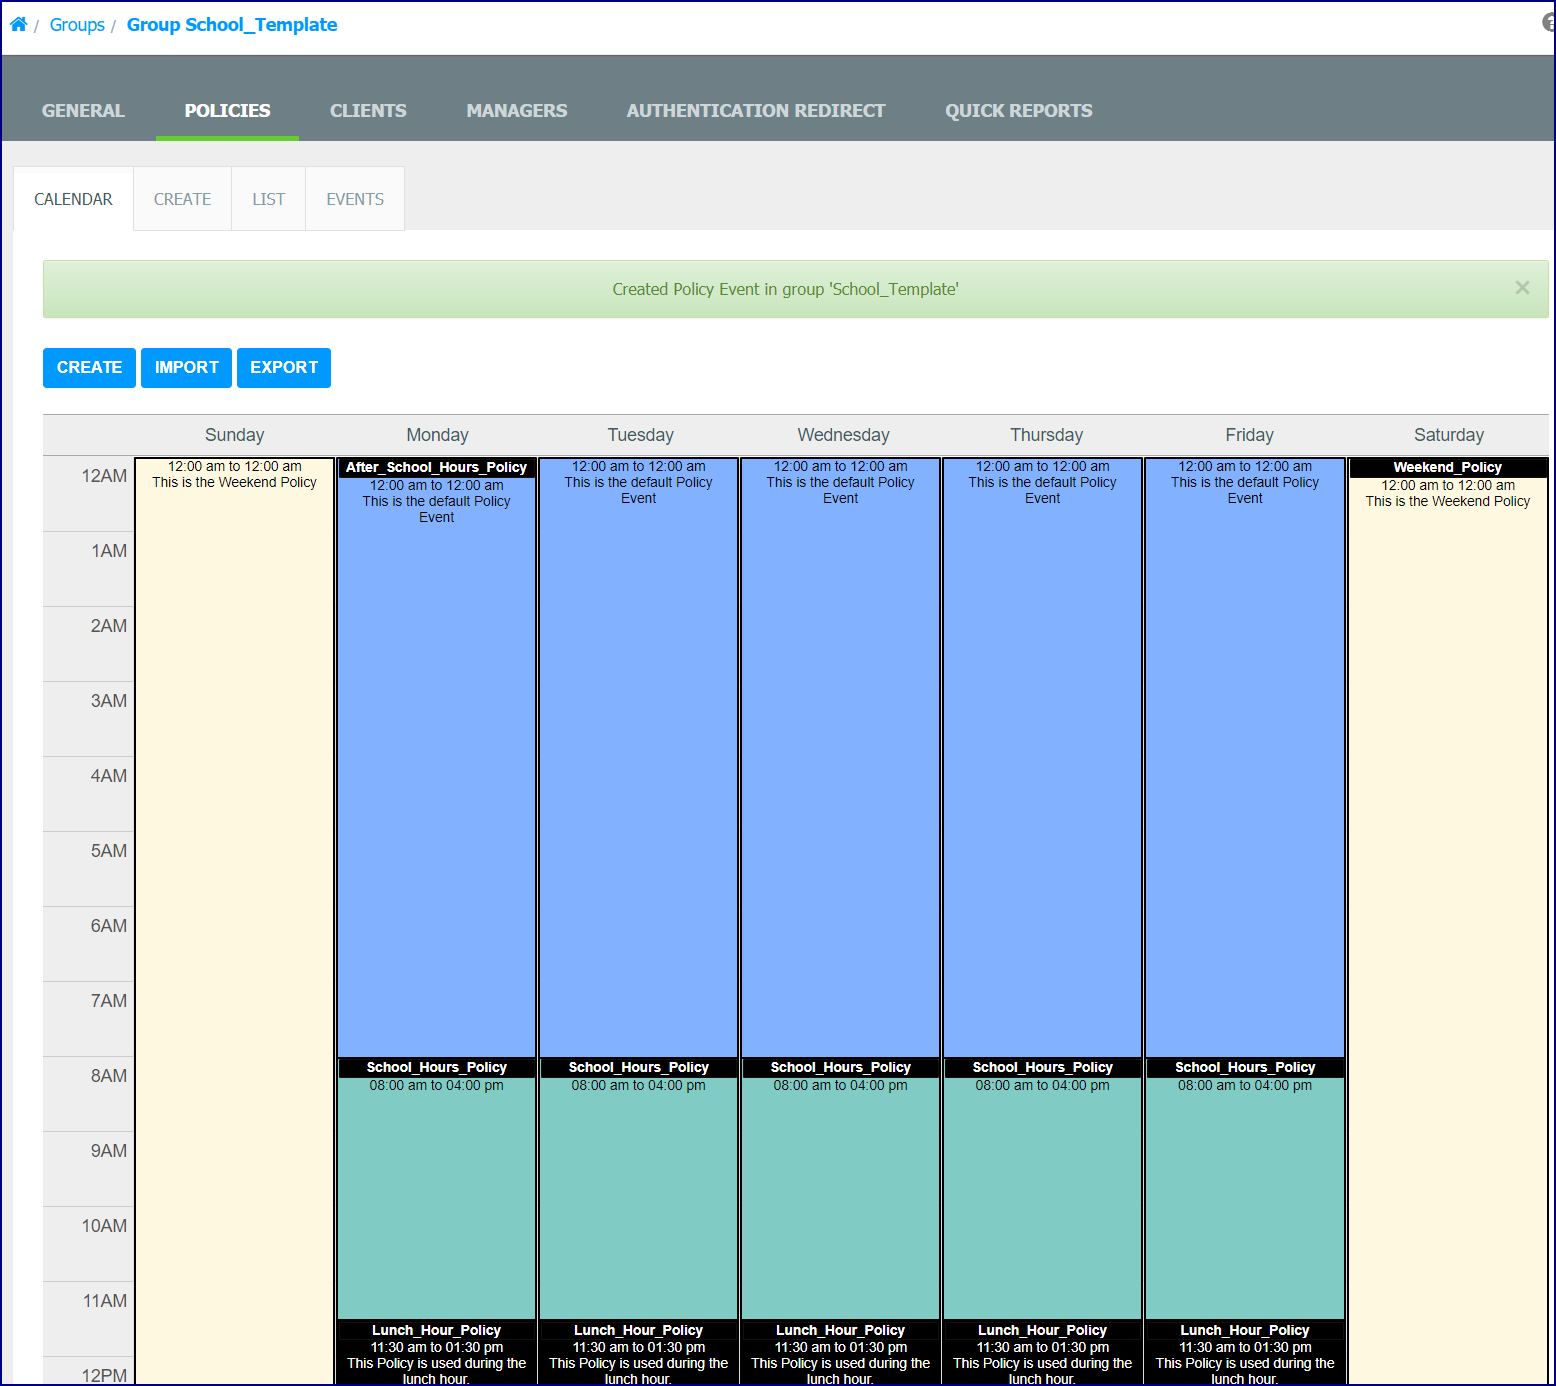
The ‘After School’ Policy Event displays. Please note that because this Policy Event has ‘No End Time’, if other existing Policy Events are deleted, this Policy Event will display in its place.
Policy Events Use Case
Policy Event Use Case
See also: Policy Events
In this example, we will create multiple Policy Events for a school week. First, we must create some Category Templates with different blocked Categories: After School, Lunch Time, School Hours and Weekend. We will apply these Category Templates later after we create some Policies.
Please note: An administrative Account is required to create and manage Category Templates.
Creating Category Templates
-
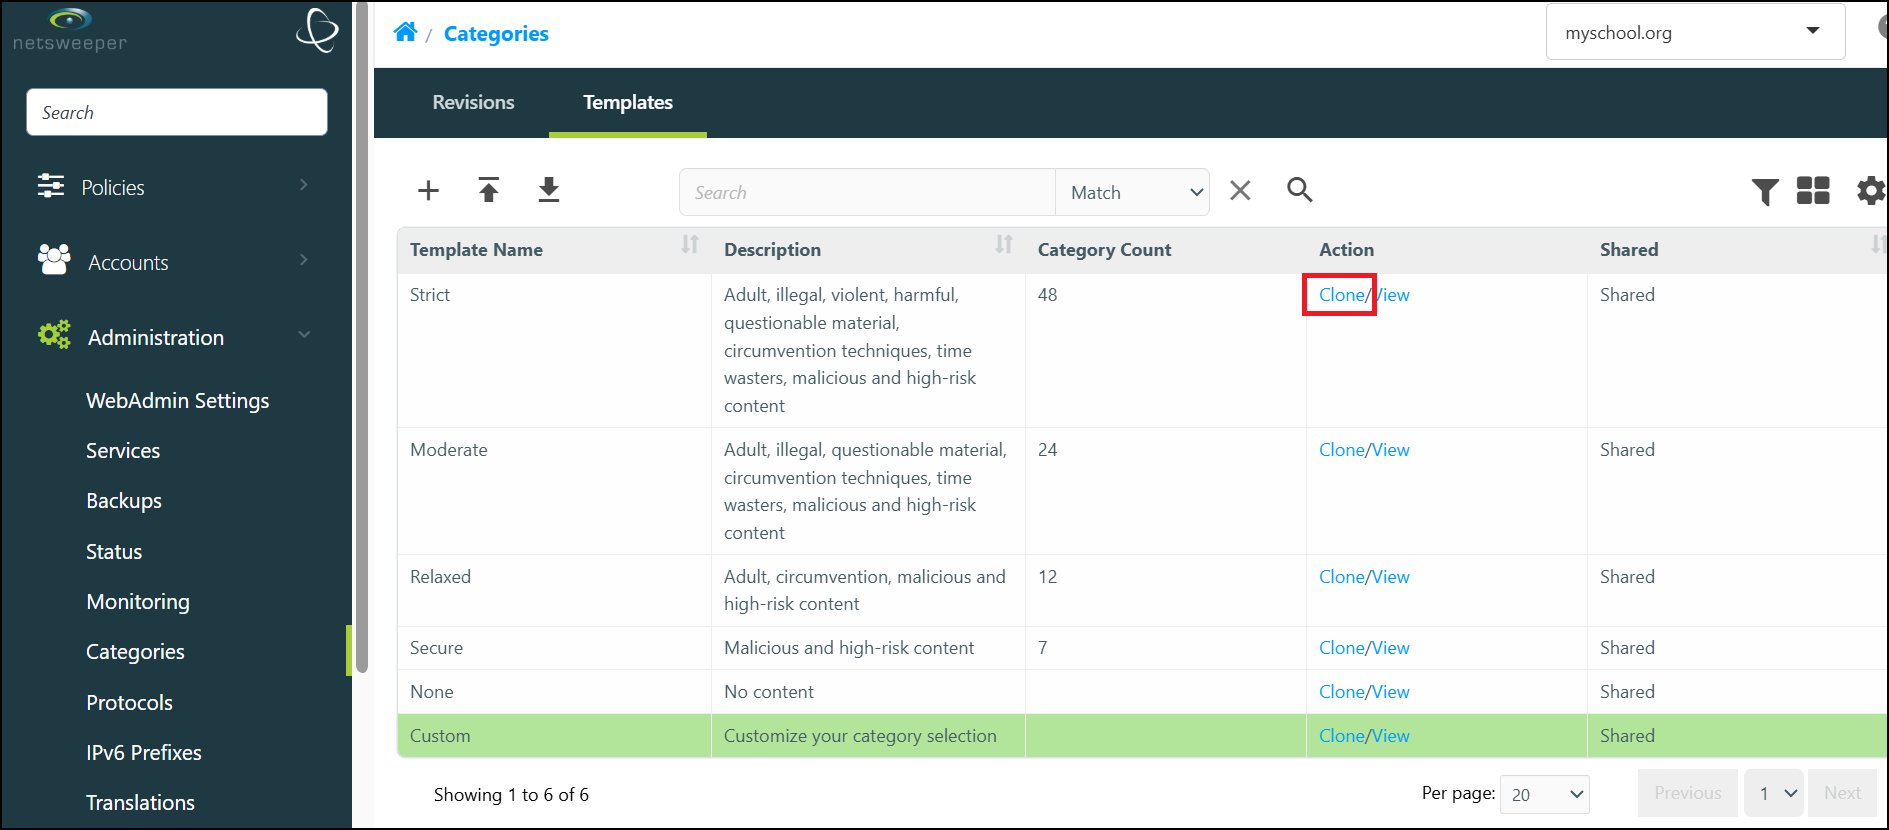
Navigate to Administration > Categories and select the Templates tab.
-
Select the Clone button for the 'Strict' template.
-
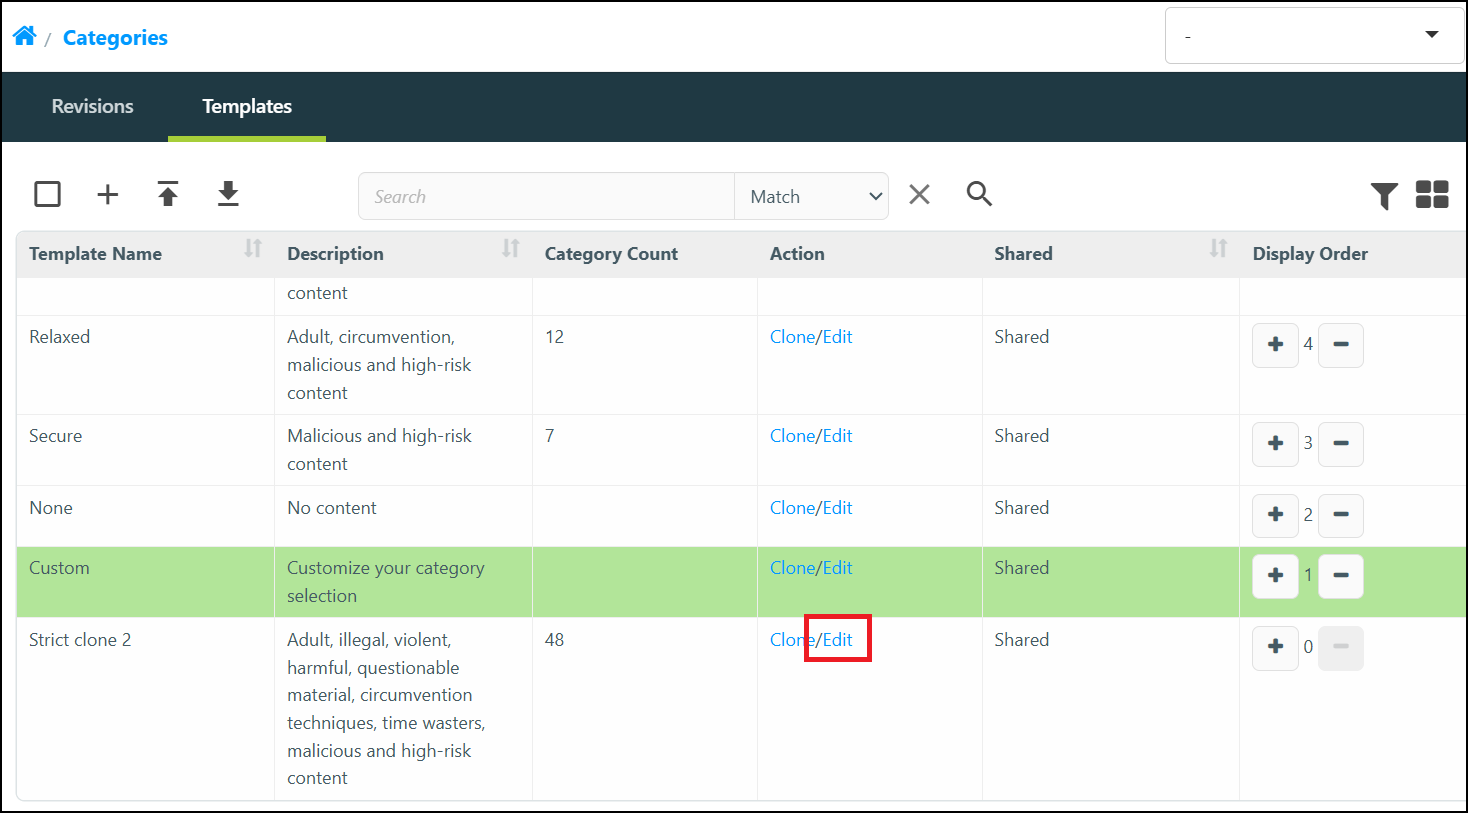
Select the Edit button for the 'Strict Clone 2' Template.
-
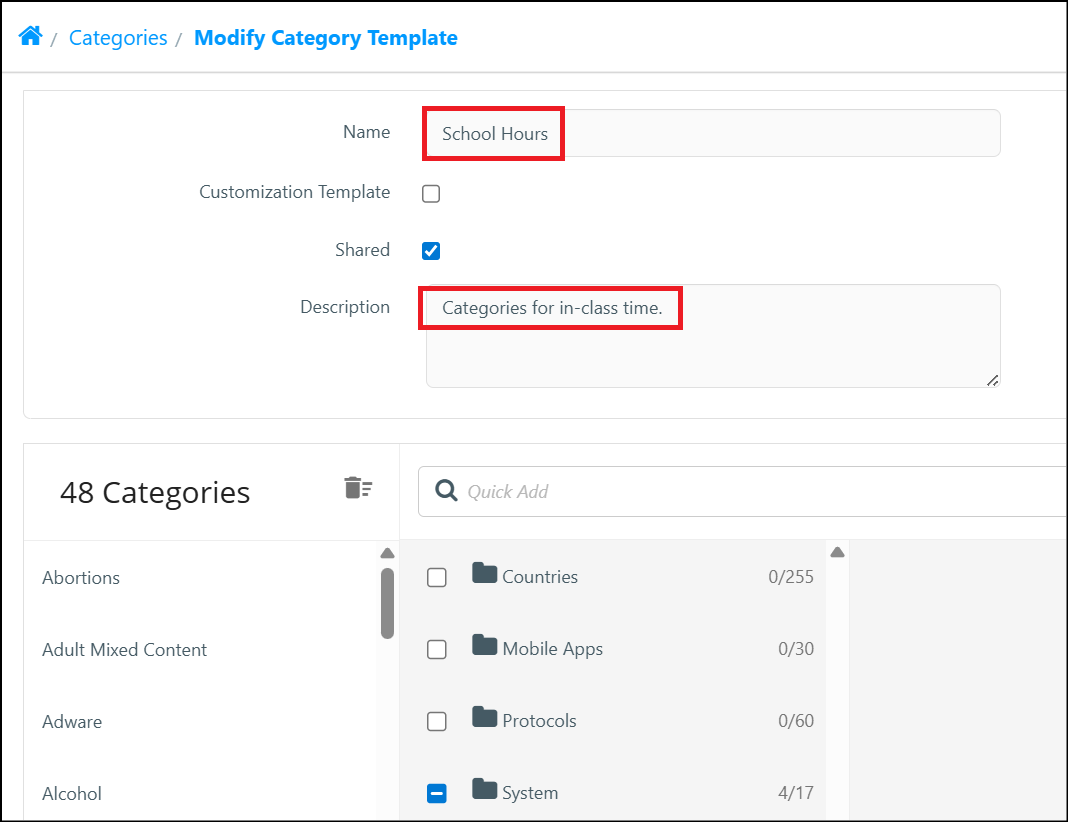
Rename the Template 'School Hours' and add an optional description.
-
Leave the default (48) Categories as is and select the Submit button.
-
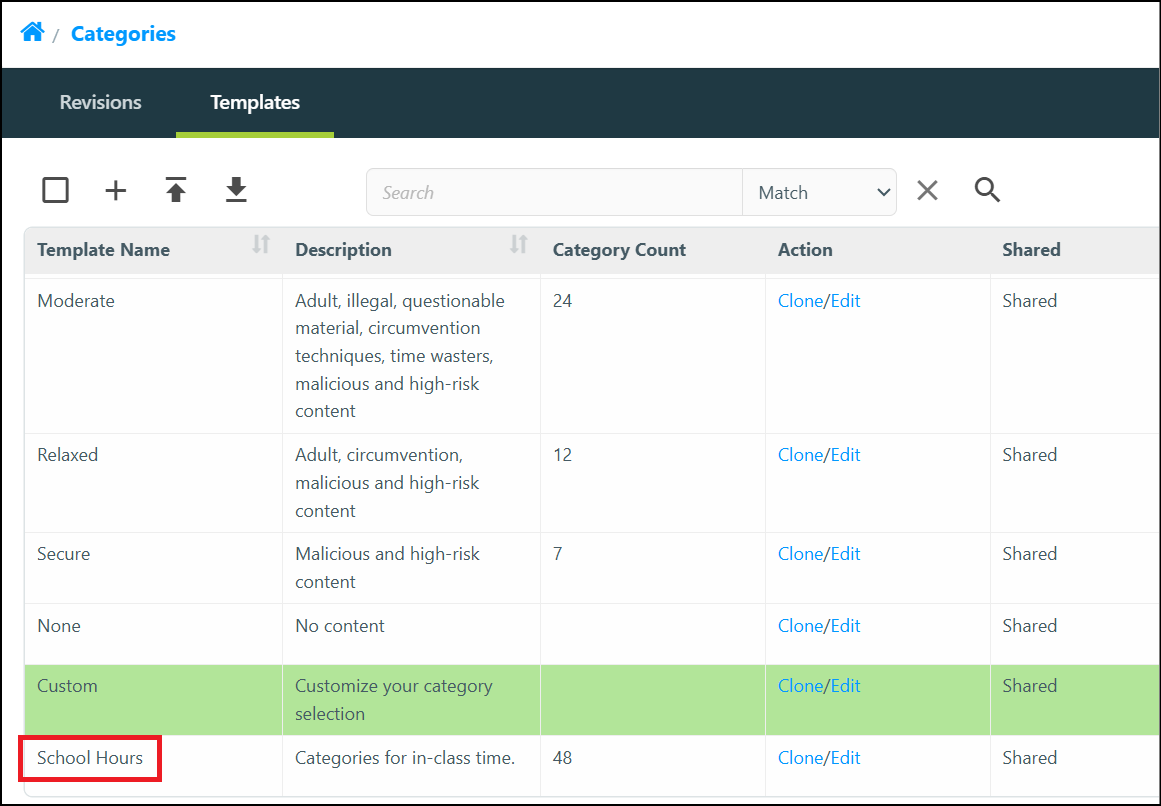
Use your breadcrumbs to return to the Categories window, where our new template displays.
-
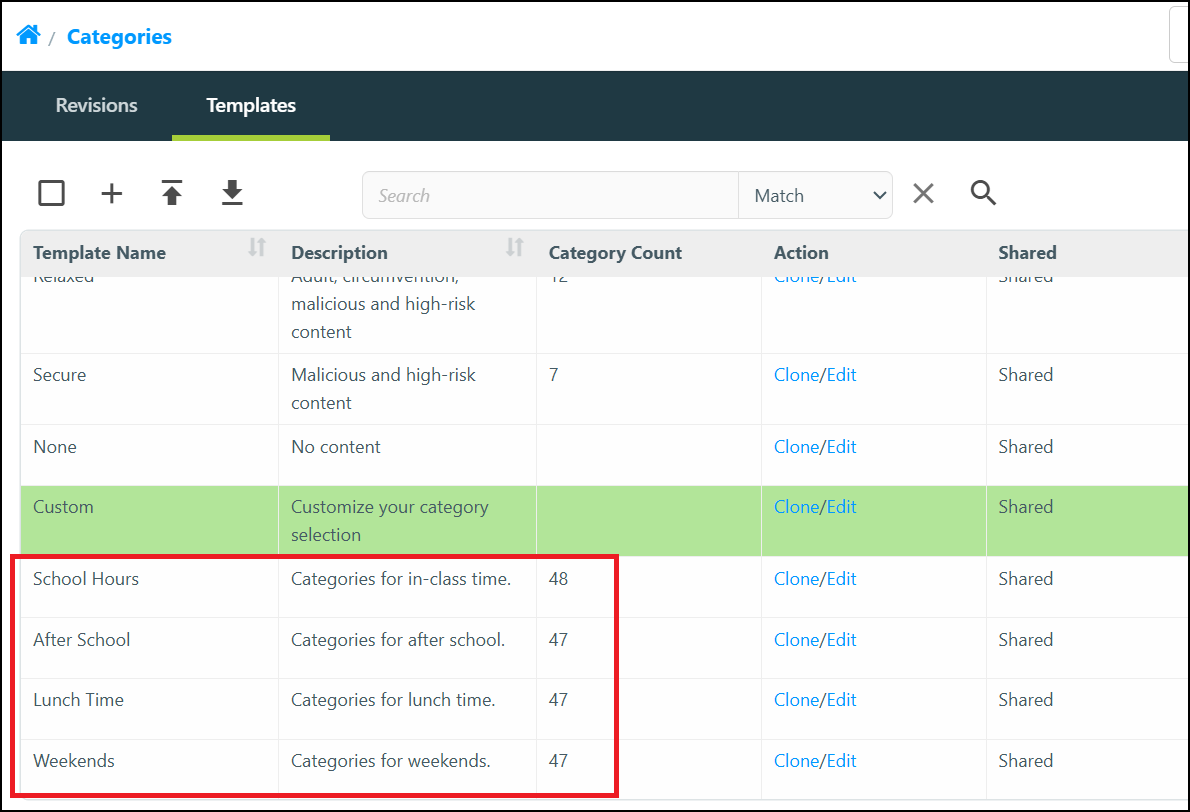
Next, clone the School Hours template, rename the template 'After School', adjust the description and remove the 'Social Networking' category.
-
Clone the After School Template twice, renaming one clone to 'Lunch Time' and the other to 'Weekends' and updating the descriptions.
-
Your Categories window should look like this:
We can now proceed to scheduling our Policy Events.
Delete the Default Time Event
Open the desired Group and select Calendar subsection of the Policies tab. By default, the default Policy Event displays in red. We want to delete this event. Click on the Policy Event to display the edit window and choose Delete to delete the Policy Event.
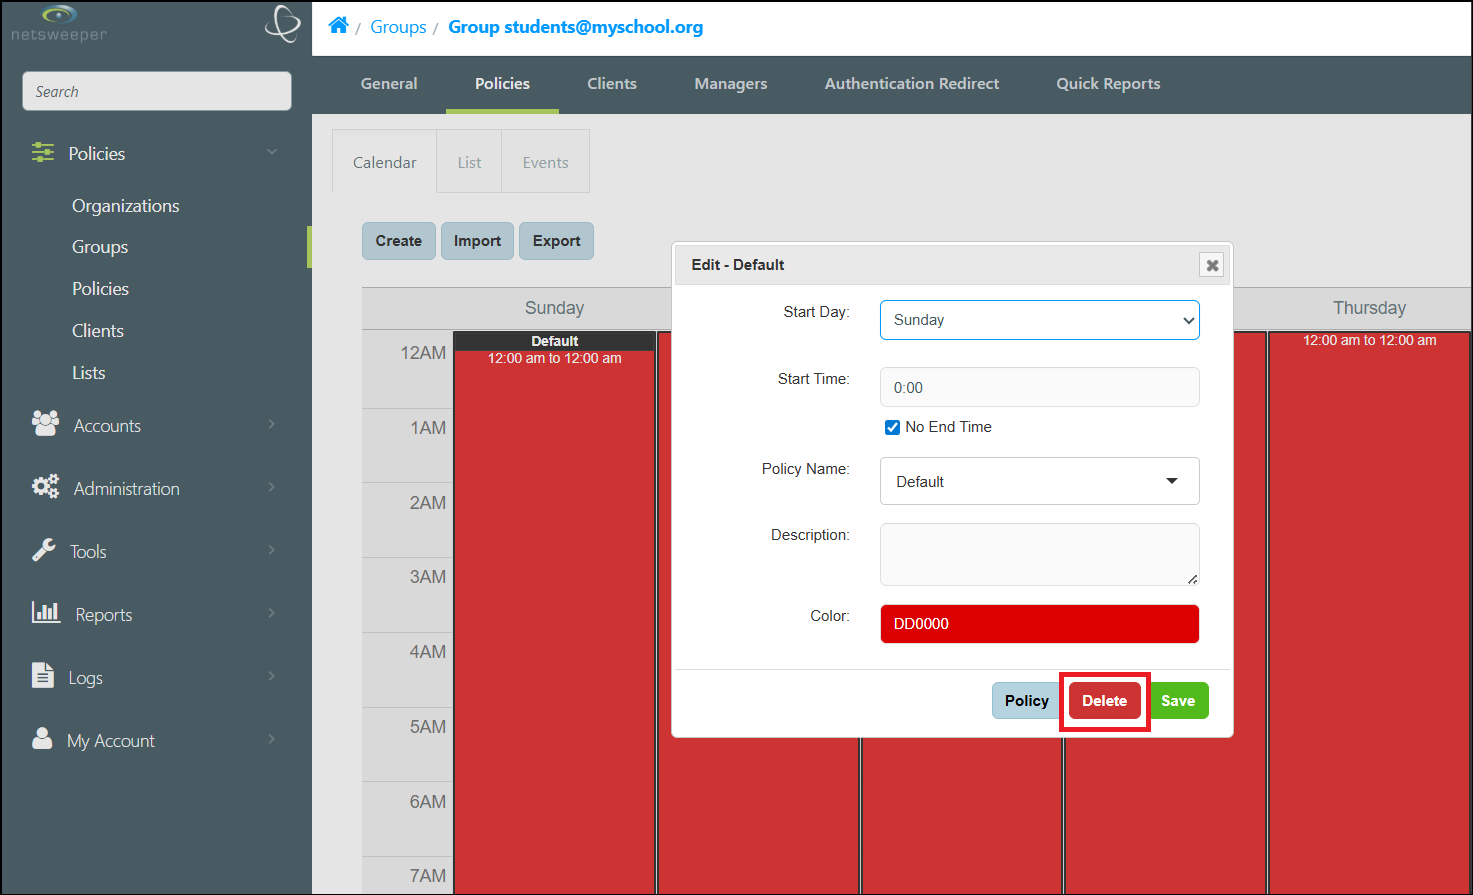
The screen displays with no Policy Events.
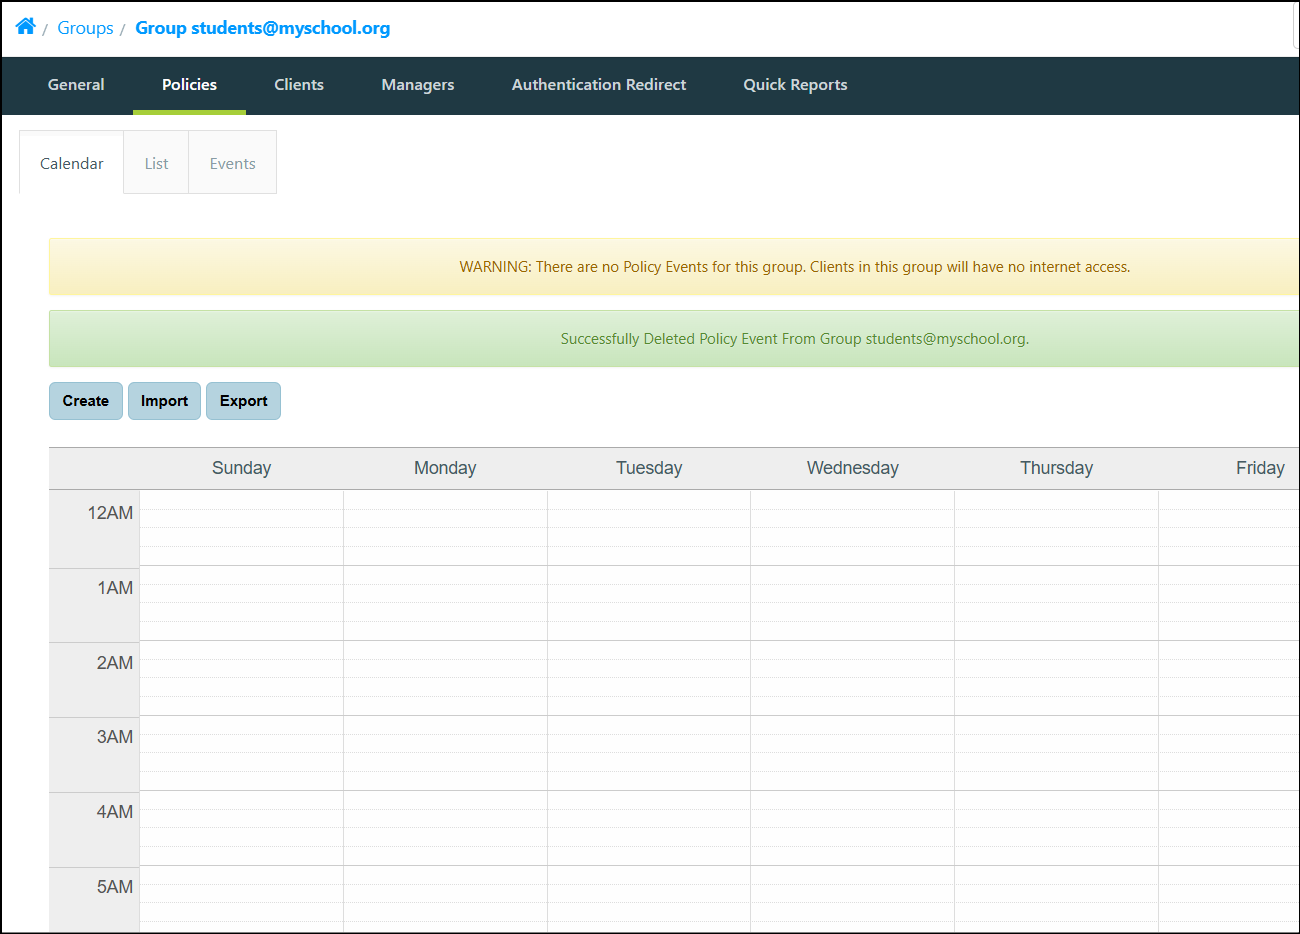
Create the School Hours Policy Event
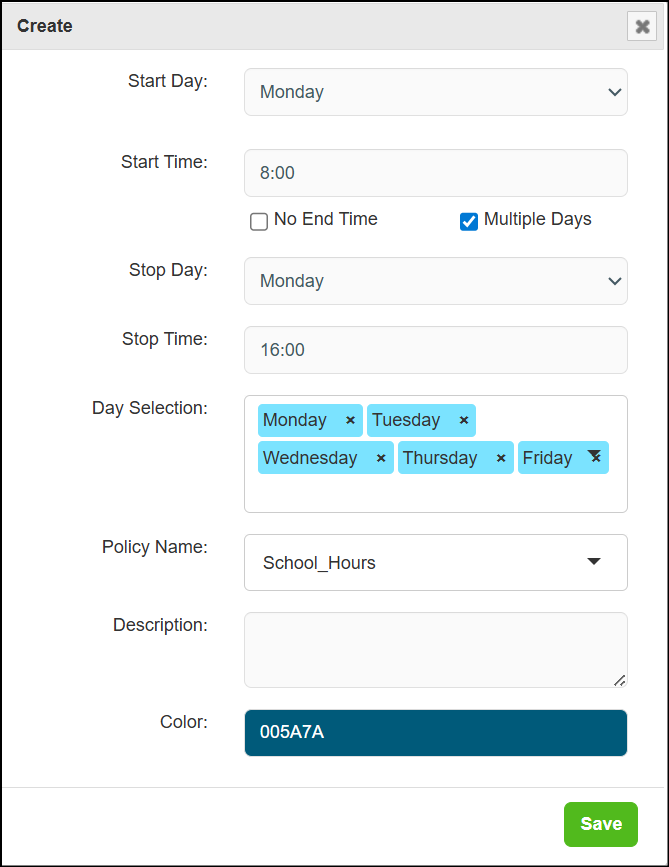
Select the Create button or click anywhere on the calendar. The ‘Create’ window displays. We want to add a ‘School Hours’ Policy Event attached to the ‘School Hours’ Policy. This will be applied from 8:00 am to 4:00 pm from Monday to Friday.
Set both the Start Day and Stop Day fields to Monday. The Start Time is 8:00 and the Stop Time is 16:00.
Select the ‘Multiple Days’ checkbox and choose Monday to Friday.
Set the Policy Name to School_Hours. Give your Policy Event a custom color (the example uses #005A7A).
 .
.
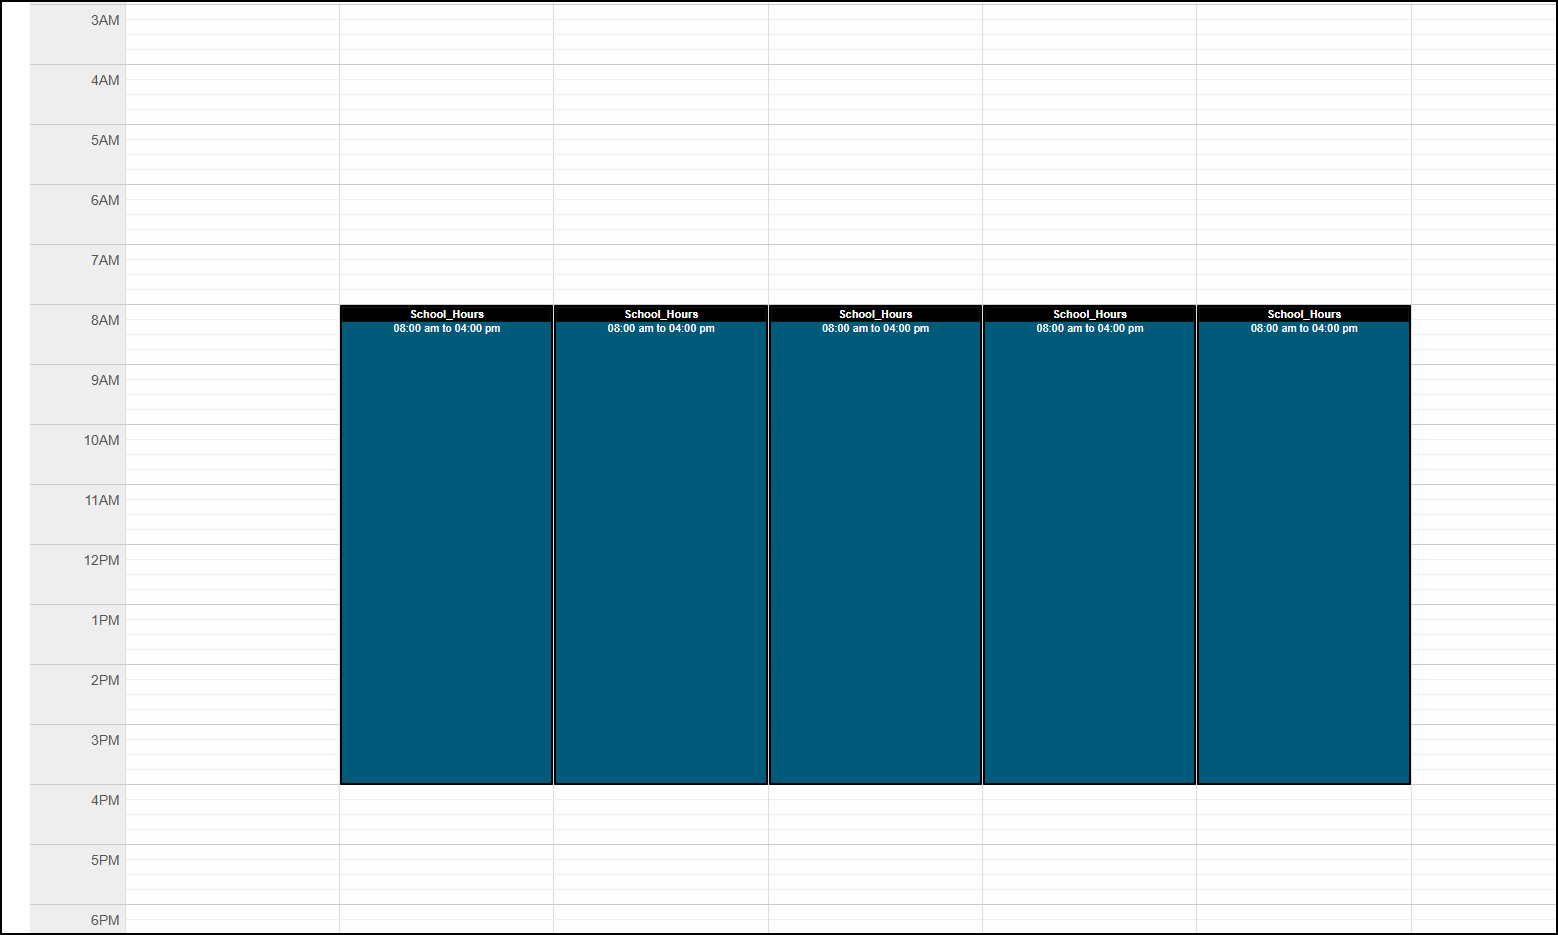
When we choose Save, the Policy Events display in the Policy Calendar. Please note that you can drag the title bar of the Policy Event to move it.
Adding a Lunch Time Policy Event
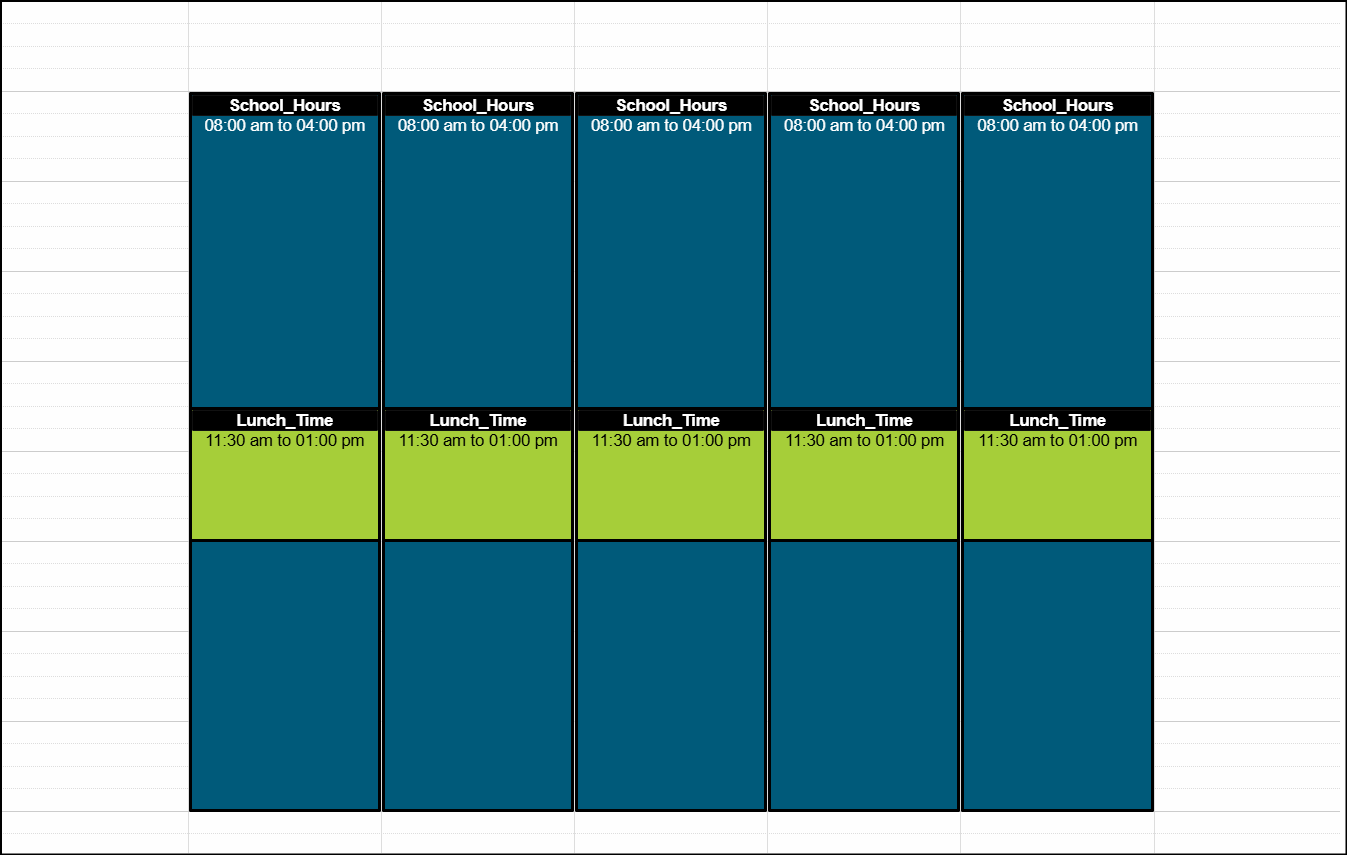
We now want to add a lunch hour Policy Event with different filtering. This Policy Event is like the ‘School Hours’ Policy Event but we will overlay this on the ‘School Hours’ Policy Event. Enter the options as shown here and click Save.
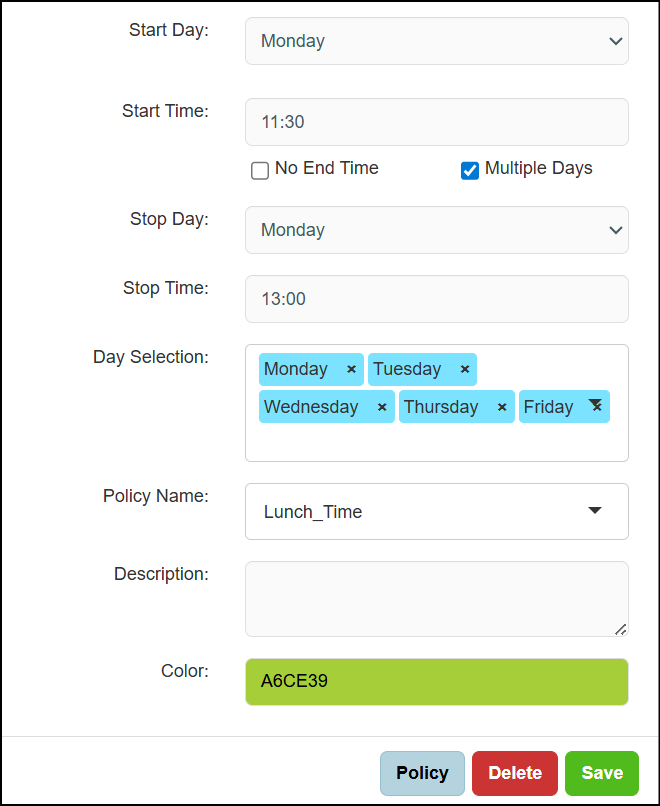
The Lunch Hour Policy Event displays.
Creating a Weekend Time Event
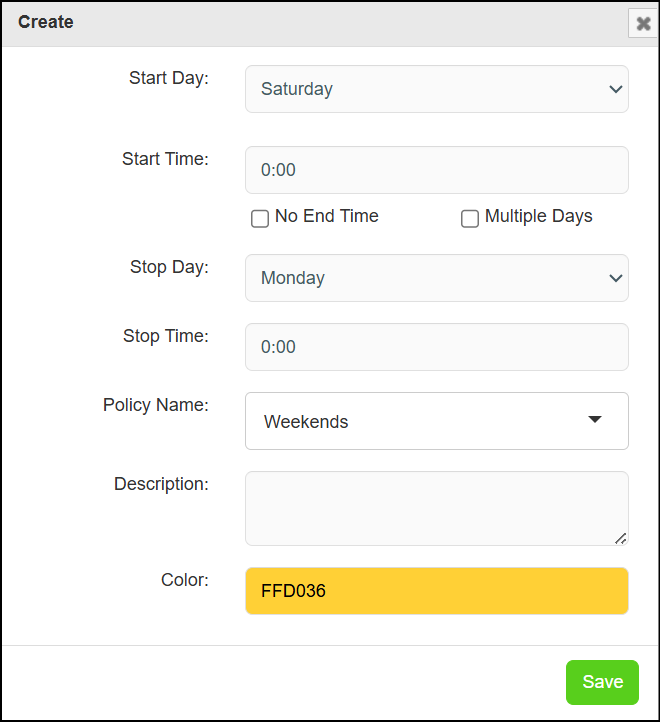
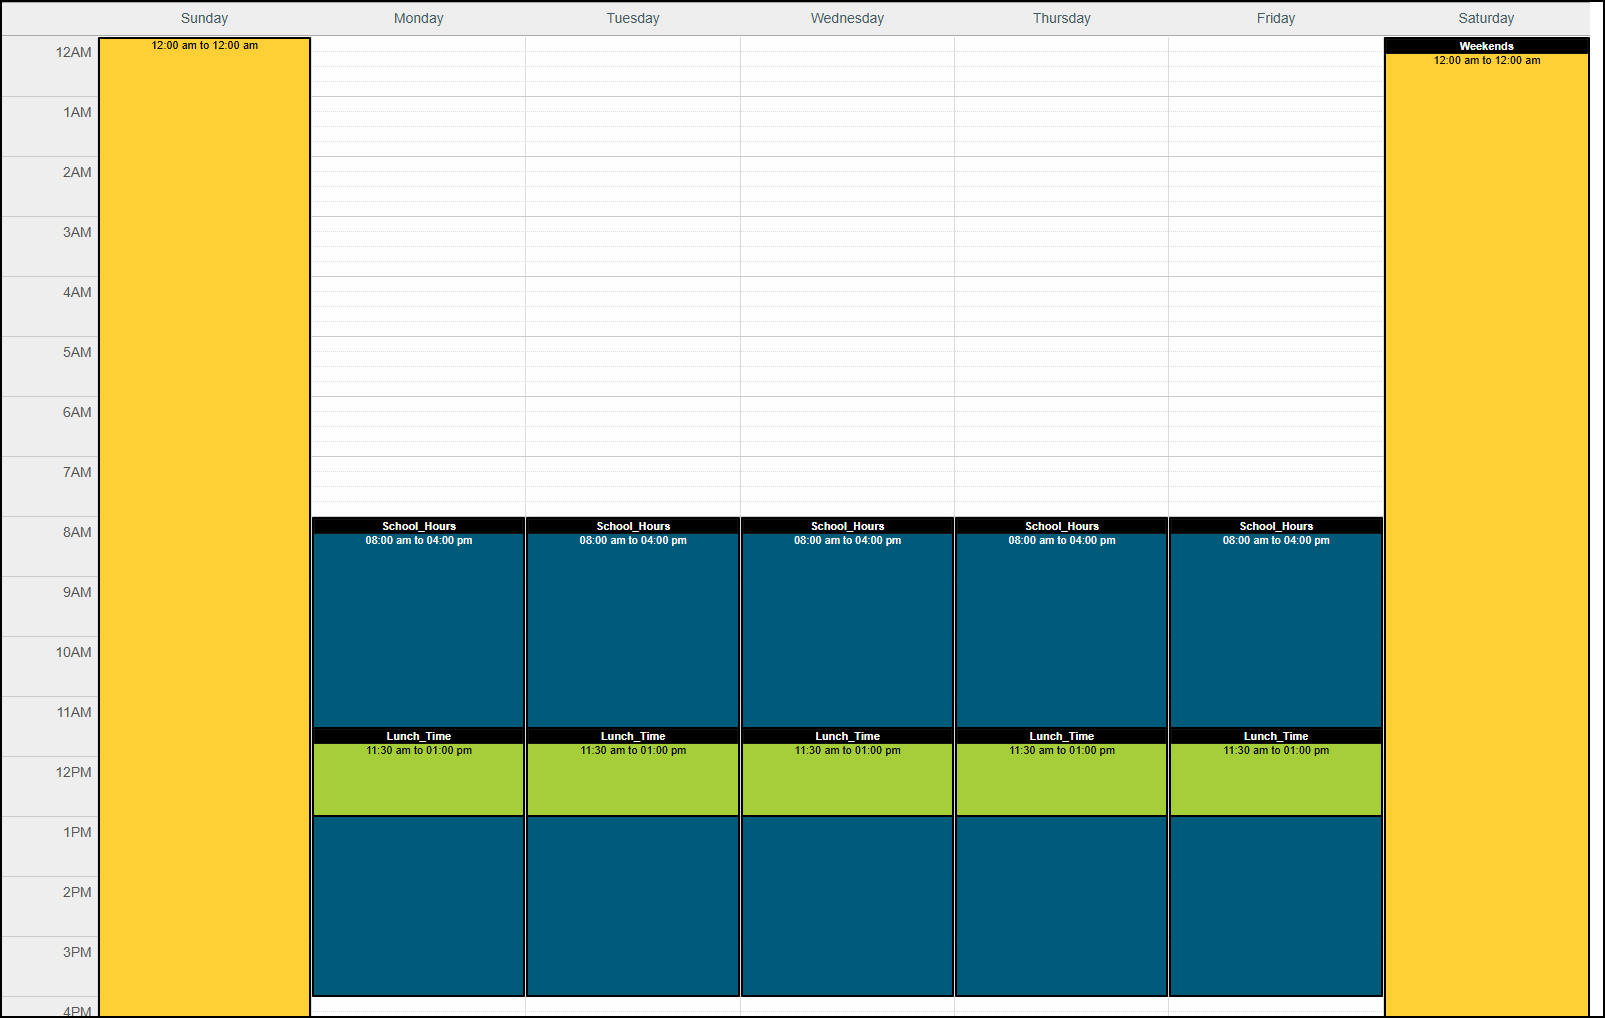
We now want to add a ‘Weekend’ Policy Event and Policy. This will span over multiple days with no time duration specified. We choose the ‘Start Day’ of Saturday with a ‘Start Time’ of 0:00 and our ‘Stop Day’ will be Monday with a ‘Stop Time’ of 0:00. This is the end of Sunday night. We will create a ‘Weekend_Policy’ and apply a color. Click Save.
The Weekend Policy Event displays.
Warning Message for Empty Sections
If there are sections of the Policy Calendar that are not covered by a Policy Event, a warning message displays.
Creating an After School Time Event
We will now create an ‘After School’ Policy Event and Policy. This Policy Event and Policy will act as the default Policy for this Group and it will use ‘No End Time’ and not ‘Multiple Days’. Here is a brief description of these two options.
-
No End Time: This option will disable ‘Multiple Days’. If this is enabled, no end time will be used for the selected Policy Event.
-
Multiple Days: This option is disabled if ‘No End Time’ is enabled. Use this option if you wish your Policy Event’s duration to be replicated across multiple days. If this option is selected, a ‘Day Selection’ field dropdown menu displays where you can click to add additional days.
Choose Monday as the ‘Start Day’ and enter a ‘Start Time’ of 0:00. Select ‘No End Time’ and create the new ‘After School’ Policy. Apply a color and choose Save.
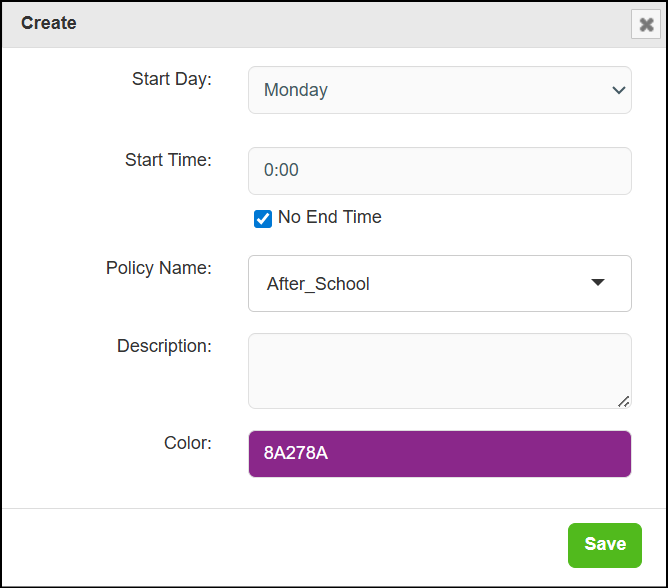
The ‘After School’ Policy Event displays. Please note that because this Policy Event has ‘No End Time’, if other existing Policy Events are deleted, this Policy Event will display in its place.
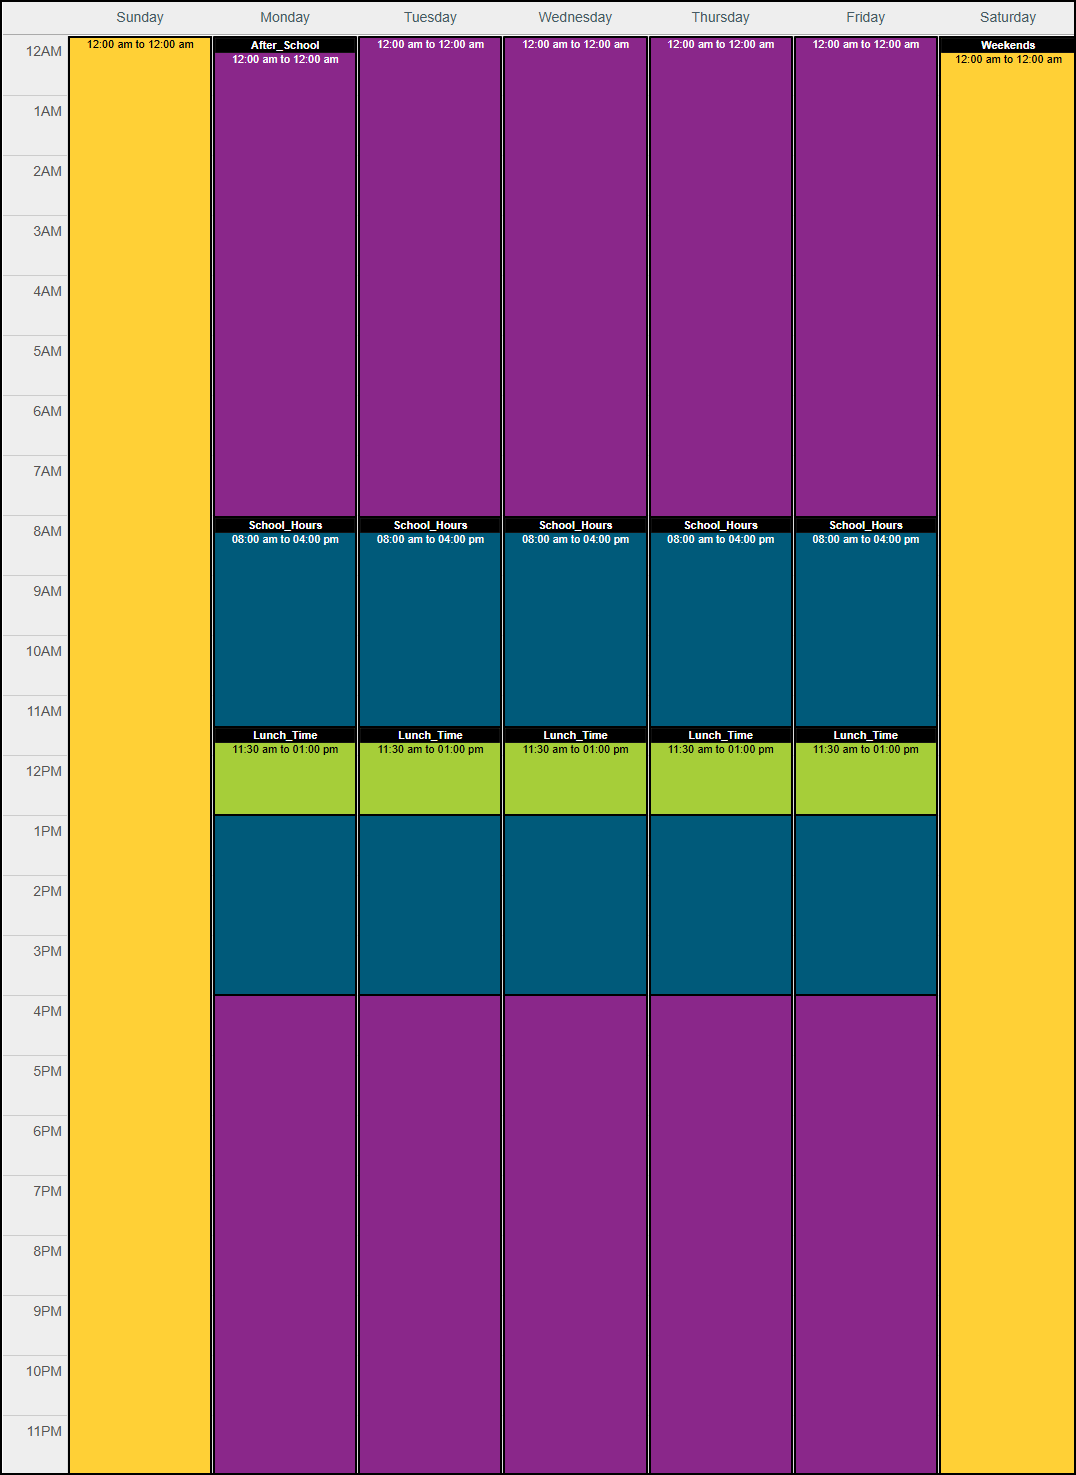
Applying the Category Templates to the Policy Events
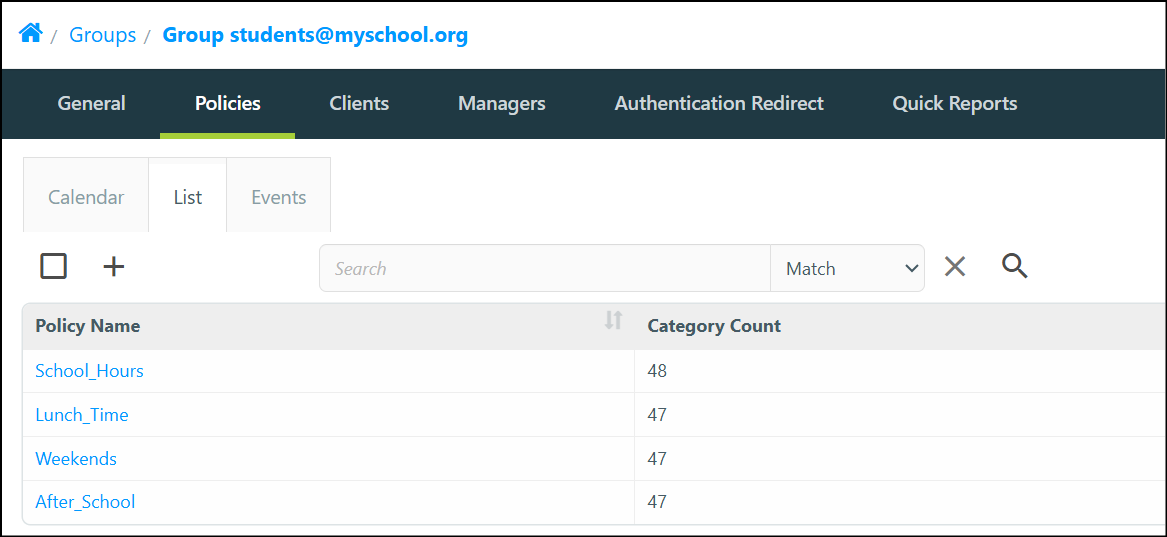
The final step is to apply our Category Templates to our Policy Events. Simply navigate to the List subsection of the Policies tab.
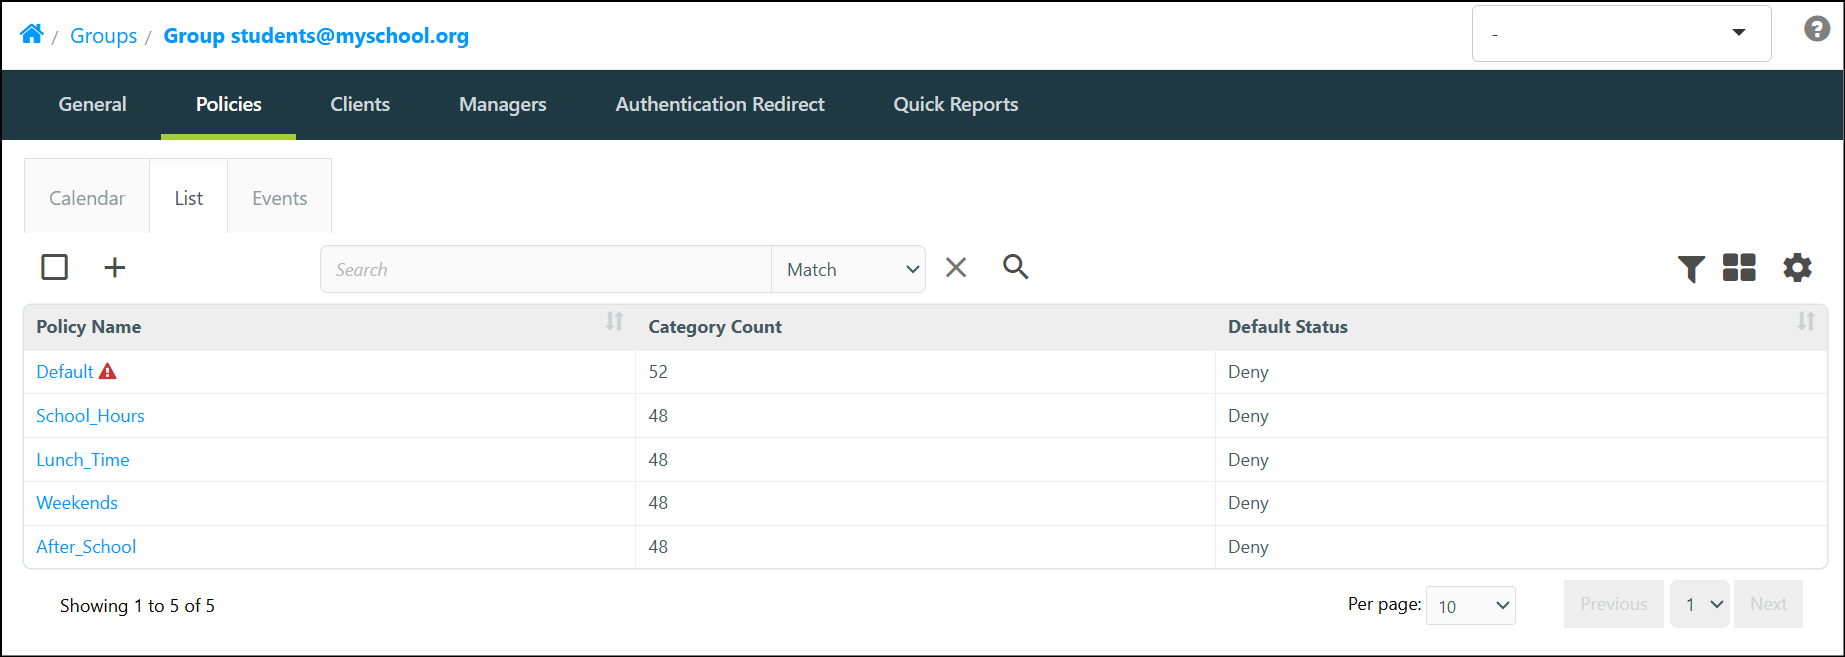
Delete the 'default' Event, which is no longer used. Select the School_Hours Policy and navigate to its Categories tab. Choose the School Hours Category Template and select Submit.
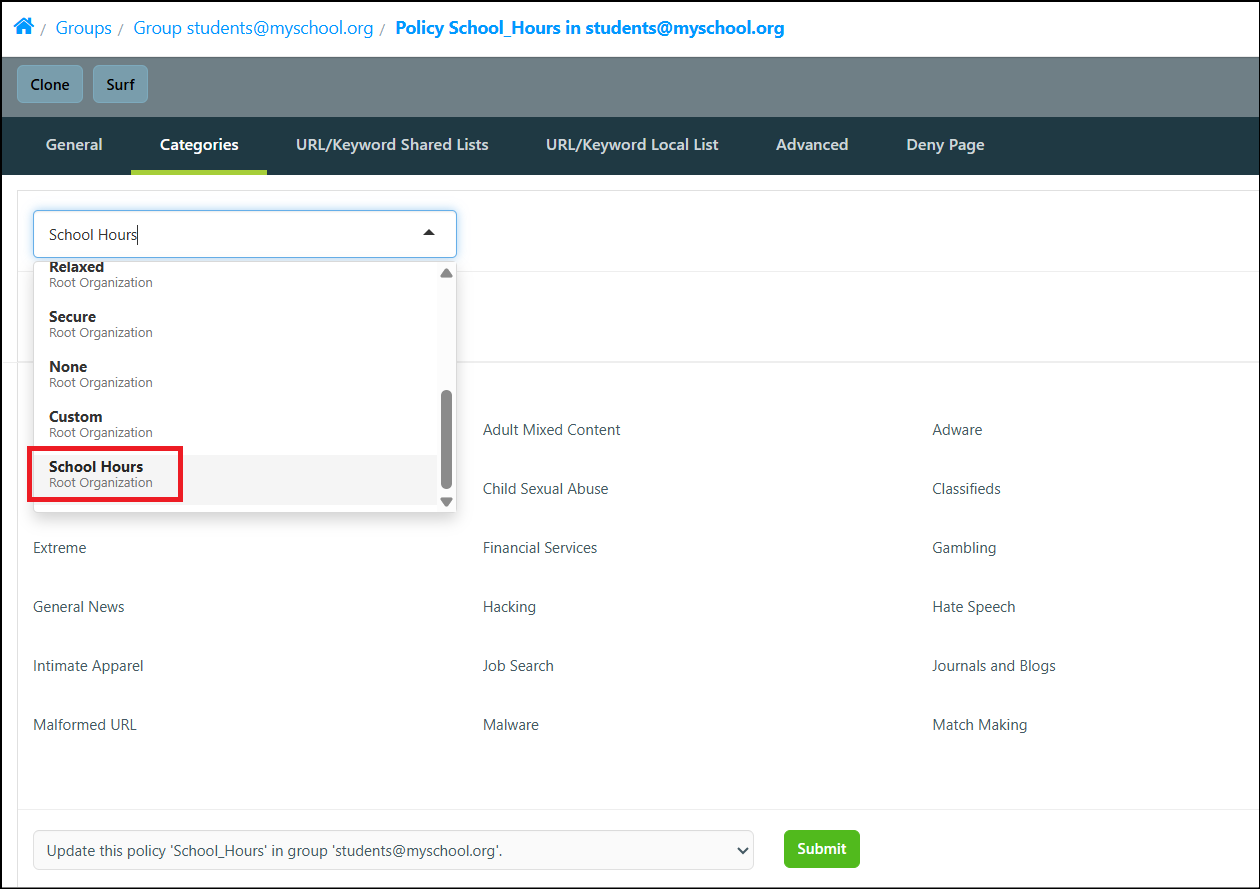
Use your breadcrumbs to return to the Group. Repeat these steps for the Lunchtime, After_School, and Weekends Policies.