Installing Netsweeper in a Single-Server Environment
About Netsweeper in a Single Server Environment
Overview of the Installation Process
Prepare Your System for Netsweeper
Inbound Firewall Ports to Open
Outbound Firewall Ports to Open
Install the Netsweeper ISO from a CD/DVD
Install the Netsweeper ISO from a USB Key
Configuring System and Network Settings
Log in and Change your Console Password
Setting the External URL of the WebAdmin Server
System Backups in the WebAdmin
Traffic Interception with Capture Modules
Adding Workstations and Confirming Filtering
Complete These Tasks before Continuing:
Confirming List Downloads and Updates
Confirming Filtering by Using ‘Monitoring, System Status’
Common Deny Problems and Possible Solutions
Appendix: Installation/Configuration Checklist
Appendix: Installation/Configuration Checklist
About Netsweeper in a Single Server Environment
This document provides an overview of how to install the Netsweeper ISO and configure it for a single-server setup using mostly default settings. The Netsweeper product is very versatile, and you can configure it in many ways for networks that range from very simple to very complex. One document cannot describe all the configuration, implementation, and deployment options.
This document provides an overview of how to install the ISO and configure a simple Ethernet bridge on a two NIC-server or a simple one-NIC server that uses Client Filters. Please refer to our other documentation for more complex installations, including multiple-server setups.
Generally, specific deployments only change details of network and Capture Module configurations.
Overview of the Installation Process
Below is a list of the steps in the Netsweeper installation and configuration process:
-
Prepare your system for Netsweeper.
-
Install the Netsweeper ISO.
-
Perform first-time system/network configuration.
-
Configure the WebAdmin.
During this configuration, please make use of the Installation/Configuration checklist provided in the Appendix.
Prepare Your System for Netsweeper
Minimum Server Requirements
Depending on how you deploy Netsweeper, your hardware requirements may vary greatly. Different functionality and configuration requirements may dictate very different server specifications.
For example, a machine filtering a 6.8 Gigabits-per-second network will require more CPU cores and memory than a machine filtering a 600 Megabits-per-second network. In both cases, you will require a specific deployment configuration, along with proper product scaling.
The Netsweeper software can run on a machine with lower CPU and less memory; however, the following requirements are the recommended minimum for out-of-the-box server operation.
| Item | Recommended |
|---|---|
|
Processor speed |
2 GHz |
|
Memory |
4 GB to 16 GB or higher |
|
Network interface |
1 or more |
|
Storage |
60 GB |
Preparing Your Firewall
You must open both inbound and outbound firewall ports for proper Netsweeper operation. Please refer to the following two tables for the commonly used ports. See your firewall documentation for specific information about how to open these ports.
These lists do NOT include ports that Netsweeper may require for integration with 3rd party applications or installation of multi-server setups.
For more information on Inbound and Outbound ports, please see the Ops and Admin Appendix document ‘Inbound and Outbound Ports’.
Inbound Firewall Ports to Open
| Ports | Description |
|---|---|
|
80 and 8080 – WebAdmin and Profile Manager (optional) |
Netsweeper uses these two ports for WebAdmin access. If you are using the Client Filter, you will also use these ports to access the Profile Manager. However, you can firewall these ports if you are only accessing the WebAdmin interface internally. All filtered customers must be able to load the deny page on these ports. Deny pages are also loaded from the WebAdmin. It is very important that ports 80 and 8080 are accessible to all filtered workstations. |
|
3431 and 3432 – Client Filter |
If you are using the Client Filter with roaming users, you will need to open both ports. The Client Filter uses port 3431 for Windows Username filtering (RUS Mode), while the Profile Manager uses port 3432 for Client Filter management. |
|
60104 – Secure Shell |
Open this port if you want remote support from Netsweeper. We use this port for SSH support instead of the usual port 22. |
Outbound Firewall Ports to Open
| Ports | Description |
|---|---|
|
25,
possibly others |
You can configure Netsweeper to send emails from the WebAdmin and/or the Reporter server. For email sending, the Netsweeper server must have access to the mail server as configured in the product. Generally, TCP port 25 is used for sending email via SMTP. Open this port only to the mail server. If you did not configure a mail server, you must open the SMTP outgoing port to all remote systems. |
|
53 (DNS) |
You must open the DNS port to allow the Netsweeper to resolve domain names. |
|
80 and 443 – update.netsweeper.com |
Your Netsweeper server will use ports 80 and 443 to accessupdate.netsweeper.comto download updates to the product, categorization templates, lists, and other functions. NoteThe IP address of this update server may change at any time. Depending on your security policy, please implement proper firewall rules. |
|
3436 – cns.netsweeper.com |
Your Netsweeper server will use port 3436 to communicate in real time with the Categorization Name Service, an array of CNS servers that resolve from cns.netsweeper.com and related servers, depending on geographical location. |
Installing Netsweeper
Installing the Netsweeper ISO will format your disks with the Netsweeper Operating System. Everything will be erased! There will be no prompting, and the OS will use the entire disk.
Install the Netsweeper ISO from a CD/DVD
-
Boot the server from the Netsweeper ISO disk. You may need to change the boot order in the server’s BIOS or press a certain key to select the boot device.
-
Press Enter to run the installer.
-
You may be asked to select the time zone for your region during installation. Follow the instructions on your monitor to continue with the install process.
-
Wait while the installation finishes. Installation may take an hour or longer to complete, depending on the size of the hard disk and other server specifications.
-
When the installation finishes, your server may automatically eject the CD and reboot. If this does not occur or if another screen appears, eject the CD manually and reboot the server.
-
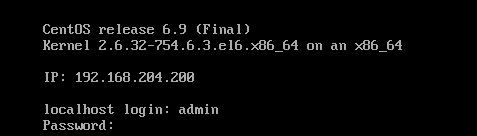
After the server has rebooted, you will see a login screen with the system’s IP address.
Install the Netsweeper ISO from a USB Key
Download a utility to write the ISO to the USB key. Some examples include:
Universal
USB Installer:
http://www.pendrivelinux.com/universal-usb-installer-easy-as-1-2-3
UNetbootin:
http://unetbootin.github.io/
Rufus:
https://rufus.akeo.ie/
Rawrite32:
http://www.netbsd.org/~martin/rawrite32/
-
Open the utility and write the Netsweeper iso file to a USB key. Make sure you mark it bootable.
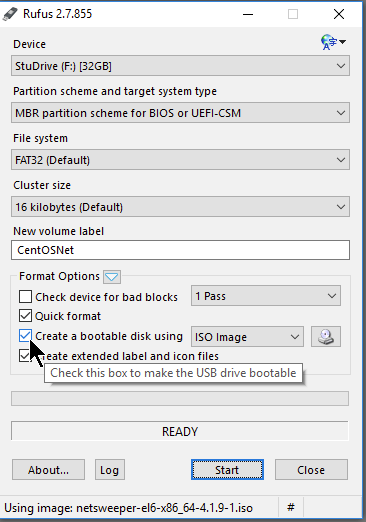
-
Install Netsweeper from Netsweeper USB installation key
-
Insert the USB key into the physical machine and restart the machine.
-
Configure BIOS setting to boot from USB device. See your BIOS documentation.
-
In the console, type: usb
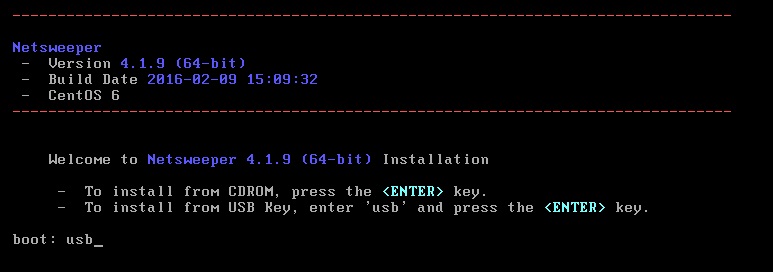
-
Press Enter to run the installer.
-
Select Hard Drive and press OK.
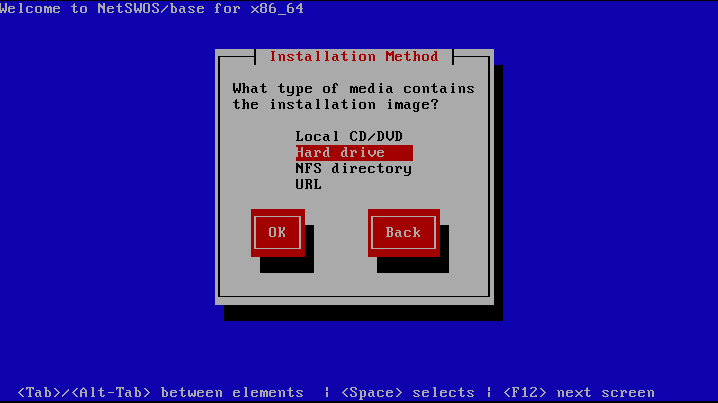
-
When prompted to select a partition, select the partition that corresponds to your install USB. In this example, it is /dev/sda1. When done, press OK.
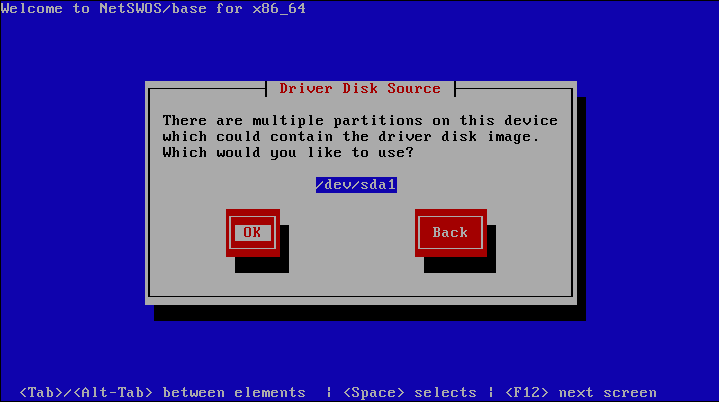
-
Select the time zone for your region.
-
Follow the instructions on your monitor to continue with the install process.
-
Wait while the installation finishes.
-
When the installation finishes, it will automatically reboot the server.
-
After the server has rebooted, remove the USB device attached.
-
You will see a login screen with the system’s IP address.
Configuring System and Network Settings
Netsweeper Out-of-the-Box System Username and Password for both the WebAdmin and the Policy Server
Username: admin
Password: netsweeper
By default, Netsweeper uses DHCP to lease an IP address from your local DHCP server. Your IP address will be displayed as part of the console welcome message when you power on the system.
Log in and Change your Console Password
For security purposes we recommend you change your default password for the admin user.
OS Level Complex Passwords
On EL 8 installs, Admins are forced to change their OS Level password. The complex password must expire in 90 days and the admin cannot change it again within 7 days.
-
New password must be at least 14 characters long
-
New password must contain at least one character of all 4 types: lowercase letters, uppercase letters, numbers, and symbols
-
New password must not have 3 or more repeated or consecutive characters
-
New password cannot be the same as the previous 5 password
1.Type admin in the Login field and netsweeper in the Password field. Press Enter. See OS Level Passwords above.
2.Type passwd and follow the prompts to change the password for the admin user. See OS Level Passwords above.
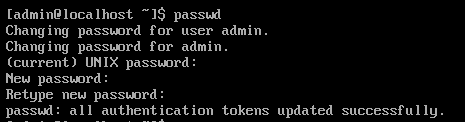
Netsweeper recommends using sudo to elevate to root permissions. By default, the admin user is added to the sudoers file with full access.
Network Configuration
Network interface configuration files can be found in /etc/sysconfig/network-scripts/ifcfg-<interface name>. Edit this file using your favourite text editor (e.g. nano or vim). Below is an example of a management interface with a static IP configuration.
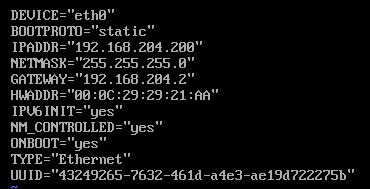
Netsweeper is built on top of CentOS, which is a derivation of Red Hat Enterprise Linux. For more information on configuring your Network please see Chapter Network Interfaces of the Red Hat Deployment Guide.
DNS Settings
With the default DHCP Network Configuration the DNS server will be set automatically to the DNS specified by your DHCP Server.
To manually configure the Netsweeper Server DNS for a static IP configuration edit the /etc/resolv.conf and update the nameserver directive.

Host Settings
For the Netsweeper product to work, you MUST configure a Fully Qualified Domain Name (FQDN) of the host, and it should resolve properly -- via both forward and reverse DNS -- to the specified DNS server.
If you either do not control your DNS or cannot verify this functionality, you must properly configure the Deny Page Host setting later in your Policy Server Settings, otherwise deny pages will not properly display to your filtered users. Similarly, you must also configure your mail server in Administration > Configuration and click on WebAdmin Settings and then on a mail server on your network that accepts mail from the Netsweeper server. Otherwise, customers may not receive email notifications and reports. Please see WebAdmin Configuration and Policy Service Configuration respectively.
To temporarily set your hostname for this session type:
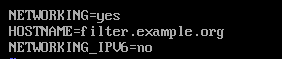
hostname filter.example.org
To set your hostname permanently after reboot, edit /etc/sysconfig/network and update the HOSTNAME line.
Bridge Settings
If your deployment requires a physical layer bridge for the user traffic, please refer to the Red Hat Deployment Guide Network Bridge Chapter to add a bridge device.
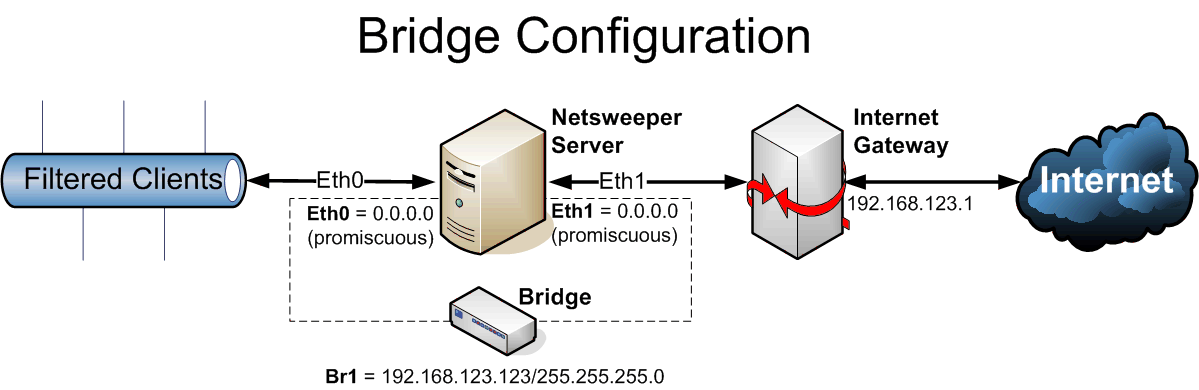
All your bridges should have static IP addresses. If you want a bridge with no IP address assigned, use 0.0.0.0 as the IP address and 255.255.255.0 as the network mask.
If you have only two network cards, you will need to provide the Netsweeper Bridge interface with an IP Address that your filtered workstations can access. This generally must be on the same network as the filtered workstations, unless routers or other devices exist between the filtered workstations and the Netsweeper Server.
Restart Network
After you complete the interface and bridge configuration, to finalize your network configuration you need to restart the network service.
el6 method:
service network restart
el8 Method:
systemctl reload NetworkManager
WebAdmin Configuration
You should now be able to access the WebAdmin through your browser to finish configuration.
If you added a DNS alias to access your server, you may see a deny page when you try to ac cess the Netsweeper via the alias name. This is because you need to configure the Filter Bypass List to always allow access to the DNS alias as mentioned in Filter Bypass List.
Logging on the WebAdmin
The master admin account or an Admin with enough permissions can access and change most WebAdmin system settings.
-
In your Browser type the <hostname/webadmin/> that you configured in the System Configuration steps earlier. e.g. filter.example.org/webadmin
-
The WebAdmin Login page appears.
-
Type admin as your Login name.
-
Type the password for the master admin in the Password box.
-
Click Login.
-
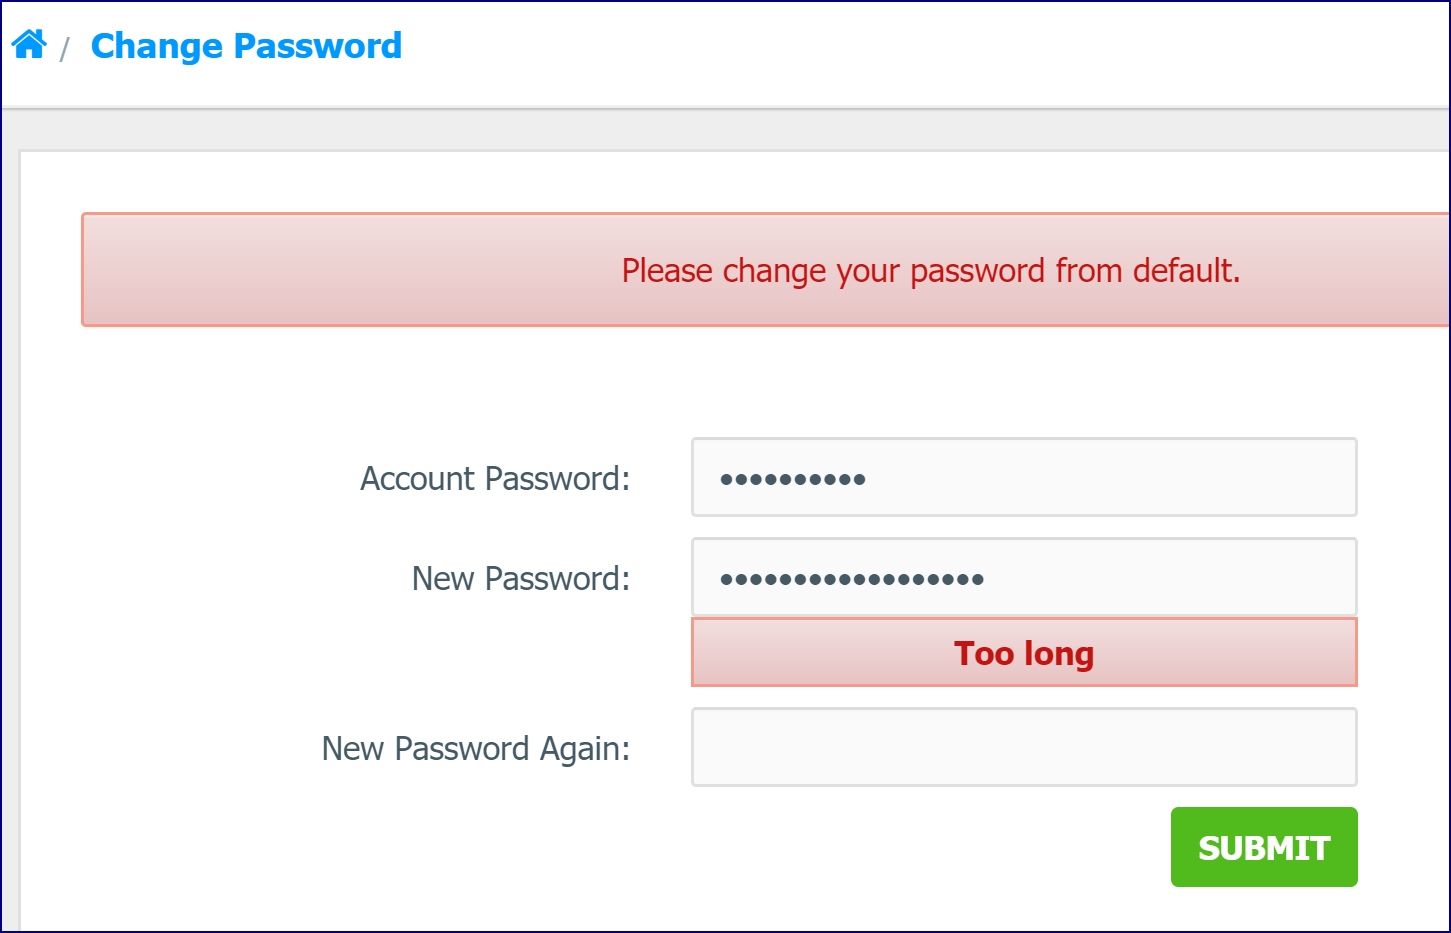
You will be prompted to update your WebAdmin admin account upon login. It is required that you update this in order to continue using the WebAdmin.
Filter Bypass List
The Filter Bypass List is critical. It contains the hostnames or IP addresses to which access is always allowed. The Netsweeper Policy server will automatically add the IP addresses of all interfaces into this list along with whatever is configured in the deny_page_http, deny_page_https, and webdb_host configurations in your Policy Service configuration file. If you have added other DNS aliases, external NAT IP addresses, or other addresses or hostnames used to access the system, you must add these to the Filter Bypass List, outlined in the table below.
A URL entry in the Filter Bypass List means the site or URL should never be blocked. The Filter Bypass List is a customer managed list that can be modified in the 'List' window. An entry in the Filter Bypass List is generally only recommended for Deny Page URLs, or internal system resources that should not be filtered like email servers or file servers.
1.In the WebAdmin, go to Policies > Lists and click on the Lists tab.
2.Select
Filter Bypass List from the ‘List Name’ column.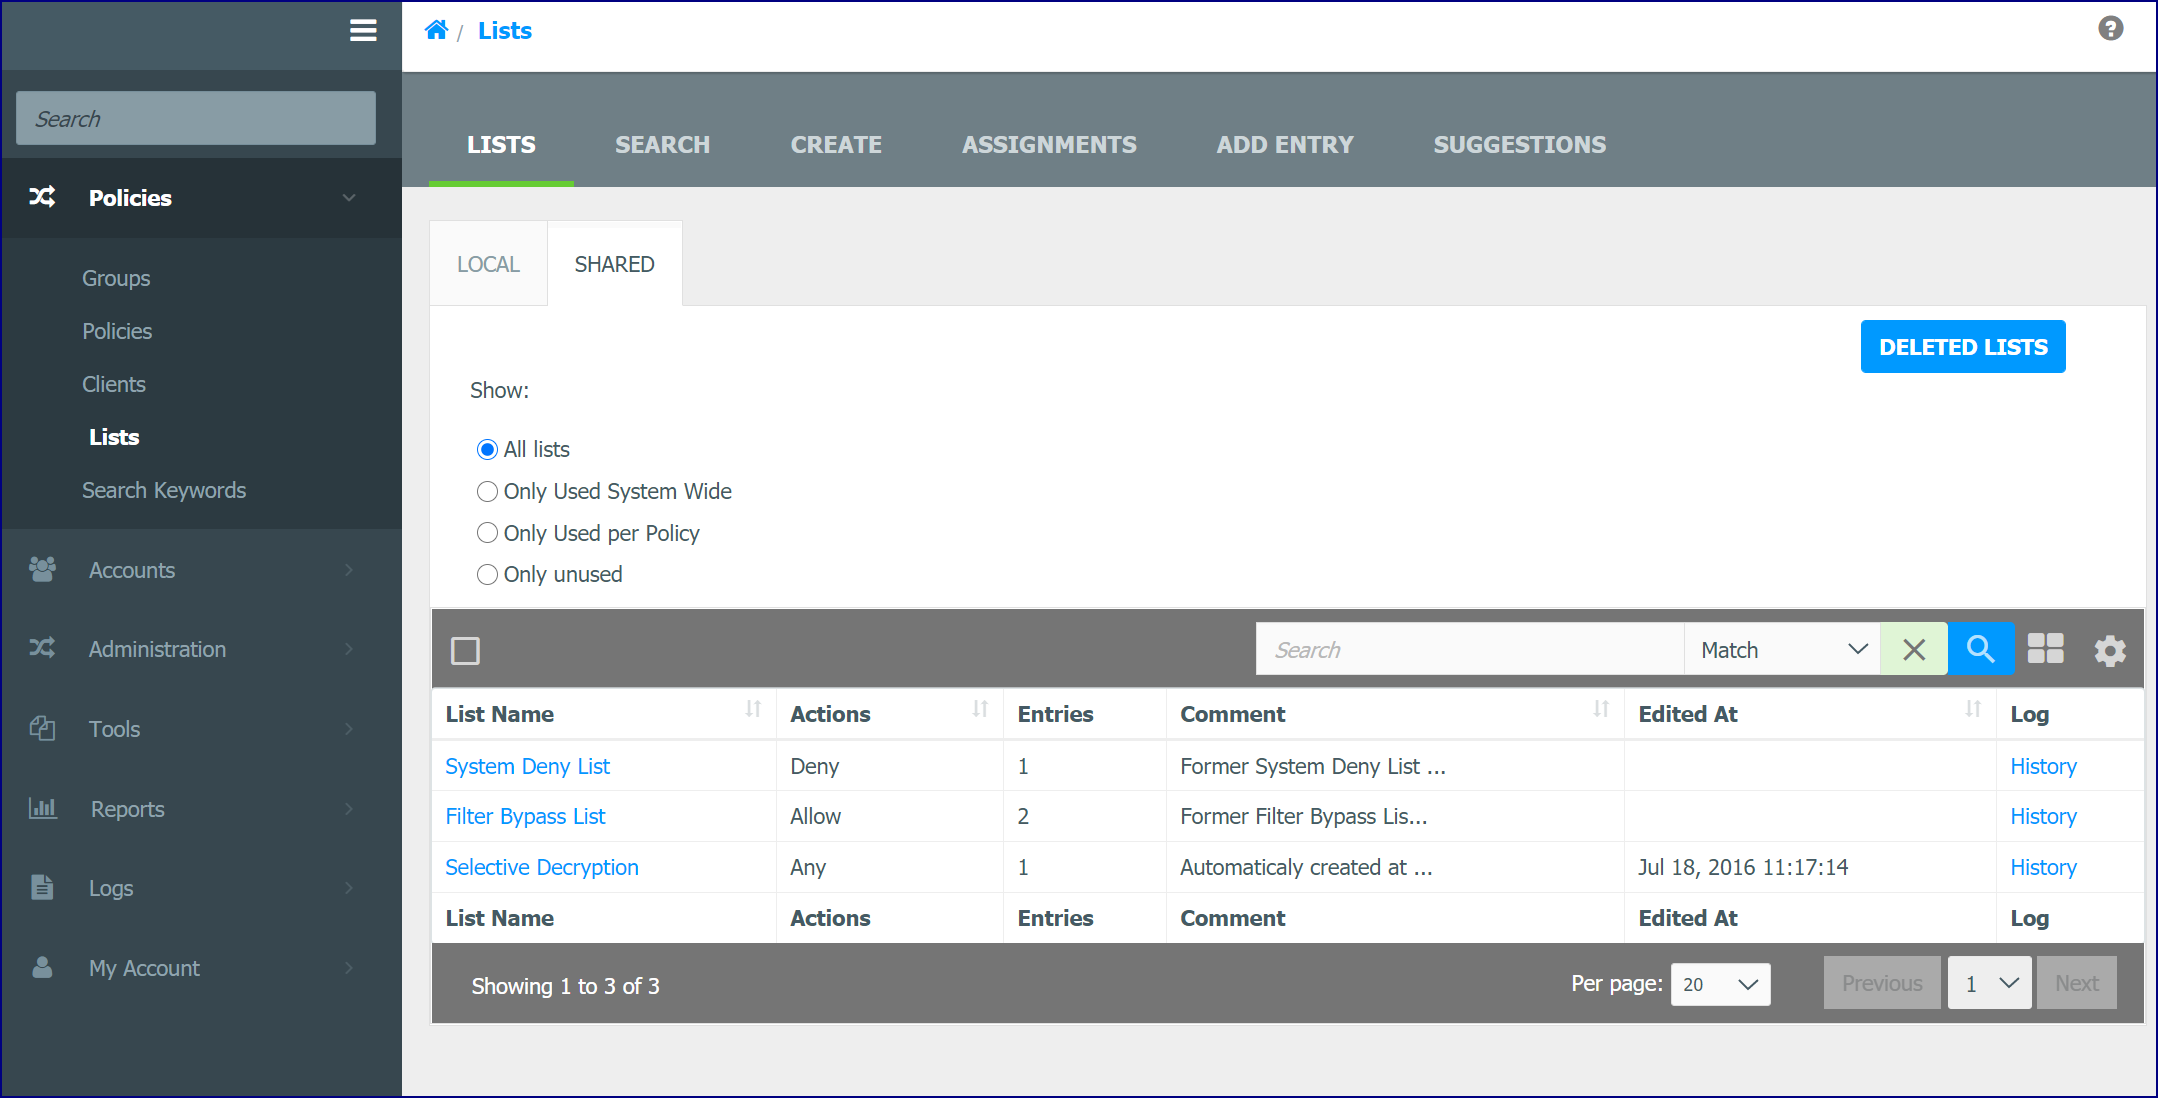
3.Click
the New Entry button to add any relevant Netsweeper system hostnames.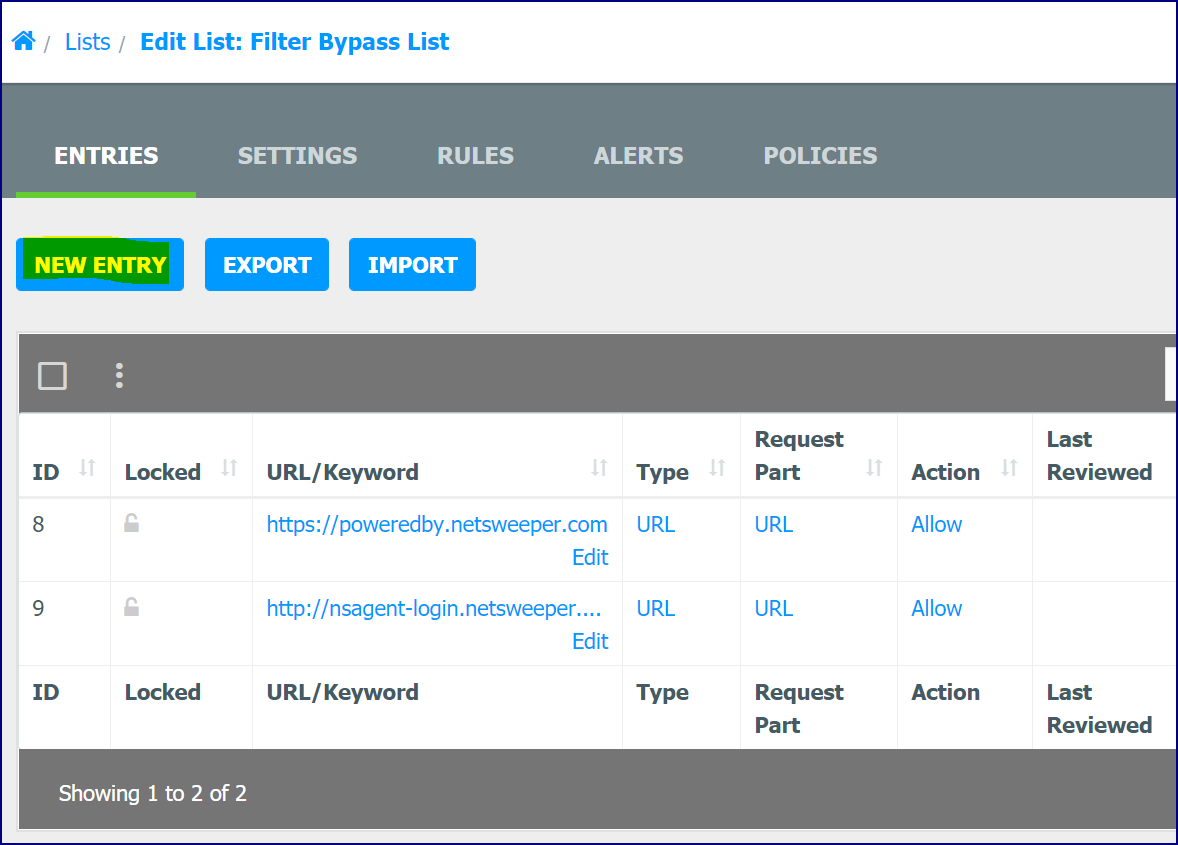
For example, if the IP address of your Netsweeper server is 192.168.123.123, your external IP address is 1.2.3.4, and you have the hostname filter.example.org, you may want to add the following to the Filter Bypass List:
| Entry | Description |
|---|---|
|
http://1.2.3.4https://1.2.3.4 |
The external IP Address is not automatically added to the Filter Bypass List. If you use this to load deny pages, or access the policy server from outside your network. These MUST be added. |
|
http://filter https://filter |
Depending on your customer’s machines, the domain suffix may allow customer to access the filter via just the hostname if the domain name of the server is also the SUFFIX on the filtered workstations. Therefore, type the hostname into the Filter Bypass List without the domain name SUFFIX. |
|
http://signin.example.orghttps://signin.example.org |
If you have any captive portals or other system setting between the Netsweeper Server and the Internet that the filtered workstations must always access, you must add their IP addresses to the Filter Bypass List. The Filter Bypass List is the only list that will always allow access to the URLs, regardless of policy server configuration. |
Date and Time Settings
If you did not select the correct time zone during installation of the ISO – or if the date set by the installation is not correct – you can change it in the WebAdmin.Go to Administration > Configuration and click on WebAdmin Settings.
In the General Settings section updating the Default WebAdmin TimeZone will change the time zone.
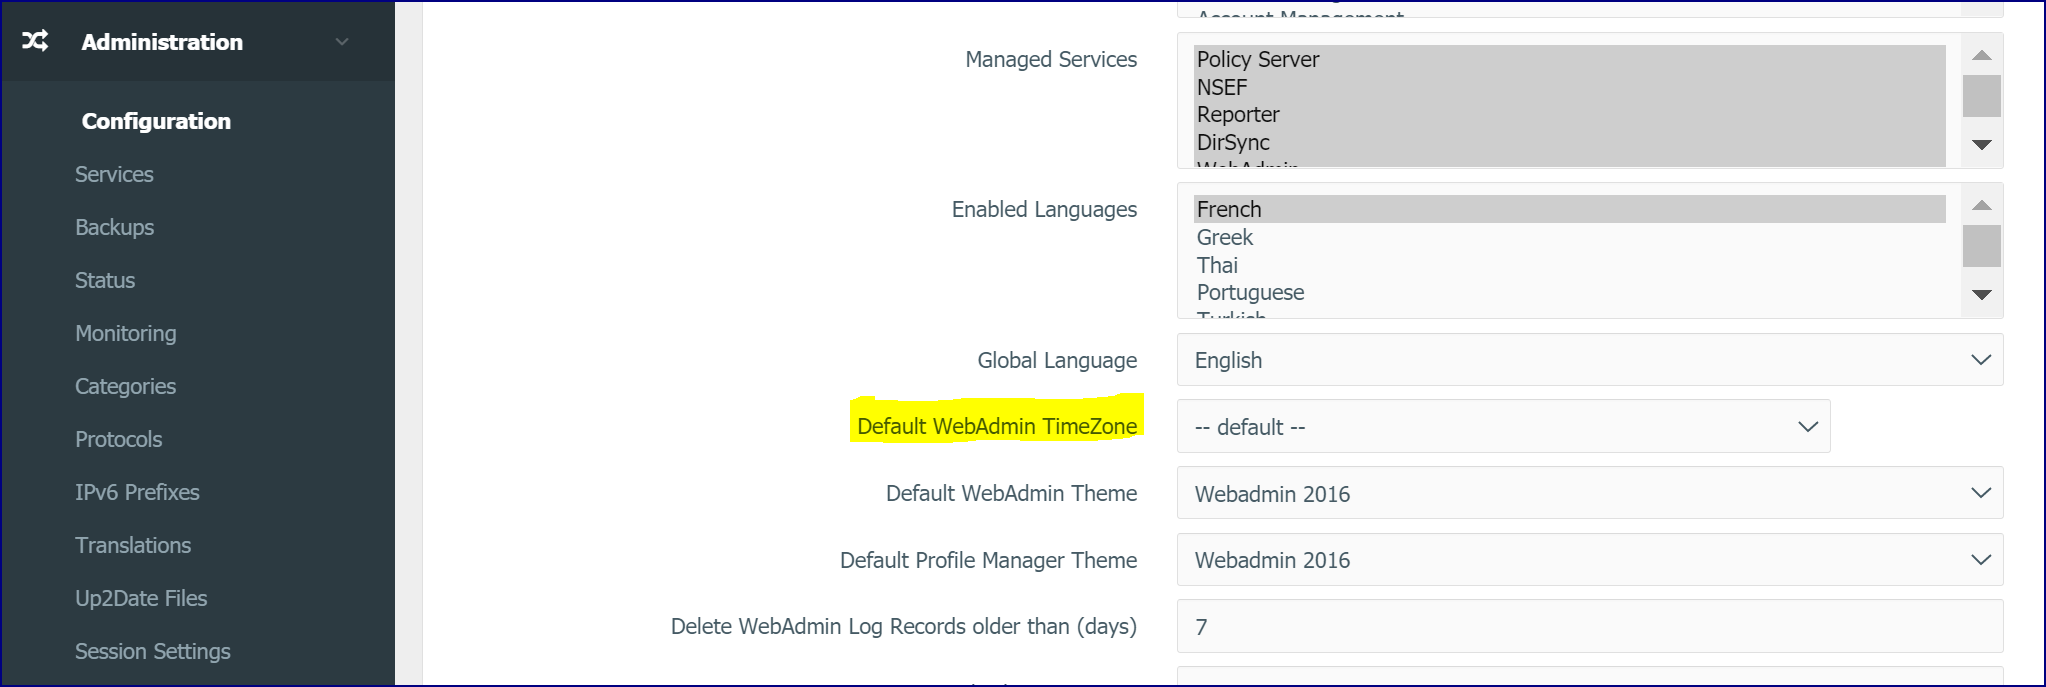
The time zone should be that of the filtered workstations and not of the physical server location. If your clients are using the server from many different time zones with the Client Filter, some using Greenwich Mean Time (GMT) or a time zone WITHOUT day light savings time, consider using this time offset in creating reports and time-dependent policies.
Mail Settings
Netsweeper sends emails for WebAdmin notifications and reports, so take care to provide the correct mail server information when configuring this. This can be configured in the WebAdmin.
Go to Administration > Configuration and click on WebAdmin Settings.
Scroll down to the 'Email Sending Setting's section.
If your email server requires authentication, you must fill out the Email Server, Email Server Login, and Email Server Password field, plus any other relevant settings required to authenticate against your server.
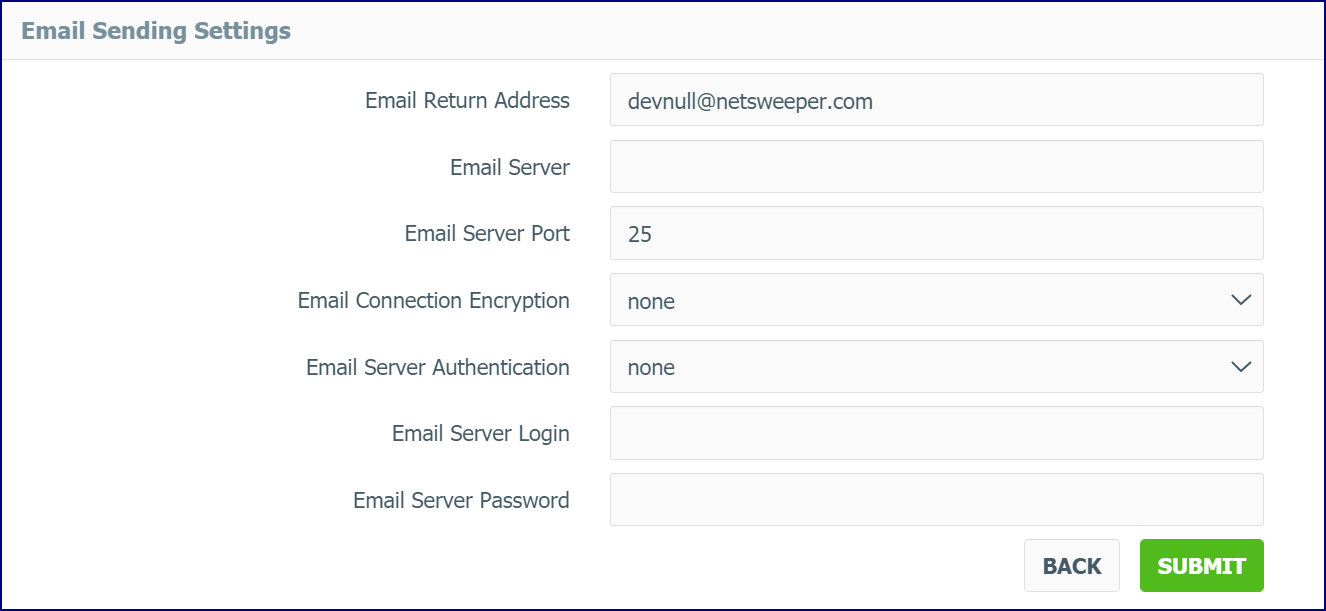
If you are not certain what to enter, you can temporarily type localhost as the email server. However, the email server will generally detect emails configured this way as spam if the email server lacks the appropriate DNS settings.
We do not recommend this type of setup except on a very temporary basis.
Setting the External URL of the WebAdmin Server
If your server is installed behind a firewall, integrates with a cache, or is a multiple server deployment, you must explicitly set the URL of the WebAdmin server to the external IP address or DNS name of the server that customers will use to adjust their filtering configurations and to load deny pages. Otherwise, your Deny Pages may not load images or other resources.
1.Go to Administration > Configuration and click on WebAdmin Settings.
2.Scroll
down to the General Settings section, and change the WebAdmin External
URL from Generated to the external IP address or DNS name of the
server. Use the format:
http://<IP or HOSTNAME>/webadmin//.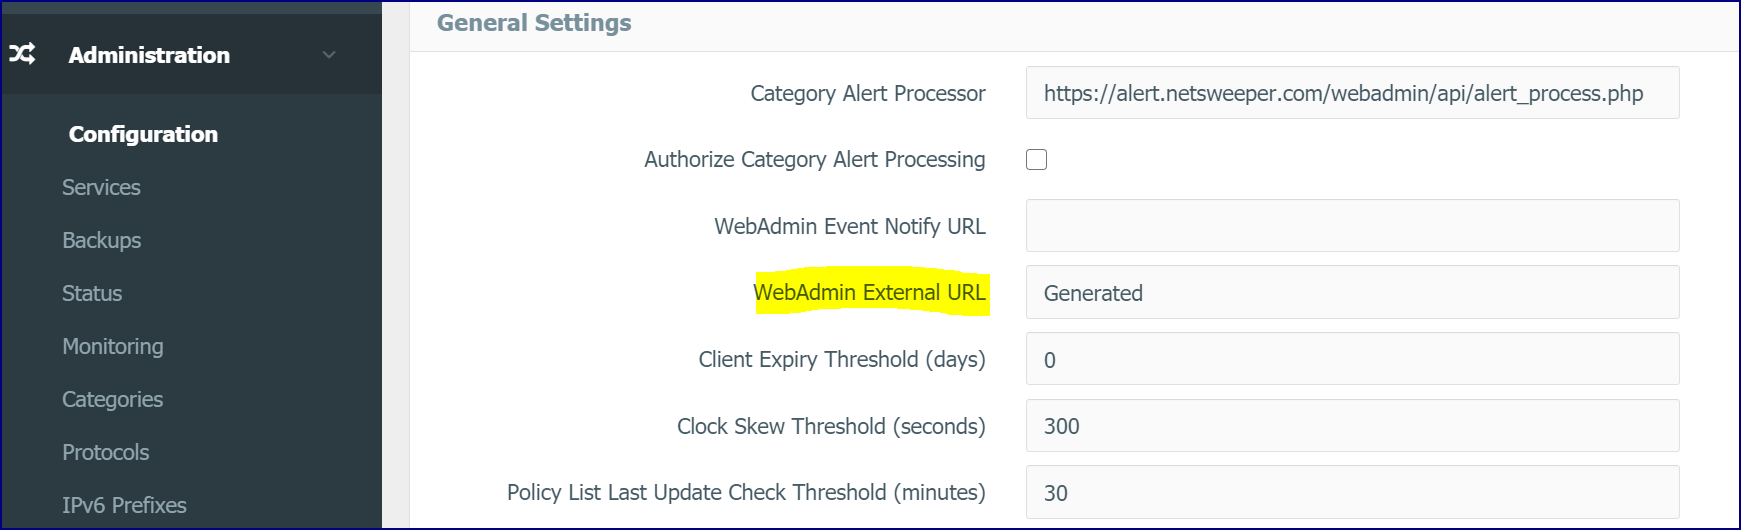
3.Click Submit at the end of the General Settings section to save this setting.
System Backups in the WebAdmin
Netsweeper generates backups every day, week, or month, depending on your selection. You can download these backups via the WebAdmin. >By default, the backups are performed at 3 a.m. local time at the interval you indicate on this page. The default on this page is Daily. You must manually copy the backup from your Policy Server to another location for more complete system security.
Log on to the WebAdmin, and then go to Administration > Backups.
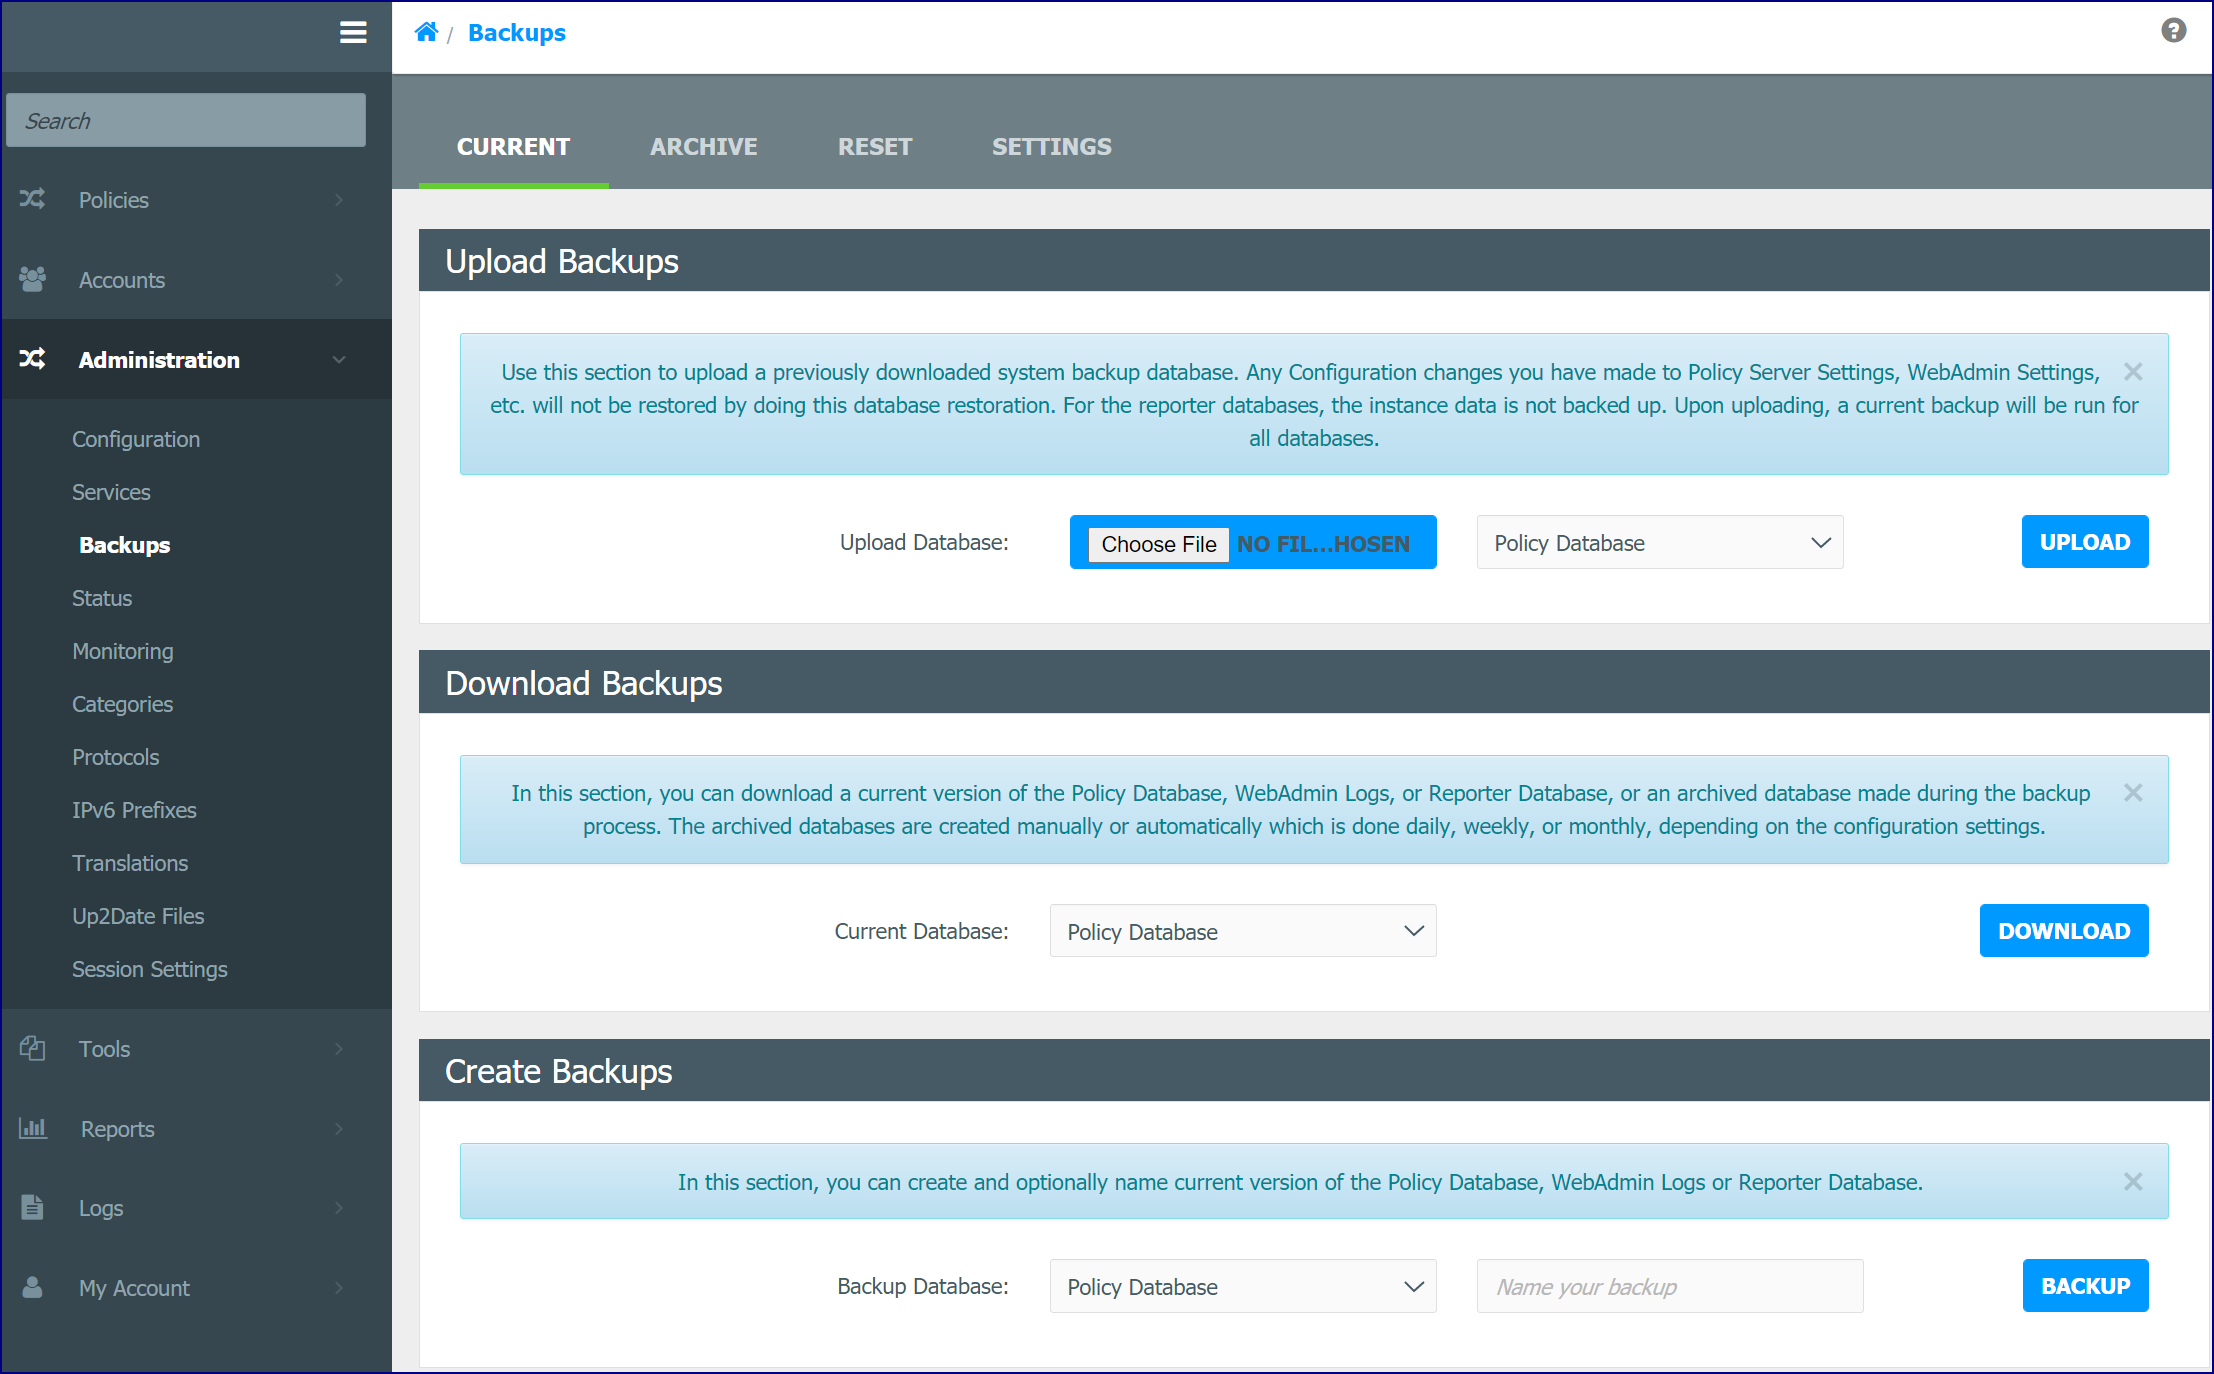
For system security, manually copy the backup from your WebAdmin to another location as often as your IT security policy requires. The backup configured in the WebAdmin only backs up the Netsweeper configuration database to the server itself.
Reporter Settings
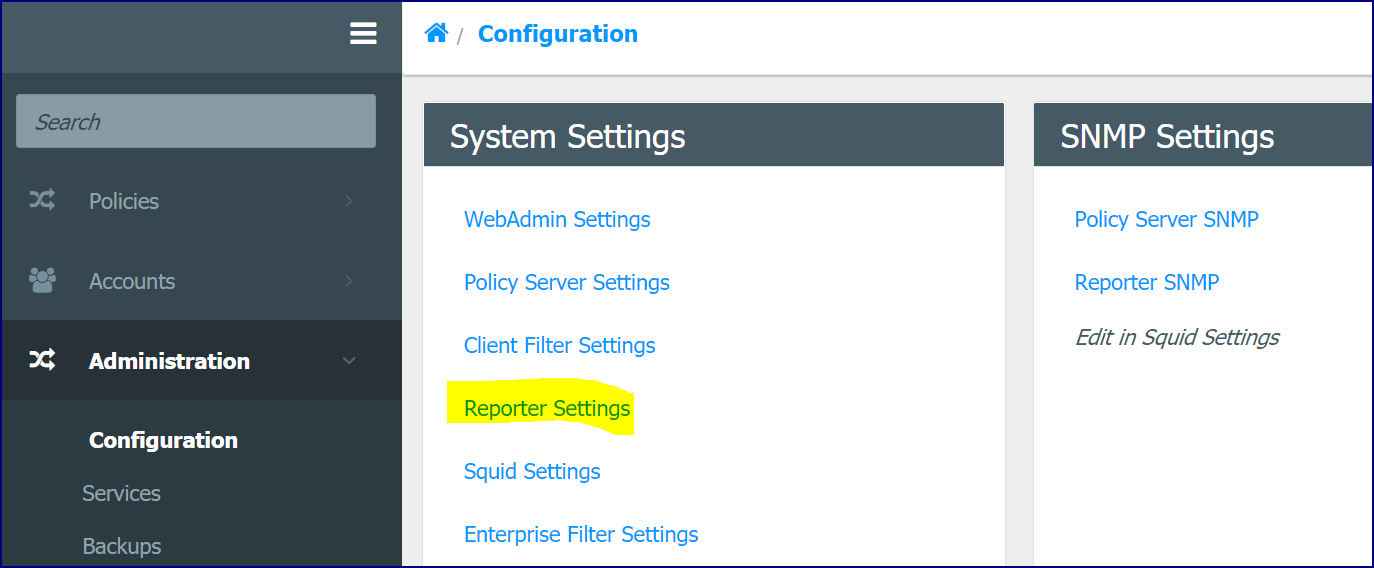
In a single-server setup of Netsweeper, the Reporter service will be on the same server as the Policy service you have already configured. If you have properly configured the DNS settings, the Reporter address should be the hostname of that server. To configure the Reporter, navigate to Administration > Configuration and click on Reporter Settings.
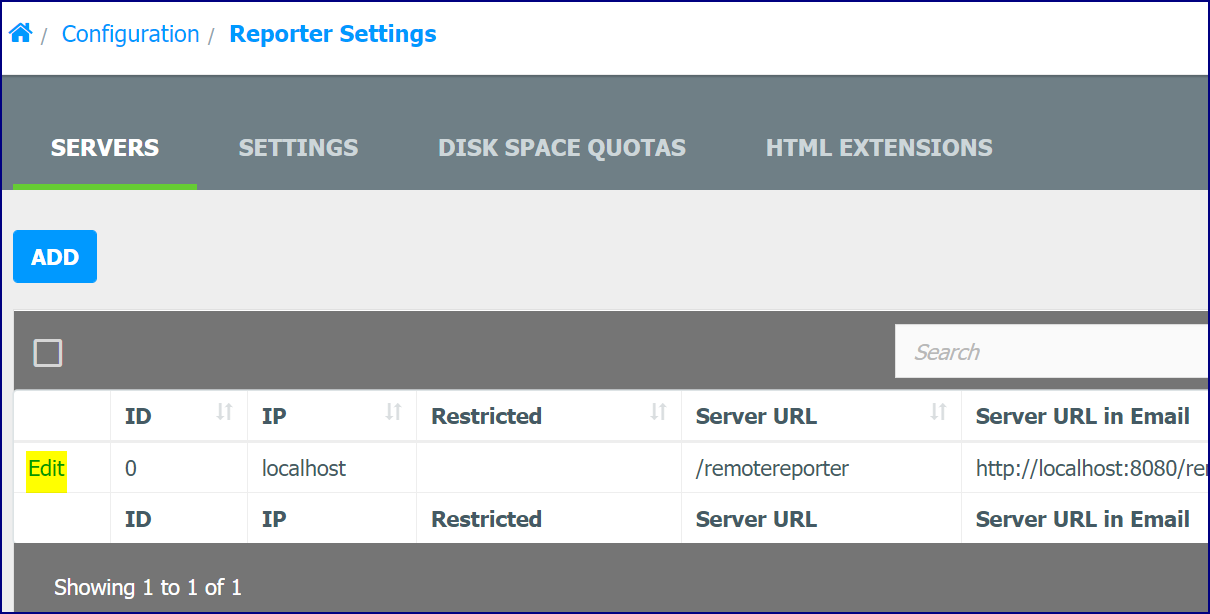
Click the Edit beside the default server.
These settings will change the address for reports sent to customers in emails. Therefore, if the reports are sent outside your network, provide the correct external IP address that redirects port 80 and 8080 to the Netsweeper server.
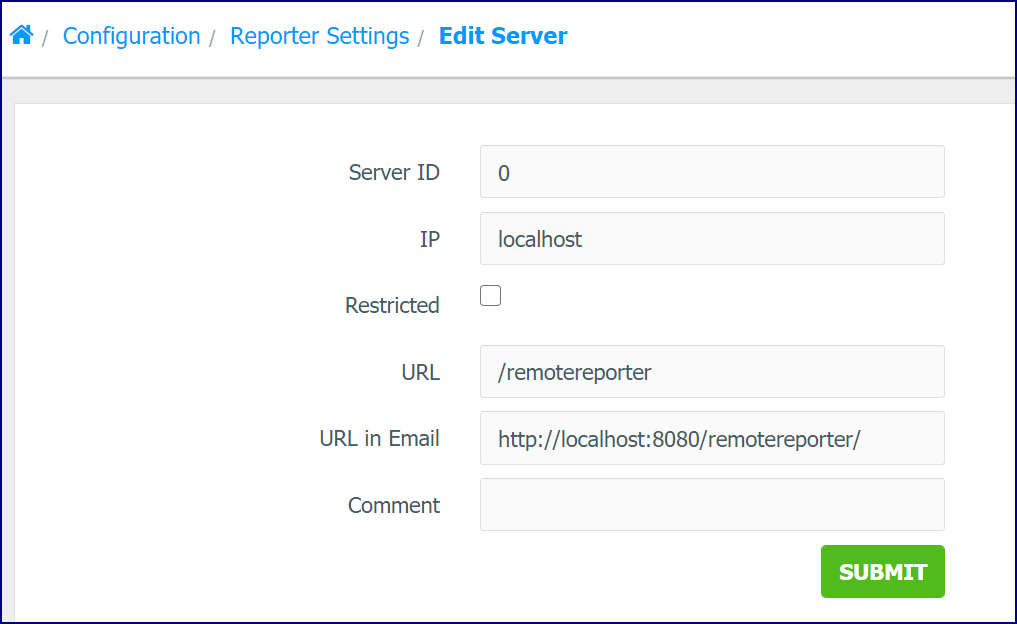
The Reporter server can be the static IP address of an interface – for example, 192.168.123.123.
You may want to register a separate domain or hostname for the Reporter server.
For more information see the document, ‘Reporter Settings’.
Policy Service Configuration
You are now ready to configure your Policy Service to handle incoming requests. To initially configure your Policy Server Settings:
-
Log on to the WebAdmin as the master admin, using the login name admin.
-
Go to Administration > Configuration.
-
Click the Policy Server Settings link.
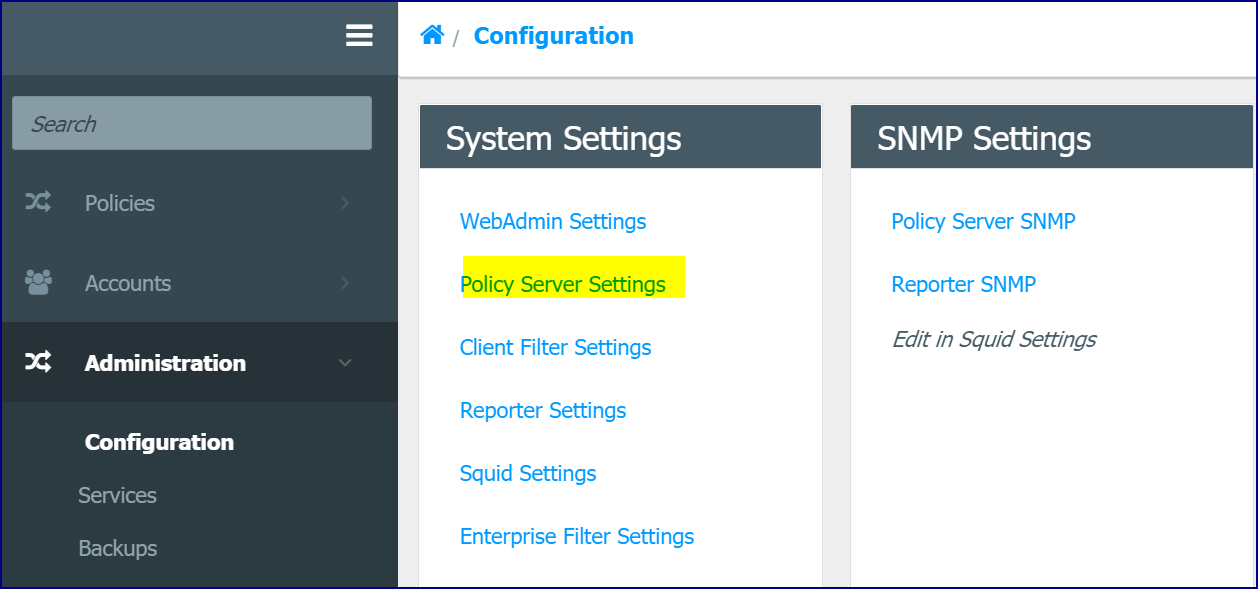
Configuring the Serial Key
The Netsweeper Server will not filter without a valid serial key. Use the Netsweeper serial key provided by the technical staff or your account manager. Please contact us at http://helpdesk.netsweeper.com or email support@netsweeper.com if you have questions about your serial key.
1.In the Current Configuration window, scroll to the serial configuration in the 'Netsweeper Serial' section.
2.Type
your serial key replacing the default 12345 invalid serial.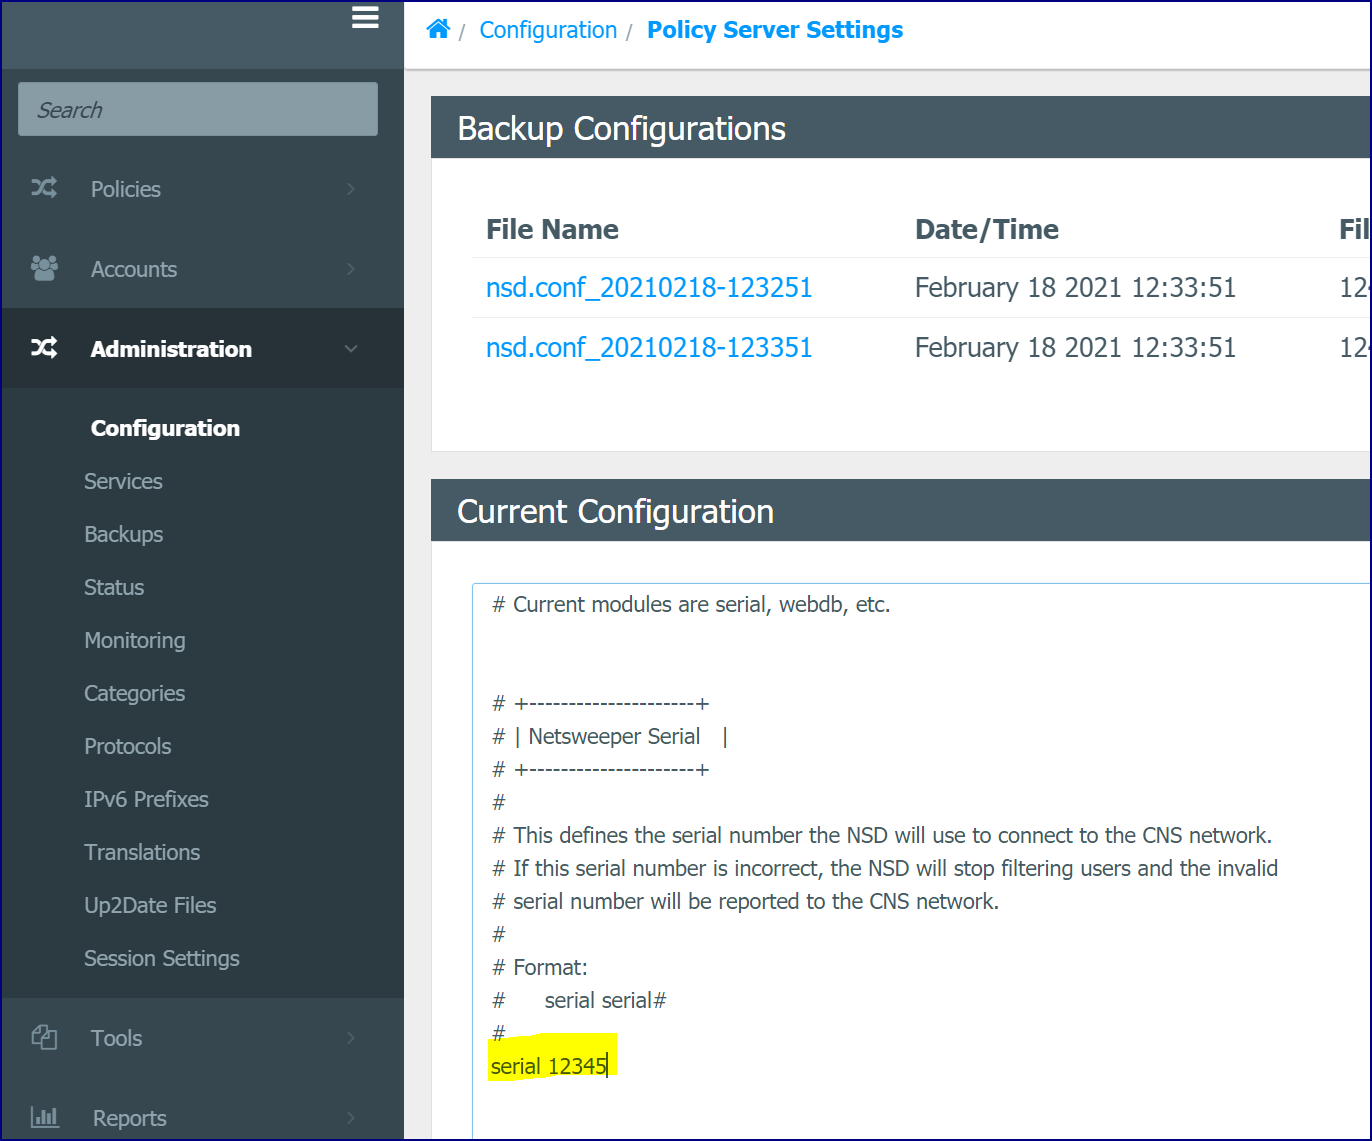
3.Click submit to save your changes.
The serial key is case sensitive. If the serial key is invalid or expired the behaviour will be dependent on the serial_failure configuration in the Policy Server Settings. You may have to wait up to 5 minutes for the policy service to reload lists after a valid serial is added.
Deny Page Host Settings
By default, the deny_page_host is configured to resolve to the IP address of your first network interface.
deny_page_host $IPADDR_eth0
Change this value to your FQDN.
deny_page_host deny.example.org
This should always resolve for external off-site users as well as internal users.
If you enter the external IP Address of your gateway, set up port forwarding for all ports listed in the Preparing Your Firewall for Netsweeper section of this document. For example, forward ports 80 and 8080 to the internal IP address of the server.
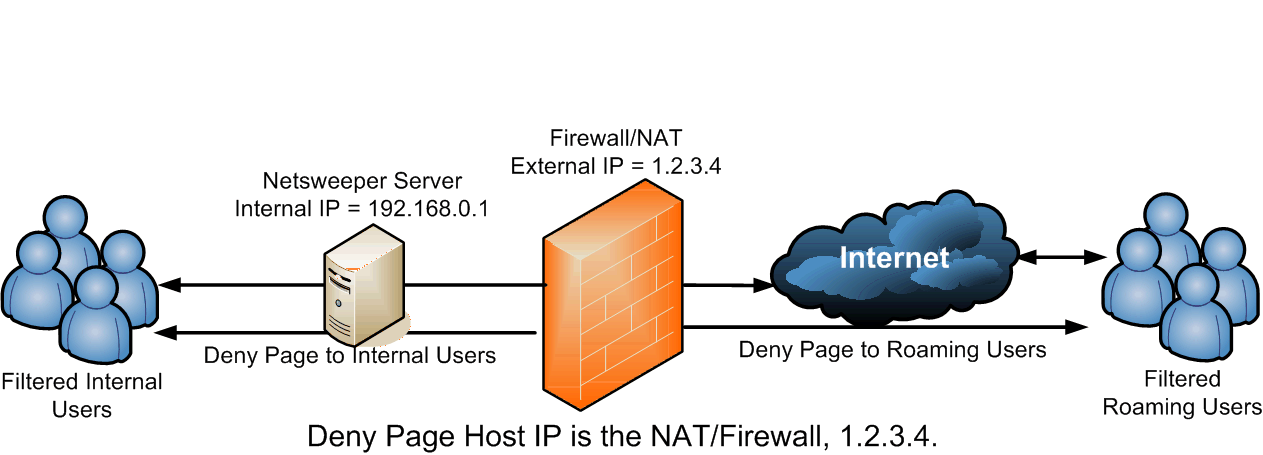
You can also add a DNS alias for the deny pages, or register a separate domain name specifically to serve these deny pages, for example:
deny.example.org
deny.example.com
deny.example.ca
You can use a static IP address for the deny pages. However, if you are using DHCP, you must have the DHCP server automatically register the hostname with the DNS server on your network. Otherwise, you must configure a separate server to host the deny pages.
The value $HOSTNAME defaults to the local machine’s hostname value. If the hostname does not resolve to a proper DNS, enter the IP address of the server.
If you are using DHCP on a specific interface and want to use that interface address, enter $IPADDR_eth0 – where eth0 is the interface you selected to use DHCP during interface setup.
Some valid examples using this setting include:
-
$IPADDR_eth0
-
$IPADDR_en0
-
$IPADDR_wlan0
Request Log Disk Usage
By default, Netsweeper allots 20 GB of disk space for reports and 5 GB for logs. Generally, however, you will need to change these settings to suit your deployment and server hardware.
If you have a 500-GB disk, you may want to set the maximum logger disk usage at 200 GB. Remember, the disk will also need space to store reports and temporary space for report generation.
To change the logger’s maximum disk usage to 200 GB, add the following line to your Policy Server Configuration file:
g1_disk->max_disk_usage_size 200 gb
For more details on configuring the Logmod5 logging framework, please refer to ‘Logging Documentation’.
Traffic Interception with Capture Modules
This is an example of a possible Policy Server (NSD) configuration for deploying the Capture Modules. Each deployment type captures traffic differently and will require a different type of configuration, however for the purposes of this document we will enable the Capture Modules with cmauto.
The following Policy Server has one network card which is used for the management interface denying client and server traffic. We are using a multicore server.
With PF Ring aware Ethernet cards, more configurations are available. To find out if your cards are PF Ring aware, please see ‘Capture Module Documentation’ for more detailed information.
In your Policy Server Settings, add this to the bottom of the file. This configuration is to capture traffic on eth0 and send out the deny page on eth0. The policy server will automatically decide the number of Capture Modules for the device based on the 'Receive Channels' available on the device.
cmauto eth0
For further configuration overrides and optimization of Capture Modules, see the ‘Capture Module Reference’ document.
Adding Workstations and Confirming Filtering
Physically connect at least one workstation to the filtered network so that you can confirm proper operation of the filter and your configuration. You can use the workstation that you used for configuration for this task.
At this point, you have:
-
Prepared your firewall
-
Completed the installation checklist
-
Drawn a diagram of your network
-
Installed the ISO
-
Configured the System/Network Settings
-
Configured the WebAdmin Settings
-
Configured your Policy Server
-
Physically added at least one test workstation to your filtered network.
Now you are ready to confirm that basic filtering is operating properly.
Depending on how you install and use the Netsweeper product, the method you will use to confirm filtering will vary. This checklist will help you quickly narrow down your networking and other issues while using the Netsweeper filtering product.
Complete These Tasks before Continuing:
-
You have opened incoming and outgoing firewall ports required by Netsweeper.
-
You have installed the Netsweeper ISO.
-
You have created a diagram of your network, showing all important interfaces, bridges, routers, gateways, servers, and workstations.
-
You have completed setup through the Configuration Manager.
-
You have added at least one workstation to the filtered network to use in testing the filtering configuration.
-
You have confirmed that you can access to all Network devices that interface with the Netsweeper Policy Server.
-
You have confirmed that you have access to the WebAdmin from both the management interface and the filtered network.
You have completed final configuration in the WebAdmin.
Testing System Metrics
To ensure that filtering is operating correctly, check these simple system metrics.
-
Confirming List Downloads and Updates
-
Confirming Filtering by Using ‘Monitoring, System Status’
-
Checking the Monitoring
-
Confirming Filtering
Confirming List Downloads and Updates
When you install the Netsweeper product, the software downloads all updates required for full operation. Afterwards, the Netsweeper product will check for updates every 5 to 10 minutes. The first update downloaded may contain up to 40 MB of data. Even though the Netsweeper product will start and operate properly without these updates, any decision to skip an update may affect the accuracy of your filter. We recommend that you verify that the Master List has been properly downloaded before running any product accuracy tests.
1.Log in to the WebAdmin with the admin username and password.
2.Go to Tools > Category Lookup. Ensure the URL Lookup tab is selected.
3.Type
http://netsweeper.com in theURL box and then click Lookup.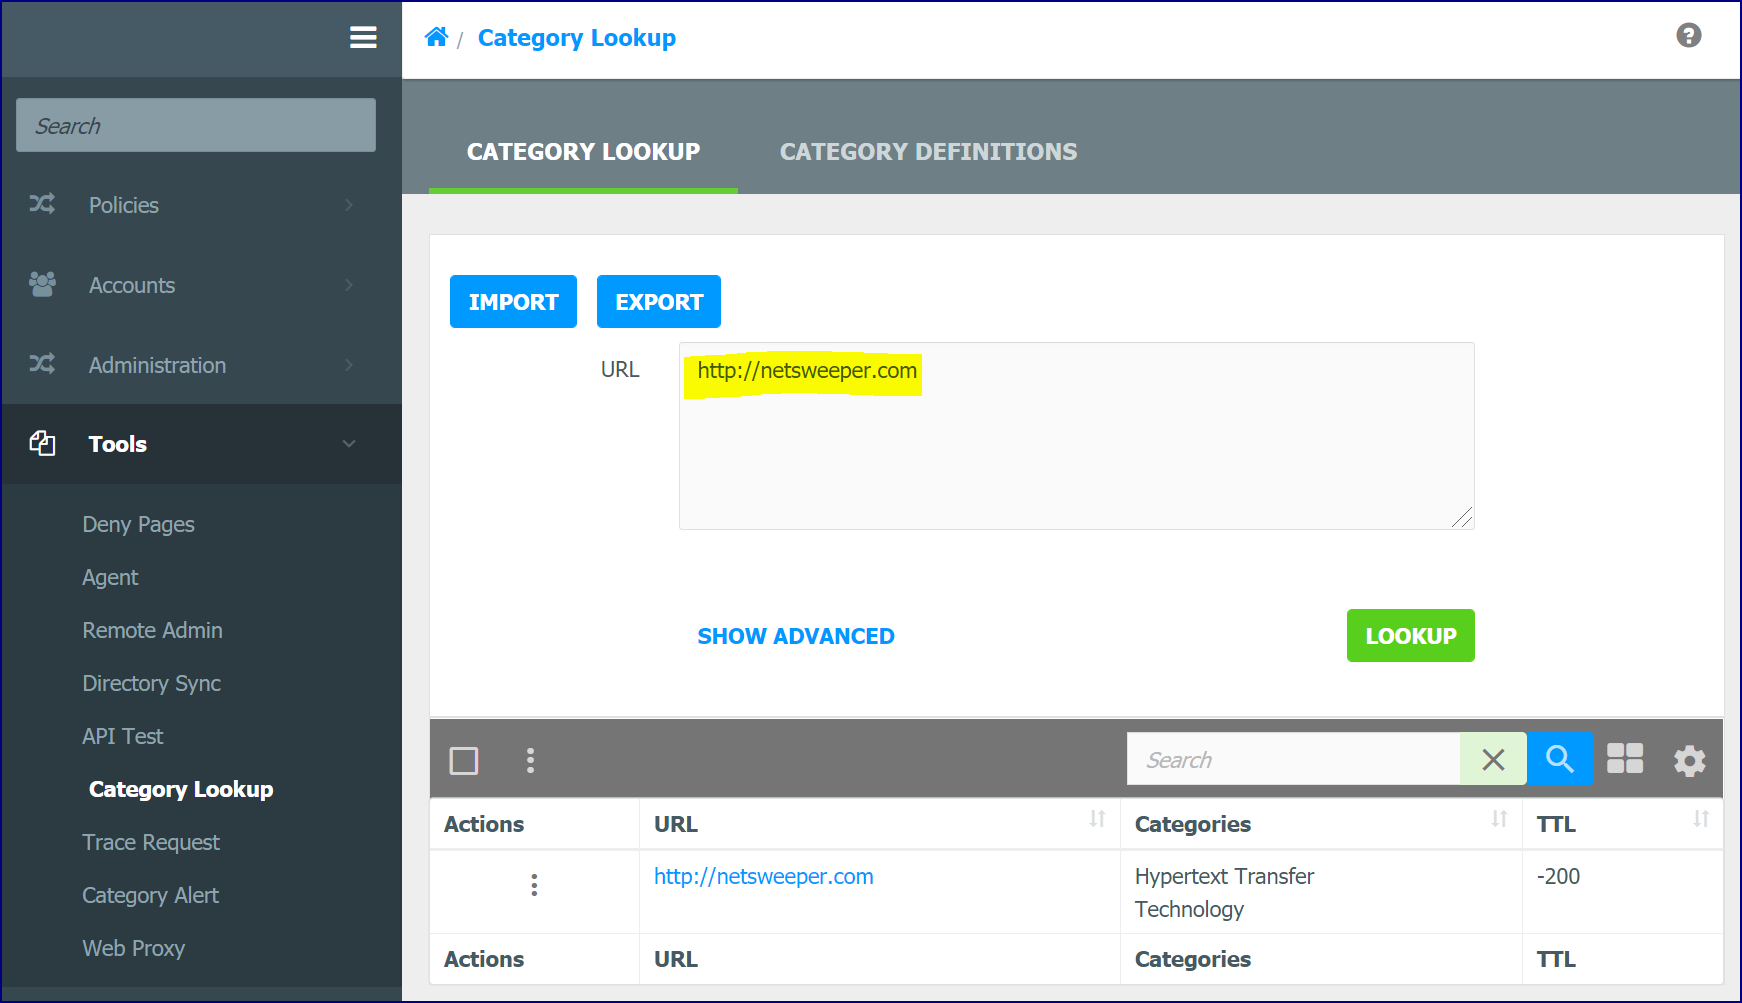
4.In
the Category Lookup' window, click the Settings icon and ensure
that Details is chosen.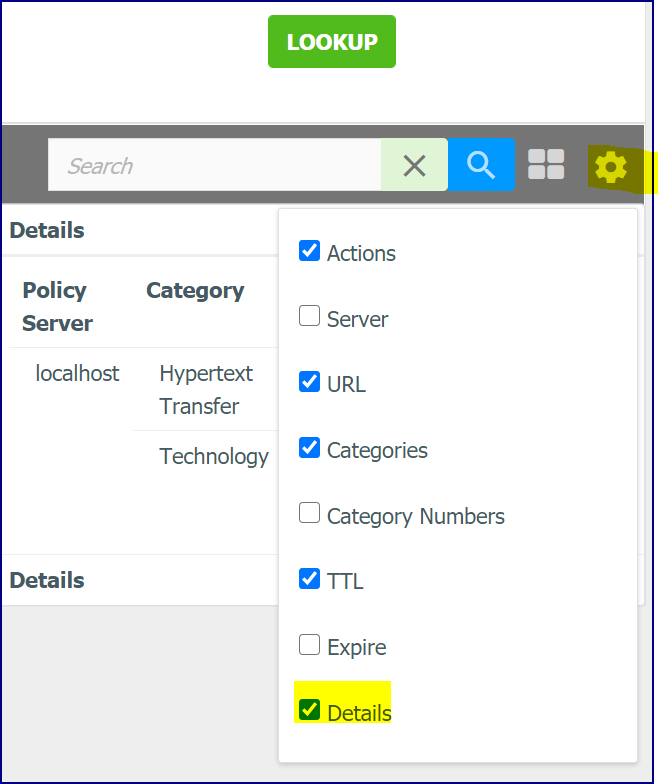
5.The phrase “Master List” should appear in the Category Source column. This confirms the download of the Master List. If this is not the case, try again in 5 minutes.
If the problem persists, your serial number
may be invalid, or you have not opened port 80 in your firewall to the
Netsweeper update server, http://update.netsweeper.com. See Preparing
Your Firewall for Netsweeper.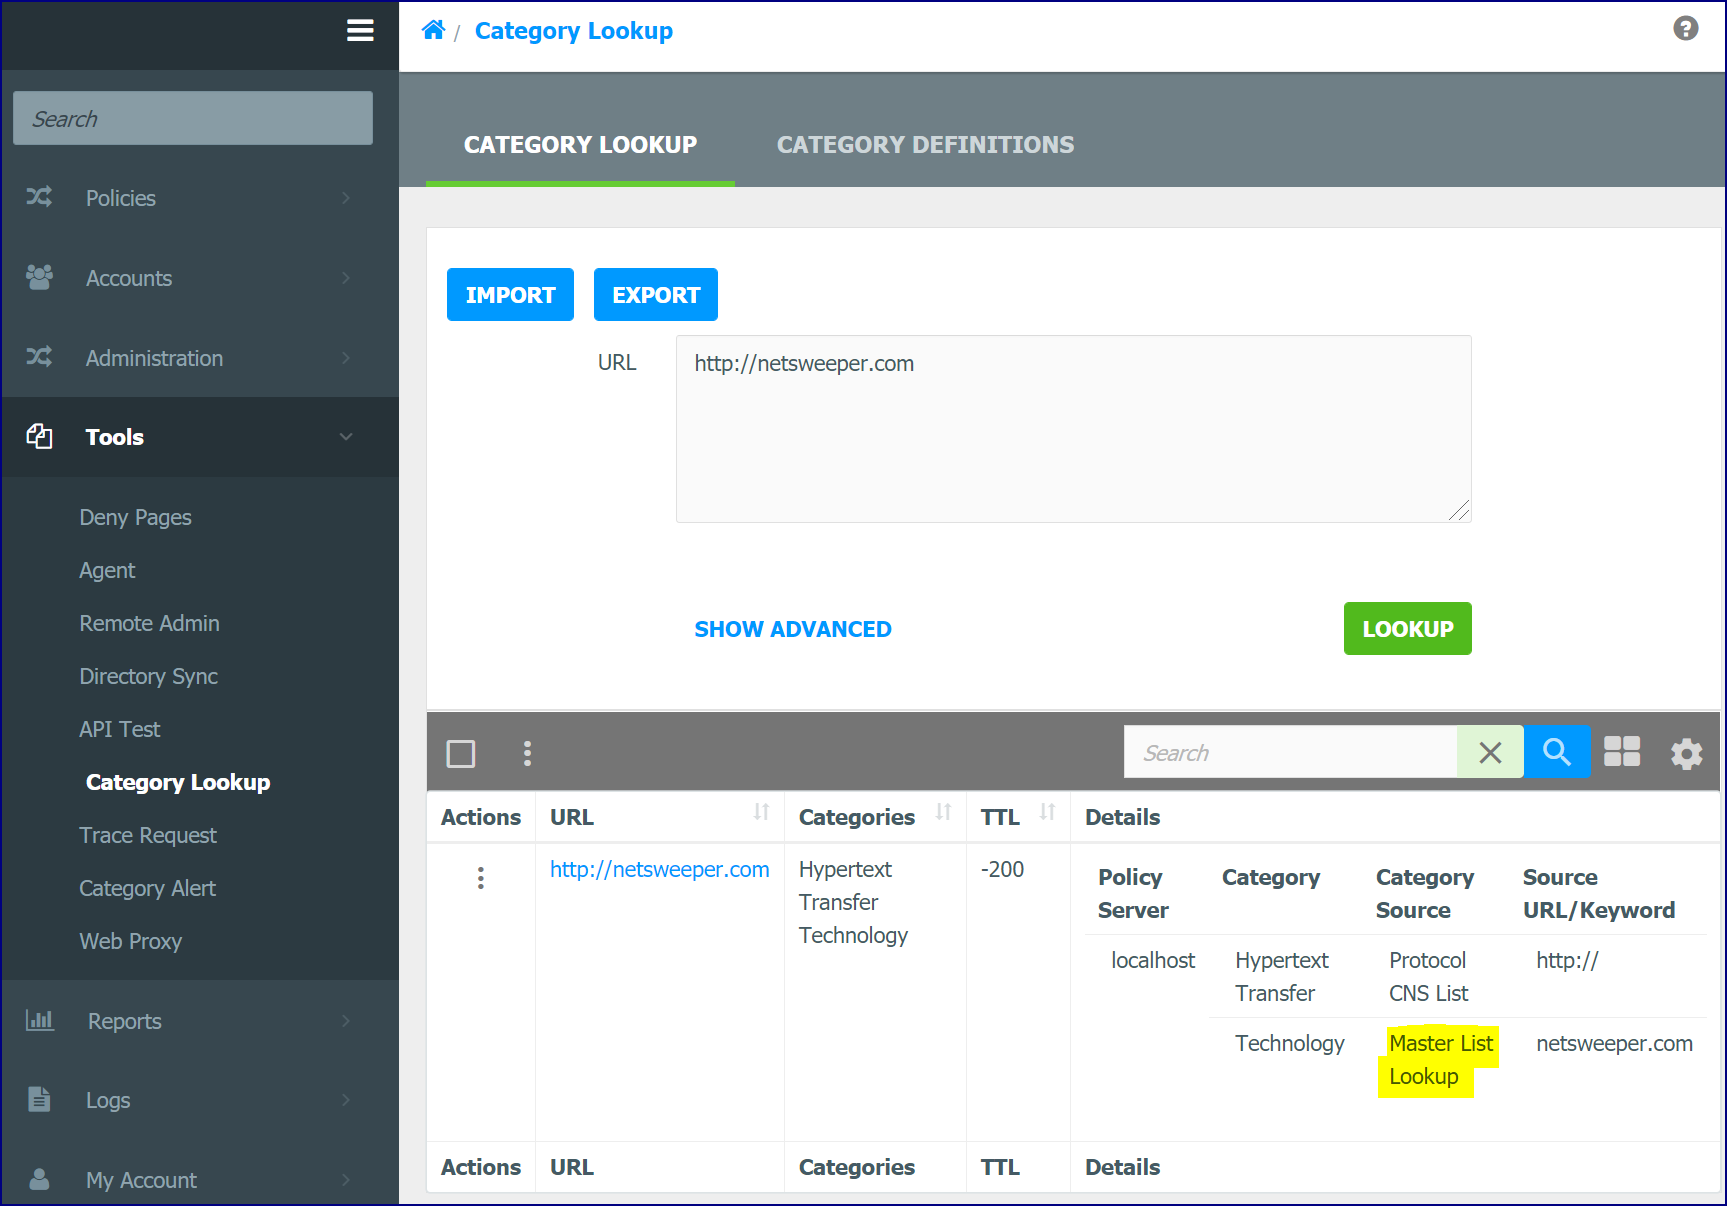
Confirming Filtering by Using ‘Monitoring, System Status’
If you want to confirm that filtering is operating properly, the easiest way to check is to select the System Status options from the Monitoring menu. This page reports on the overall health of the system. Some metrics that appear here include:
-
List loads and updates
-
Configuration information
-
Version information
-
The online (green) and offline (red) status of services and servers
-
Policy Server, Logging Server, and Category Name Server, and WebAdmin health
The image below shows the Overview tab in Administration > Status. If both circles are green, your filtering should be correct.
In this example both circles are red indicating errors and the Service and List Status indicates 'Errors Detected' display.
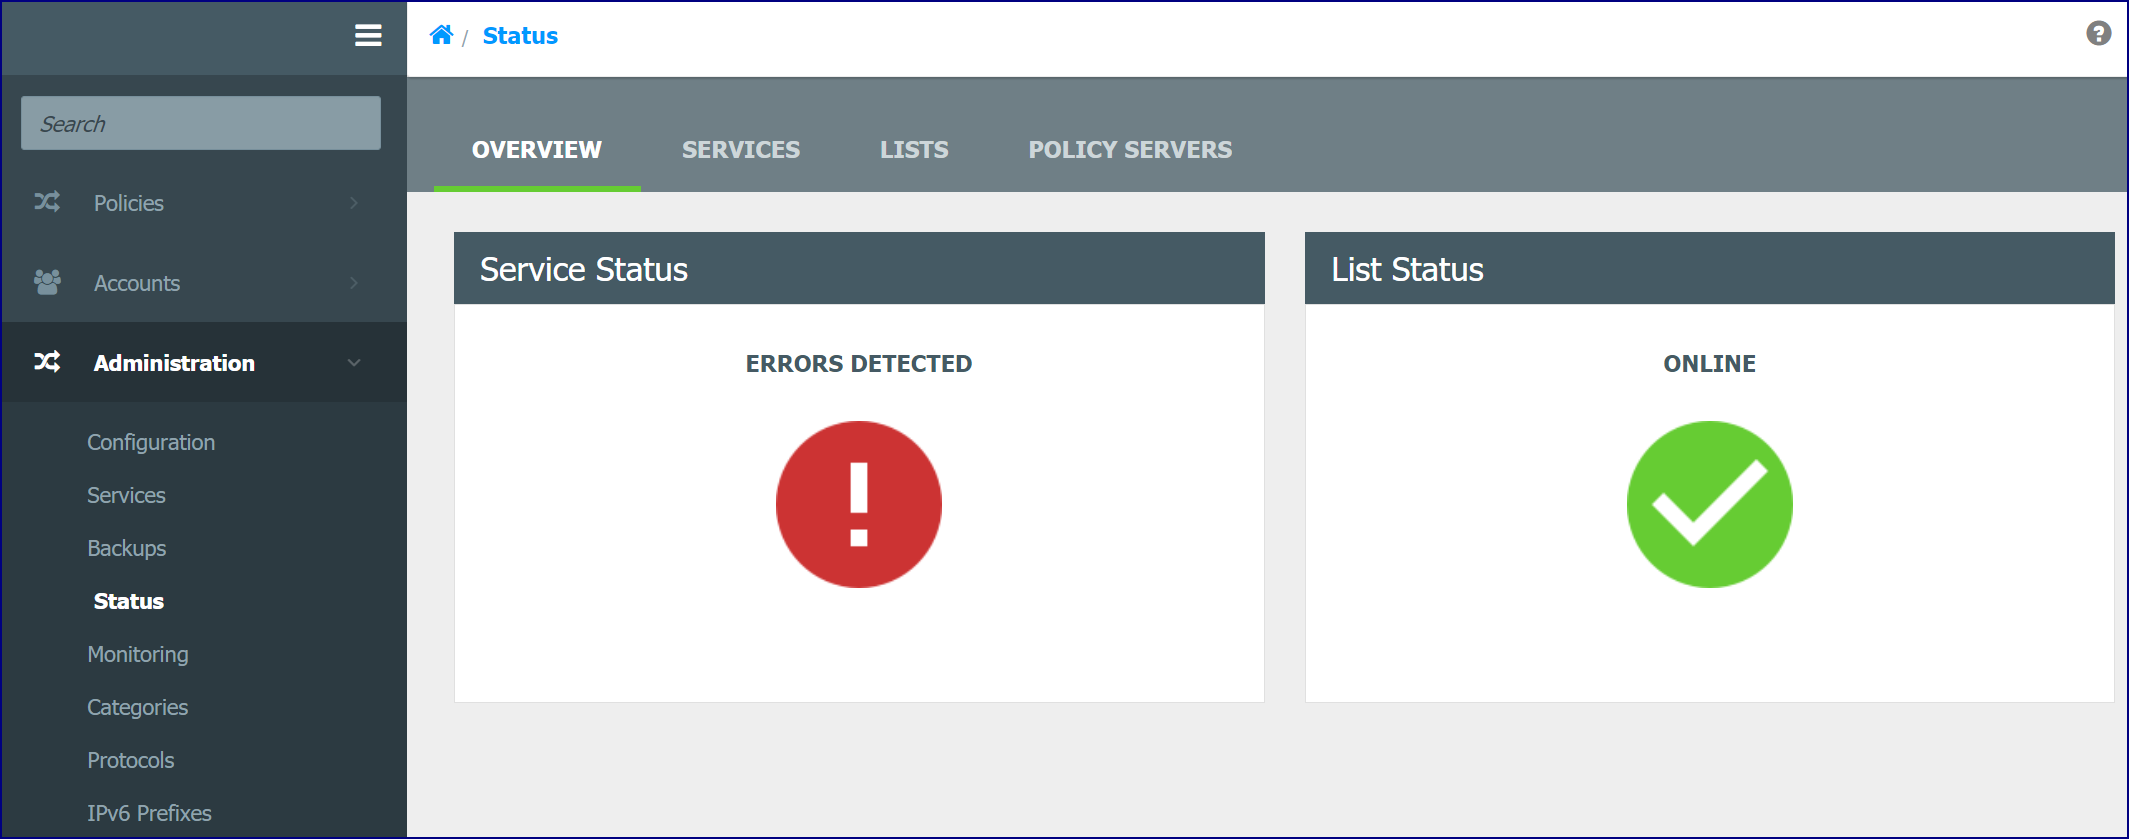
Clicking the Service Status circle opens the Services tab.
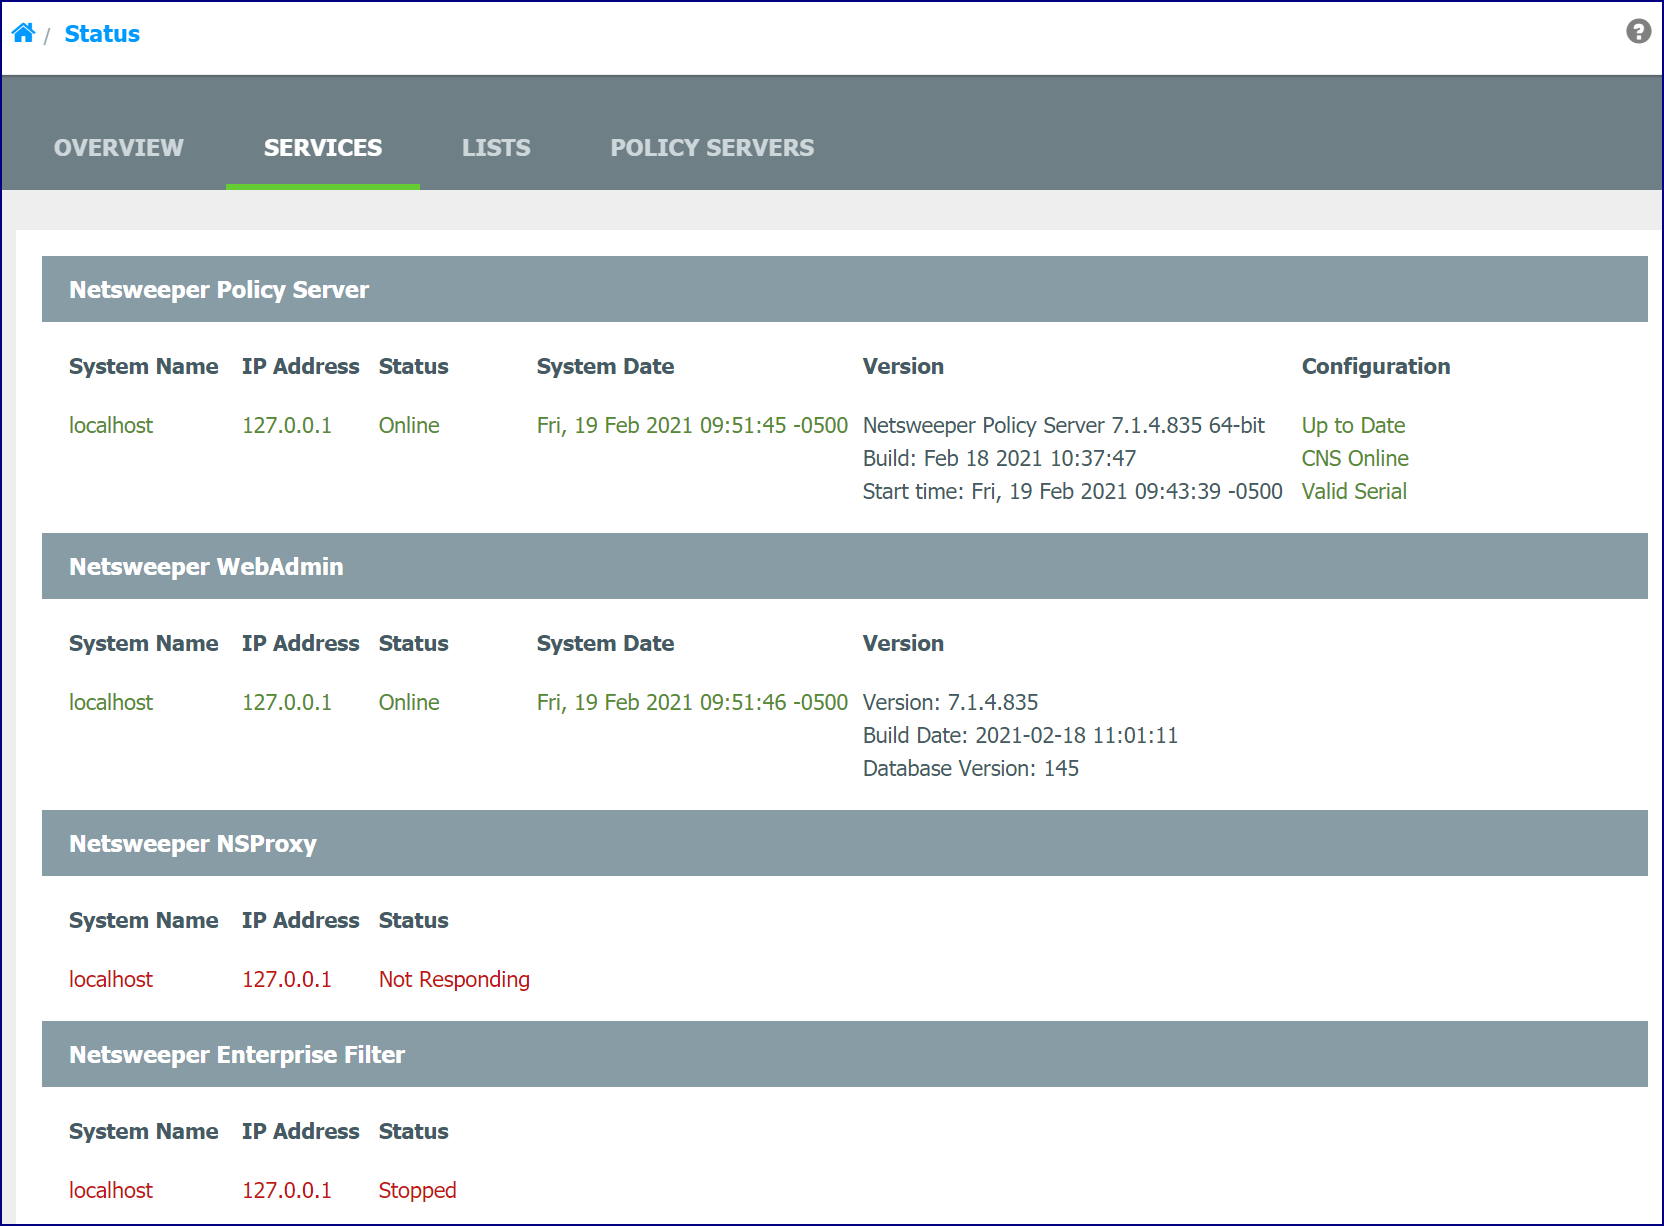
Clicking the Lists tab opens the Lists display. A red message may indicate that the lists are out-of-date.
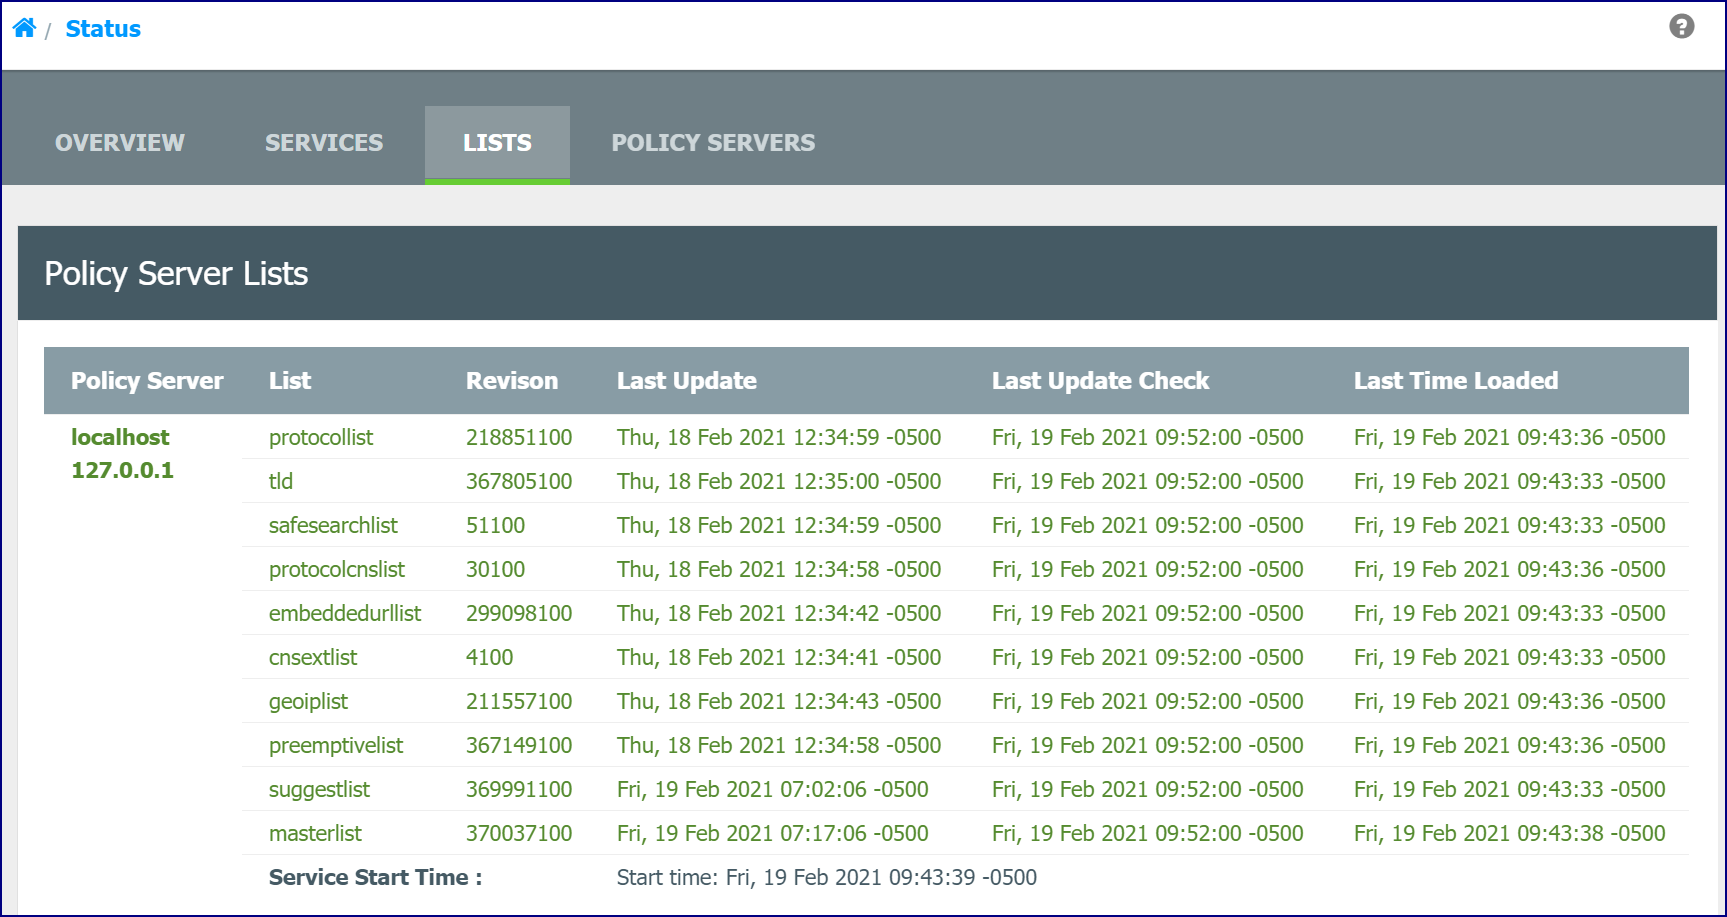
Checking the Monitoring
The Monitoring tool in the WebAdmin, accessed from the Monitoring menu, allows you to check the performance and metrics of your system over time. The graphs generated by this tool are not a replacement for an enterprise monitoring system, but they allow you to monitor a simple installation with one to four servers without the extra expense of an enterprise monitoring systems. When the product is installed, these graphs begin to display data after about 10 minutes. Use these graphs to diagnose problems when they occur.
For example, if you notice a performance issue, you can check the CPU usage graphs, along with the requests and bandwidth graphs. A CPU usage increase may reflect an increase in traffic or changes in user behaviour. However, this is not always the case. The generation of a large number of reports or large reports, for example, may affect system performance during the time of report generation.
Use these graphs to help you narrow and diagnose issues with your system. Depending on your installation, these graphs may report very different numbers. Similarly, the specifications of your server will greatly affect system metrics.
Confirming Filtering
The Request Log tool in the WebAdmin displays both live and archived logs of the traffic to and from filtered workstations. From that log, you can verify that web requests from filtered workstations display in the log, which indicates that filtering is occurring.
1.Log on to the WebAdmin as the master admin, using the login name admin.
2.Click
Logs on the menu bar and then select Request Logs. The Request
Logs page appears.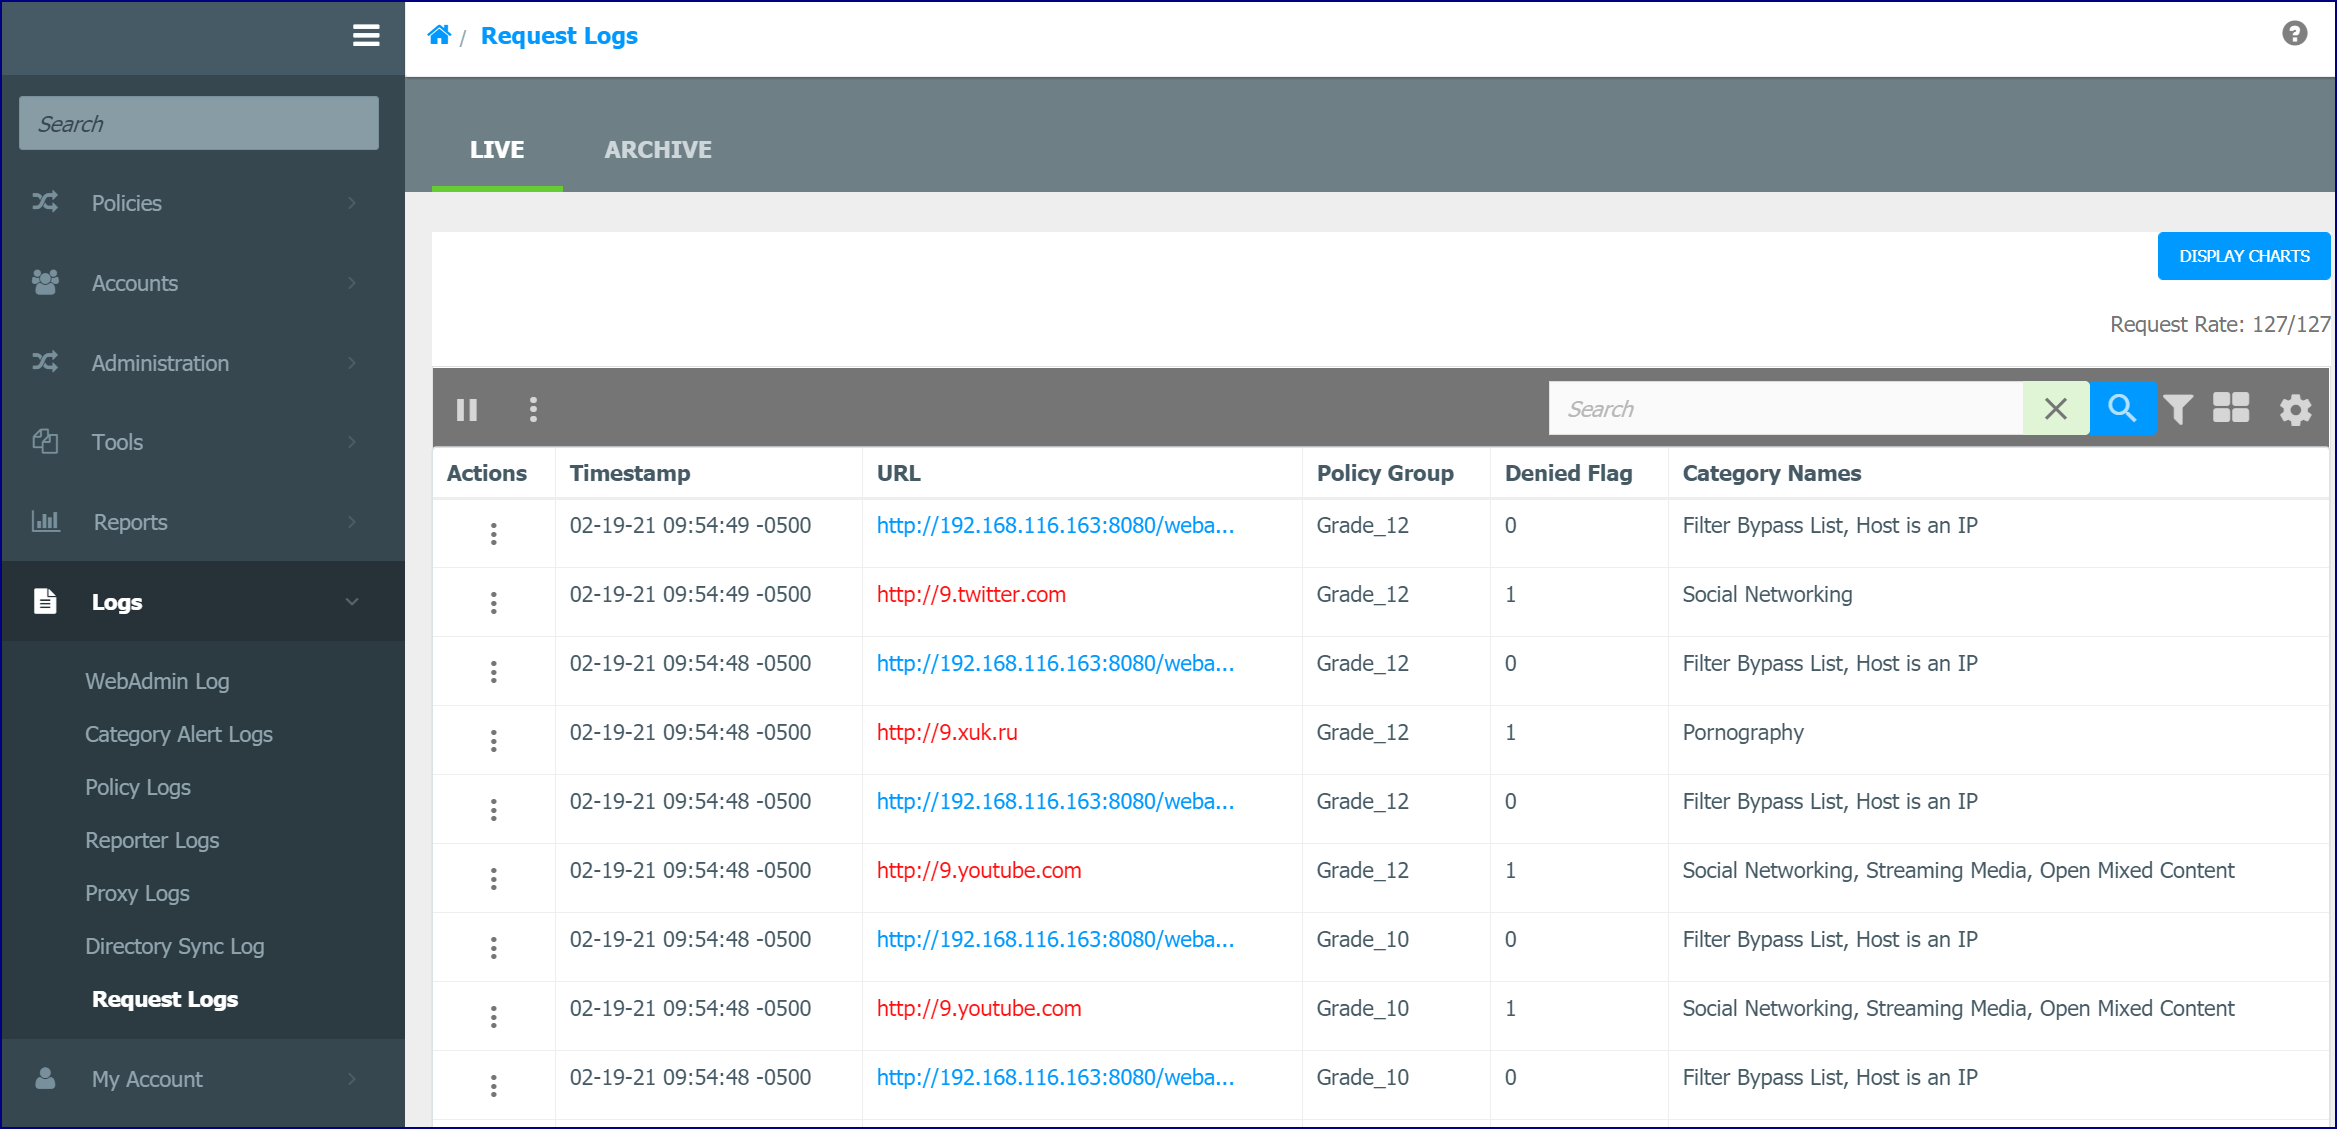
3.On the filtered workstation, go to http://www.netsweeper.com or another commonly accessed website.
4.Verify that this access displays on the Logs > Request Logs page.
If you are using the Netsweeper Client Filter, please refer to the Ops and Admin Client Filter documentation and training materials for more information.
Causes of Filtering Problems
If the Confirming Filtering exercise did not work, here are some possible causes:
-
The workstation is not on the filtered network.
-
If you could not browse to http://www.netsweeper.com, you may have a network issue. Confirm both the physical and logical network setup.
-
If you get the Serial deny page, the policy server serial number is invalid.
-
If you get the Configuration deny page, the configuration could not be loaded. You may need to add the local hostname or http://localhost to the Filter Bypass List.
Common Deny Problems and Possible Solutions
Network configuration issues, firewalls, or other network devices may cause the allow/deny operations to fail, even though filtering is working properly. If this happens, check the following:
-
Make sure that the workstation is filtered, and the policy server can see the traffic.
-
The Netsweeper policy server has an IP address and valid route to the filtered network.
-
The Netsweeper policy server has an IP address and valid route to the Internet.
-
You can access the WebAdmin via HTTP from the filtered workstation.
Appendix: Installation/Configuration Checklist
You can use this datasheet to input your network and device configuration information.
Generic Server Configuration
The hostname is the fully qualified domain name for this server. Both the Gateway and DNS Server addresses should conform to IPv4 standards. Role: WebAdmin, Policy Server, etc.
|
Location |
Hostname |
Role |
Interfaces |
IP Address |
Netmask |
Gateway |
|---|---|---|---|---|---|---|
|
|
|
|
|
|
|
|
|
|
|
|
|
|
|
|
|
|
|
|
|
|
|
|
|
|
|
|
|
|
|
|
WebAdmin Configuration
|
Servers |
Processor |
Memory |
Network |
Storage |
Firewalls
|
Firewalls |
Settings |
|
Inbound Ports |
|
|
Outbound Ports |
|
WebAdmin Servers
|
Location |
Hostname |
Role |
Interfaces |
IP Address |
Netmask |
Gateway |
|
|
|
|
|
|
|
|
|
|
|
|
|
|
|
|
|
|
|
|
|
|
|
|
Interfaces/Bridges
If you are using a non-bridged interface, Netsweeper recommends that you use a static IP address.
|
Hostname |
Role |
IP Address |
Static IP Address |
Static Netmask |
|
|
|
|
|
|
|
|
|
|
|
|
|
|
|
|
|
|
Additional Configuration
| Addition Configuration | Settings |
|---|---|
|
Accounts |
|
|
Console Account Password |
|
|
WebAdmin Admin Password |
|
|
|
|
|
Date and Time Configuration |
Netsweeper uses NTP servers to synchronize the time automatically. We recommend that you use the default NTP servers.
|
|
Time Zone: |
|
|
NTP Server 1: |
|
|
NTP Server 2: |
|
|
NTP Server 3: |
|
|
|
|
|
Outgoing Mail Settings |
The Netsweeper server will use these mail settings for all communications with your servers, including all notifications and reports.
|
|
Return Address: |
|
|
SMTP Server: |
|
|
SMTP Port: |
|
|
SMTP Encryption: |
|
|
SMTP Authentication: |
|
|
SMTP Login: |
|
|
SMTP Password: |
|
|
|
|
|
Backup |
The backups are performed at 3 a.m. local time at the interval you indicate on this page. You must manually copy the backup from your Policy Server to another location for more complete system security. |
|
Interval (Daily, Weekly, Monthly): |
|
|
|
|
|
Licensing |
|
|
Serial Number: |
|
|
|
|
|
Deny Page Host |
Type$HOSTNAMEas the Deny Page Host if you want to serve deny pages from this server. If you want to specify another server, type in that server’s IP address.
|
|
Deny Page Host: |
|
Appendix: Installation/Configuration Checklist
Use the checklist below to ensure that all installation and configuration tasks are addressed.
| Task | Date | Status | Owner/ Resource | Notes |
|---|---|---|---|---|
|
Verification of Netsweeper release version to be installed. |
||||
|
Verification of Netsweeper Architecture to be downloaded, 32bit or 64bit |
||||
|
Netsweeper software downloaded and written to CD/DVD |
||||
|
Serial Number from Netsweeper Technical Support. |
||||
|
Confirmation of physical server rack mounted, powered on, and connected to required networks |
||||
|
Configuration Datasheet completed |
||||
|
Document with all networking configuration, IP Addresses, routing information, etc. for server. |
||||
|
Login and Password Information |
||||
|
Verify Netsweeper Server Requirements |
||||
|
Connectivity information for outside networks |
||||
|
Any Additional Time zones? |
||||
|
Network Architecture diagrams |
||||
|
Firewall Inbound / Outbound Ports - Firewall documentation |
||||
|
External IP Address of Firewall |
||||
|
Is there integration with 3rd party applications? |
||||
|
DNS Alias/ External IP |
||||
|
Licensing Settings |
||||
|
Deny Page Host (if different from default) |
||||
|
Reporter Server: Will it require a separate domain for hostname? |
||||
|
Filter Bypass List |
||||
|
Filtered Workstation for confirming proper operation |
||||
|
Policy Server Logging Disk Usage |
||||
|
Are you using the Profile Manager and Client Filters? |